• Hi all and welcome to TheWoodHaven2 brought into the 21st Century, kicking and screaming! We all have Alasdair to thank for the vast bulk of the heavy lifting to get us here, no more so than me because he's taken away a huge burden of responsibility from my shoulders and brought us to this new shiny home, with all your previous content (hopefully) still intact! Please peruse and feed back. There is still plenty to do, like changing the colour scheme, adding the banner graphic, tweaking the odd setting here and there so I have added a new thread in the 'Technical Issues, Bugs and Feature Requests' forum for you to add any issues you find, any missing settings or just anything you'd like to see added/removed from the feature set that Xenforo offers. We will get to everything over the coming weeks so please be patient, but add anything at all to the thread I mention above and we promise to get to them over the next few days/weeks/months. In the meantime, please enjoy!

The old lady

titch22

Seedling
Joined
Dec 11, 2017
Messages
34
Reaction score
0
Workshop for wood and metal sculptures and art. Future craft hub for creative, local ladies.
Started summer 2017.
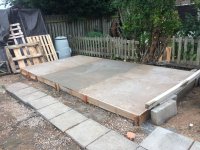
Hardcore+Concrete base.
In three sections, as my strength and stamina dictates.
Yes, i know its not perfect. Yes, i have made mistakes along the way. But I have spent time searching for information as well as talking to tradespeople. There is still much to learn. But i like a challenge and enjoy problem solving.
Area 14ft x 9ft
workshop.jpegIMG_0277.JPG
 
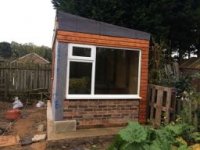
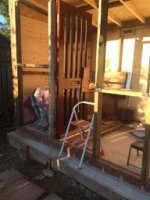
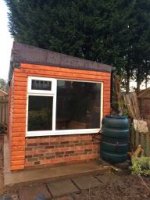
Breezeblock+kingspan+brick wall beneath large UPVC window.
Reasons:-
Was doubtful whether the wooden frame would hold the window (may be overkill?)
Had some bricks given so wanted to practise my bricklaying skills on something small.
This is the side that I see from my living room window and so wanted something decent to view.
The photo came up upside down in preview. Tried all sorts without success. Which is a pity as Shaun, my foreman, gets dizzy that way. :)

IMG_0299.JPG

The good Mod Fairy has been at work

IMG_0299R.JPG


When taking photos on an apple device for use on the forum, always take it with the volume buttons at the bottom of the scene and you should not have rotational problems. An apple device will compensate for rotation on its own display but our forum software cannot sadly.

Bob
 
Came out alright in the end.
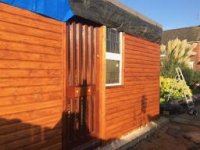
Window secure. Wall insulated. Log lap in place.View quite nice.
IMG_0436.jpg
 
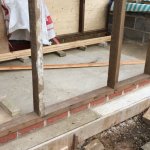
One layer of engineering brick went down.
Maybe two would have been better.
Then the frame.
Struggled to get the diagonals equal. Took many, many attempts. Got it down to 2cm out and had to be content with that.
I realise now that the concrete should have been level with the brick but at the planning stage I thought that a concrete base would be useful for pots and water tub. As well as compensating for my lack of measuring skills.
Oh dear, it's beginning to sound like a catalogue of bad judgments.
At the end of the day, I did my best.
IMG_0392.jpg
 
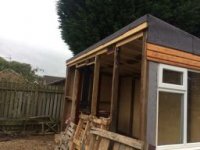
Roof...OSB interlocking boards + underlay felt + torch on roofing felt.
This was a right comedy. ( as my mum used to say)
Guy came to do this. I was around but missed the point where he was putting on the osb boards. As you can see he cut them flush to the front...not want I wanted.
The felt went on well but the edges where rough.
He never came back to put up the door and windows. Text came through that said.'I won't be back. lost enough money on the job. Keep your money.' :o
IMG_0433.jpg
 
At this point I began to panic at the escalating costs. Decided to put up the log lap without any barrier. Mistake that was rectified later.
Later, did the front right but stapled the barrier inside on the other two walls.
IMG_0437.jpg
 
So, with no workman returning, set too to hang the recycled door. Solid, heavy mahogany with glass inserts.
Will look grand when its finished.
Finishing, however, took time as I had to recover from an accident in the meantime.
IMG_0393.jpg
 
Together with the art deco windows salvaged from the house it began to look smart.
Log lapped the last side just in time to weather proof it before the wet weather arrived.
Ventilation strip at high level (front). There is also a ventilation square at the back.
IMG_0440.jpg
 
Guttering up. Restricted room for ladder made for difficulties.
Gutter guard to hold dropping conifer needles.
Water but in place.
IMG_0862.jpg
 
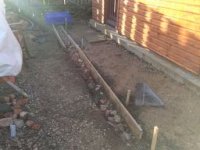
Electrics going in on 3rd Jan. Qualified electrician. I don't touch electrics.
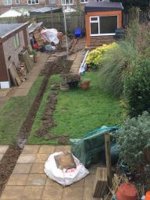
Just a 30 foot trench to dig over the Christmas hols for the armoured cable.
Porch...trench started for that.
IMG_0864.jpg
 
Titch,

Just a minor point about posting photos. It is a two stage process, the first which you are doing just fine and the second is to place the cursor where you want the photo to appear and then press "place inline".
This will insert your picture cleanly with no nasty dotted lines or the word attachments.

I've done the last post for you to show the difference.

HTH

Bob
 
Mac user.
Copied photo from 'photos'.
Pasted into 'pictures'.
Then uploaded onto Woodhaven post
Works for me as they where coming in upside down.
 
Recent, local break ins have made me research alarms.
The workshop is over the 30 foot wifi distance for most wifi alarm systems.
Wired alarm can be put in as trench for armoured cable will be dug out soon. wired alarm
PIR. on shed..Low. Gaurds are coming in at heavy cost.
How easy to make?
Can use machinery at College.
 
When you copy pictures from Photos make sure you use the full copy version (I cannot remember the exact wording) when you “Share”.

Rod
 
What extension do you use to share?
Can the 'share' facility go straight to 'Woodhaven2"?
 
Mac Mini user.

Click 'Upload Picture'
Click 'Choose File'
Mac Finder window opens. Click on 'Photos'.
Select photo. Click 'Choose'.
Click 'Add the fil'e.
Click 'Place in line' after you've moved the insertion point to where you want the image to go.

HTH
 
electrics.jpgElectrics going in. first fix. The guy was impressed with the straight trench. All thanks to my lovely neighbours who lent me the long, thin trench spade. Even so there was lots of mud and hard slog.
 
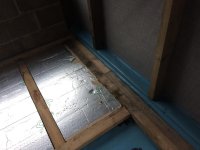
Laying the floor.
DPM, wood and recycled kingpan. Tried to fill the gaps with that expanding foam. What a faff. Abandoned it.
Just spent an hour trying to get the photo from the electrics post the right way. had to do it another way in the end.
But this photo comes out the right way first time. Puzzled!
 

Attachments

  • fullsizeoutput_473.jpeg
    fullsizeoutput_473.jpeg
    241.5 KB · Views: 6,211
Hi Titch,
The reason you are possibly having problems with picture rotation is possibly to do with the way apple store photos. They save the picture info, together with orientation information in a special way*. When viewed on an apple device it will turn the picture so that the horizon is maintained even if you view with the screen rotated.
The forum software cannot read this rotation info and so cannot "find" the horizon.

The simple fix is to always take the photo with the phone/pad/pod such that the volume buttons are at the bottom.

Alternatively you might try opening the photo in a non apple photo editor ( I think an apple one will just make everything look the right way round when it won't be on the forum) and rotate it how you want it and re-save. I usually add an R to the file name so i know it has been rotated, and then upload that to the forum.

*Apple defend this storage method say it is faster that rotating the image when saving and enables their video and "rapid fire" photo modes to be faster. Could be true or could be what I call "apple arrogance" :lol:

HTH

Bob
 
You can rotate the photos using Edit (in Photos) then post - definitely works using Tapatalk to access the Forum.

77da81bc43751d79a7fa4168e129f8dd.jpg


Bottom LHS Rotating square symbol


Rod
 
Seems like Bob's explanation makes sense. Me and my limited knowledge of techno will stick to building workshops and encouraging my grandkids to be handy.
Three year old Jack enjoyed drilling the screws into the wood.
 

Attachments

  • fullsizeoutput_43d.jpeg
    fullsizeoutput_43d.jpeg
    244 KB · Views: 6,197
Image success.
well Bob, it was a matter of holding the phone with the sound buttons at the bottom. I've learnt something today. Thanks :obscene-drinkingcheers:
So this is my first piece of equipment for the workshop. A local guy had upgraded and this was going for sale. It will get lots of use as long as I don't have to spend ages on this computer. ;)
 

Attachments

  • IMG_0951.JPG
    IMG_0951.JPG
    398.4 KB · Views: 6,194
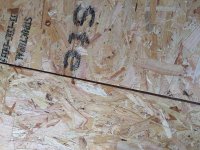
Worked on the flooring and now ready to screw the osb down.
I'm nervous as I keep thinking 'have i done it right? Have I missed something?
IMG_0966.JPG

My cutting isn't accurate and there are some gaps. Should these be attended too?
IMG_0969.JPG

Should I put a plastic sheet over the osb to prevent any water ingress?
Plan to lay laminate over the top( a freebie).


Toying with the idea of gluing them together.
So many questions.
 
I have experienced osb expanding if the water gets into the 'end grain', so I'd try and prevent rainwater getting onto it, especially the joints. The trouble is, if you cover to over with a tarp or poly and it rains on it, you've got to be careful getting the tarp/poly and the water off.

You could fill the gaps with silicone, but you've still got to try and keep the osb dry till you're watertight.
 
I've varnished the cut edges and will silicone the gaps as suggested.
thanks
 
It is all watertight in the workshop so don't expect any water to get in and spoil it.fingers crossed
 
Back
Top