• Hi all and welcome to TheWoodHaven2 brought into the 21st Century, kicking and screaming! We all have Alasdair to thank for the vast bulk of the heavy lifting to get us here, no more so than me because he's taken away a huge burden of responsibility from my shoulders and brought us to this new shiny home, with all your previous content (hopefully) still intact! Please peruse and feed back. There is still plenty to do, like changing the colour scheme, adding the banner graphic, tweaking the odd setting here and there so I have added a new thread in the 'Technical Issues, Bugs and Feature Requests' forum for you to add any issues you find, any missing settings or just anything you'd like to see added/removed from the feature set that Xenforo offers. We will get to everything over the coming weeks so please be patient, but add anything at all to the thread I mention above and we promise to get to them over the next few days/weeks/months. In the meantime, please enjoy!

Tiny tea table WIP

AndyT

Old Oak
Joined
Nov 23, 2020
Messages
3,876
Reaction score
1,799
Location
Bristol
Name
Andy
I'm making a table. It's only a little thing and shouldn't take many hours to make, but in my usual way I'll probably have it simmering away for a while. Already there have been a couple of whole mornings spent on it, as well as the odd half hour here and there. But I know other activities will take over from time to time, so bear with me. There's not much that's unusual about it but I'll probably digress into details where I've got more to say.

There are two things prompting this project. One is that we recently had some really nice double glazed timber sash windows installed. Very pleased with them. The only slight niggle is that it used to be possible to put a cup of tea on top of the radiator but now there's a neat little window board, just wide enough to get in the way but too narrow to hold a mug. So something is needed to go beside the chair.

We found a round piece of marble (sold as a cheese board) which will make a nice top. To decide on the size, I mocked up something about the same height so we could try it out.
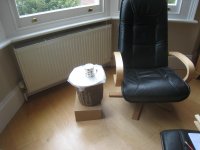
IMG_8303.JPG

This seemed about right, so I carefully modelled the dimensions needed:
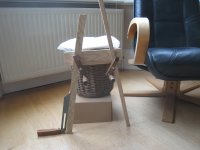
IMG_8304.JPG

The second factor that helps this project along is that since finishing the bed project, I have some offcuts of ash which I think would make nice legs. This is only a little table so it really doesn't need to be chunky; and ash is very strong even in small sections.

Deciding the shape and details was really quite a challenge. Quite a long time was spent looking at tables online. I even went into some shops and looked at what they had - and they all seemed to be either cheap and nasty or really over-expensive for what they were.

I also spent some time planing up some softwood offcuts into vague leg shapes. Some were a five-sided and tapering, some tapered part way down. They all looked a bit fussy or were too hard to make four that matched, so I abandoned them, but it was a useful learning experience. I settled on a design with an under-frame in a cross shape, with a leg on each end of the cross, held by an oblique mortise and tenon joint. Each leg is tapered on three faces but flat on the outside.

I'm afraid there isn't a drawing but the design should all become clear as we go along. I knew that I would probably change some of the dimensions as I went along, so a full sized or scale drawing wasn't going to be much help any way. I just find it so much easier to pick up something and decide to plane a bit more off until it looks right, rather than decide in advance exactly what size it should be.

Some time ago, I made a much more complex Shaker style side table out of walnut.
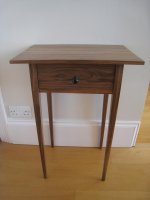
finished2.jpg

I was mostly following a dimensioned design (taken from a well-known original in Thomas Moser's book "How to build Shaker Furniture"). The wood was very generously given to me by a really skilled cabinet maker on the south coast, known to many of you as Custard. He also taught me that table legs look nicest if they show similar grain on all the faces, and how to select stock to get it.

The trick to getting the grain right is to make yourself a stencil the size of the leg you need and line it up on the end of the wood you want to use so that the grain runs corner to corner. Here you can see a bit of card with a hole in and two squares that I have drawn on a remnant of ash.
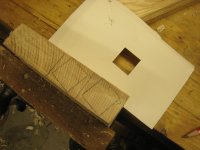
IMG_8313.JPG

and here's another bit of scrap showing the same idea less tidily
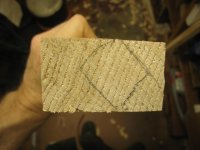
IMG_8312.JPG

To make the initial angled cuts I actually used the tilting facility on my table saw. I think that was the first time I ever have tilted the blade, in all the time I have owned it. Only for the first cuts mind; it was easier to plane the other sides down.

I didn't take loads of photos of this stage, thinking that anyone reading this knows what a plane looks like, but just for the record here's one of the legs getting a taper
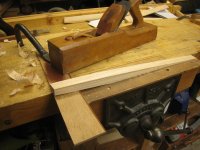
IMG_8317.JPG

Here's the set of four, with the one at the back planed down
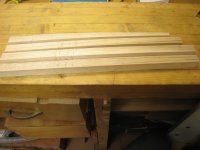
IMG_8314.JPG

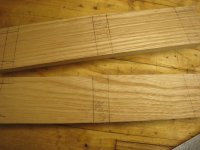
and here's a less over-exposed shot of the top ends, with the locations of the mortises sketched in so I don't get muddled and taper the wrong faces or trim an end the wrong way. I think that shows what I mean about getting a similar looking grain pattern, even though it is a bit tighter on the one in the front.
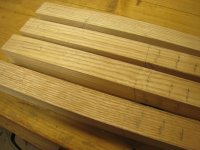
IMG_8316.JPG

I hope you can see that the grain is going to look better than it would have done if I had just sawn it through square. I didn't mind "wasting" some of this wood as shavings - it was effectively free any way.
 
My goodness Andy.......you really are in the swing of it now, aren't you.

I love the sophisticated mock up! :)
 
I’m not sure if this applies to Andy but for those of us who don’t do CAD that sort of sophisticated mock up is the best, or only, way to visual a project like that. :)
I am sure the end result will look great.
 
Yebbut what's wrong with the box and waste basket, it works doesn't it? :lol:
 
This is really fun, Andy, and I'm pleased to see that your design process is similar to mine: spend weeks (months/years) looking at pictures and pieces to get inspiration, and then try some things out.

Will you have little upward lips at the ends of the underside cross pieces to hold the marble top? Or how will you stop it from moving on the legs?
 
Andyp":3twlid7f said:
I’m not sure if this applies to Andy but for those of us who don’t do CAD that sort of sophisticated mock up is the best, or only, way to visual a project like that. :)
I am sure the end result will look great.


:text-+1:
 
Peter F.":2pyf0jry said:
Will you have little upward lips at the ends of the underside cross pieces to hold the marble top? Or how will you stop it from moving on the legs?

I've got some thickish double sided tape which I think will fix the top to the frame. If that doesn't work, I'll try some silicone sealant. If that doesn't work... maybe a coach bolt in the middle? ;)
 
Very nice WIP. Gary's tip on the grain orientation in the legs is an excellent reminder of something he said wrt tables in a thread elsewhere years ago and had been forgotten by me. The template tip is good.

Simplicity, executed really elegantly and well, is often a sign of good design. This is exactly the kind of thing I want to get back to making when I finally get some time to return to proper woodwork.
 
The Walnut table looks superb! This is my favoured design for tiny tables. Three legs make for stability, and as a final design suggestion substituting wine glasses for tea cups will give everything a rosy glow.D4ACE91C-A2A6-4EA5-97FA-77C6D06F7A9A.jpeg
 
Mike, that table has some impressive twists, but I don't think my carving skills are up to it. And fortunately for me, round here plainer designs are preferred... ;)

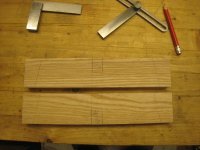
My imagined design needed a couple of little bits of wood, about 2" wide and 5/8" thick, joined in a cross shape. At first, I was just planning to cut an ordinary edge-wise housing joint, and indeed, I got as far as planing up the wood and marking it out in readiness.

IMG_8330.JPG

Incidentally, am I the only one who finds marking out always takes longer than I expect? There are just so many opportunities to go wrong, but then maybe forced concentration is good for me.

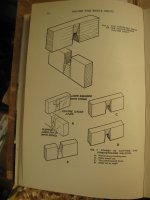
Having done all that, I remembered that Charles Hayward included an interesting variant on this joint, in his most excellent book on Woodwork Joints. (Unlike many other books that claim to cover the same subject, he actually includes proper methods for cutting the joints illustrated. A highly recommended book.)

The variant form bevels all the meeting faces. That should mean it's stronger and also easier to assemble - it tightens up as it slides fully home.

IMG_8334.JPG

I've never attempted one before, so why not use this project as an excuse to have a go?

I found that my dovetail marker was about the right size for the angles on the faces.

IMG_8335.JPG

I know from experience of writing up projects like this before, that any little errors that were hard to see at the bench show up much more clearly on a nice big monitor, so I recommend viewing the rest of this on a phone screen with the brightness turned down. ;)

In cutting the joint, you repeat the same sequence of cuts four times. I took plenty of pictures and will pick out the clearest ones for each step, once, so please excuse these not being all of the same side of the same piece.

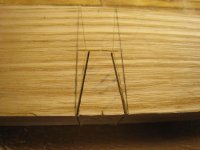
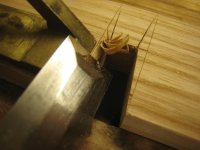
The first step was to saw down to the centre. Some paring back to the proper lines may be needed!

IMG_8345.JPG

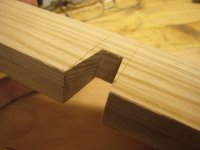
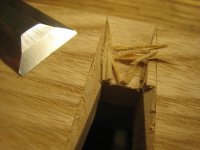
Then take out a notch by chiselling back. That gets you here:

IMG_8347.JPG

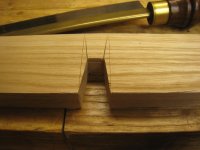
The bevel cut is about an eighth of an inch away from the perpendicular line at the centre. Next, you measure down from the surface by the same distance and saw two stopping cuts that shade off to nothing at the surface.

IMG_8349.JPG

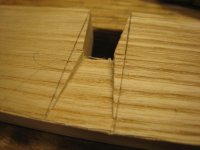
Then you chisel out a slope between these sawcuts:

IMG_8358.JPG

Then you chisel away the little slopes at the sides. The open part is easy - you can just hold the chisel at 45 degrees and push forwards:

IMG_8351.JPG

Charles Hayward says there's no need to check the angle if you just aim at getting the surfaces to meet. He's right of course, but I had this little brass angle thingy in the drawer and thought I'd use it. It made a bit more sense when I wasn't using one hand for the camera.

You then chisel down the far end, and repeat for the other side

IMG_8343.JPG

until everything joins up, a bit like this:

IMG_8356.JPG

You can see here that I was using a bit of the kiln dried ash from Yandles for these centre ribs. It has quite wide areas of open pores which are often frustratingly weak and crumbly. The legs of this table - like most of the bed I just made - are of much nicer, air-dried ash which is a pleasure to cut joints in.

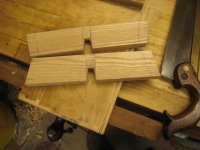
So, with that all done, twice over, I had two bits that ought to fit together.

IMG_8366.JPG

What I then discovered - it's obvious really - was that I hadn't been accurate enough in my marking out and cutting. Little errors combine, all hidden from view inside the joint, making it hard to know what's stopping it from going together properly.

I resorted to the usual trick of putting some thick pencil marks on

IMG_8362.JPG

assembling as far as it would go, then paring away areas where the lines were smudged.

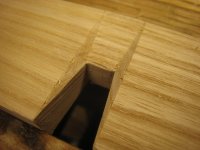
Eventually, I got it looking like this:

IMG_8363.JPG

Out of the four possible ways that joint could have been photographed, isn't it lucky that it landed that way round?!

You'll all think all four sides look like this:

IMG_8365.JPG

and that this photo must have come from somebody else's project: :eusa-liar:

IMG_8364.JPG

Never mind, it should still be strong enough to hold a cup of tea!
 
Andy
I couldn’t carve that In a month of Sundays! but I did make a barley twist jig for the router. The rest is spindle work using a template.
 
Impressive work Andy and I imagine even with that slight (expansion :D ) gap that the joint is rock solid. I guess it will be out of sight too.
 
AndyT":r5yb5xc8 said:
......I remembered that Charles Hayward included an interesting variant on this joint, in his most excellent book on Woodwork Joints.........

I might just have to invest. I find myself inventing too many joints, and thinking each time that I am re-inventing the wheel.
 
AndyT":38lq17sz said:
Having done all that, I remembered that Charles Hayward included an interesting variant on this joint, in his most excellent book on Woodwork Joints. (Unlike many other books that claim to cover the same subject, he actually includes proper methods for cutting the joints illustrated. A highly recommended book.)

The variant form bevels all the meeting faces. That should mean it's stronger and also easier to assemble - it tightens up as it slides fully home.

Very interesting joint, I haven't seen one like that before but it makes sense!

I promise I'll try to keep up with this WIP, I still need to go back and read the bed one fully :lol:
 
Never come across that before Andy, but I must say that the straightforward cross halving joint never has felt very secure or strong. Thanks for that, I shall have a go, very clever indeed.
 
It certainly does seem to be an unusual joint. Has anyone else on here made one?

Skimming through some of the thousands of how-to videos on YouTube I couldn't find any demos.

I did find this from Graham Blackburn. He discusses strength in joints and shows some pre-made examples including this halving joint.

https://youtu.be/NSLsAdafUuA

[youtubessl]NSLsAdafUuA[/youtubessl]
 
Does it seem stronger ? At first glance, it looks like even less than half of each piece is left. I can see, with practice, the mitres might make a neater appearance. But much harder to cut.

For this sort of table, you need torsional stiffness in that joint - maybe it helps in that regard ?
 
Tony, with an ordinary edgewise halving, it's possible to snap long strips off above the notches, especially if the wood is thin. This design gets extra strength by trapping the ends of those strips, inside angled notches. It's harder to twist a strip and break it off, as its ends are held.

Also, with a plain square joint, a strip can get split off during assembly if its end is tight against the side of a crossing member.

I think in this case it's all beside the point as the wood is so strong and the load is so slight. That said, it will be really important that nobody mistakes the finished table for a stool. I don't expect it would bear a person's weight. However, the marble top should help make it not look like a stool.

That's the theory!
 
Sheffield Tony":h474j0o6 said:
Does it seem stronger ? At first glance, it looks like even less than half of each piece is left.
The mathematical approach to answering that is: there are no empty spaces left in the middle of the joint, and the two parts are (hand-tool variation aside) identical. The total 'joint volume' (i.e. the parts where the two pieces-without-joinery would intersect) is the same as for a simple cross-halving, so the total volume of wood removed from each piece is also the same as for the simple cross-halving.

Aside from capturing the otherwise weak areas as Andy mentioned, this version also has the advantage of greater contact surface providing a more robust mechanical connection. That's less relevant with modern glues, but would have been a significant advantage historically.
 
spb":2l3ncct3 said:
Sheffield Tony":2l3ncct3 said:
Does it seem stronger ? At first glance, it looks like even less than half of each piece is left.
The mathematical approach to answering that is: there are no empty spaces left in the middle of the joint, and the two parts are (hand-tool variation aside) identical. The total 'joint volume' (i.e. the parts where the two pieces-without-joinery would intersect) is the same as for a simple cross-halving, so the total volume of wood removed from each piece is also the same as for the simple cross-halving.

Ahh, but wood's strength is not the same in all directions, so volume doesn't capture everything. In which context Andy's comment about trapping the grain in the mitred bits makes some sense.
 
With the central ribs sorted, I could turn to the mortise and tenon joints. I cut the mortises in the usual way, but opted to have one edge parallel to the rail. This meant that the final trimming cut had to be at the same slant angle as everything else, like this:

IMG_8372.JPG

The other edge is perpendicular to the surface of the leg and the shoulder, as seen here:

IMG_8369.JPG

IMG_8370.JPG

I know that I could have had both edges of the tenons at right angles but this way works too, and I had to choose. The tenons were just sawn in the conventional way.

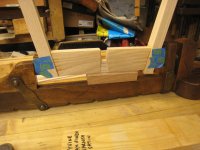
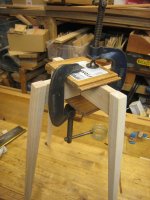
After a bit of detailed fitting, I could clamp both pairs of legs together. Here you can see that I had taped some little wedge shaped bits of scrap onto the legs to compensate for the angles. A bit of scrap underneath positions the rail in line with the clamping screw and gives clearance to the ends of the legs. (You can see that I got ahead of myself and trimmed one end at a slant too early; the right thing is to leave that trimming until after assembly.)

IMG_8374.JPG

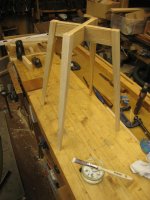
There's some degree of latitude when clamping up, even with the shoulder lines reasonably tight. I didn't want the two pairs of legs to not match. My answer to this was to cut two more bits of scrap to the right distance apart and put them between the legs at the wide end. I tried doing this with everything horizontal but soon realised that it made more sense to arrange them like this, with gravity helping.

IMG_8373.JPG

Next day I glued the rails together. It was very pleasing to see that once the glue was on, and with a bit of clamping, the joint slid together the last few millimetres.

IMG_8375.JPG

IMG_8377.JPG

Once that was dry, it was time for a final plane, sand and finish. I used Polyvine wax finish varnish again, same as I did on my bed build. A coat of satin first, to be followed by a coat or two of flat matt.

IMG_8378.JPG

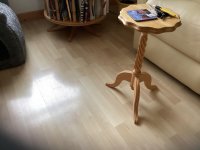
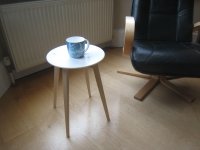
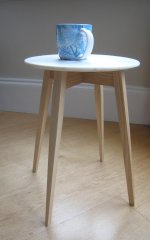
Having got that far, it seems silly to spin this out any longer. You don't need photo evidence of more varnishing and sticking the top on, but that will happen this weekend. Meanwhile, here it is as it will be very soon, not looking any different:

IMG_8379.JPG

IMG_8380.JPG

I'm happy with it; I hope you like it too.
 
Nice little table...and that Yandles kiln dried Ash is still 'orrible whichever way you slice it :lol: - rob
 
Very elegant with lovely proportions, are you making one for your other half?

We have 4 occasional tables in the lounge.

Pete
 
Pete Maddex":k9p75u7d said:
Very elegant with lovely proportions, are you making one for your other half?

We have 4 occasional tables in the lounge.

Pete

I'm no structural engineer but I think it will be strong enough for two cups... ;)

Thanks everyone for your appreciation - it really helps keep me making stuff.
 
Love it, but that's an empty cup, will it carry the weight when full is the question. :lol: :lol: :lol:
 
AndyT":mjsf0c9t said:
Pete Maddex":mjsf0c9t said:
Very elegant with lovely proportions, are you making one for your other half?

We have 4 occasional tables in the lounge.

Pete

I'm no structural engineer but I think it will be strong enough for two cups... ;)

Thanks everyone for your appreciation - it really helps keep me making stuff.

But where do you put the plate with biscuits on?

I think you should do some proper plans for it.


Pete
 
Back
Top