• Hi all and welcome to TheWoodHaven2 brought into the 21st Century, kicking and screaming! We all have Alasdair to thank for the vast bulk of the heavy lifting to get us here, no more so than me because he's taken away a huge burden of responsibility from my shoulders and brought us to this new shiny home, with all your previous content (hopefully) still intact! Please peruse and feed back. There is still plenty to do, like changing the colour scheme, adding the banner graphic, tweaking the odd setting here and there so I have added a new thread in the 'Technical Issues, Bugs and Feature Requests' forum for you to add any issues you find, any missing settings or just anything you'd like to see added/removed from the feature set that Xenforo offers. We will get to everything over the coming weeks so please be patient, but add anything at all to the thread I mention above and we promise to get to them over the next few days/weeks/months. In the meantime, please enjoy!

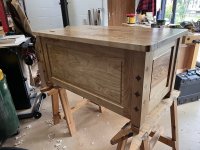
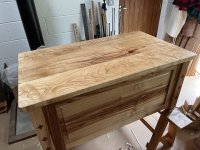
Toy Box Design - Updated with what I made!

Blackswanwood

Old Oak
Joined
Jun 27, 2020
Messages
1,472
Reaction score
969
Location
North Yorkshire
Name
Robert
I’ve been asked to make a toy box for the grandson of a friend. He’s only eight weeks old at the moment so I’ve got a few months to get it sorted! The design brief is a bit thin … substantial and probably oak.

Any design advice or critique of my thinking will be welcome.

Here is an initial sketch of what I am envisaging …
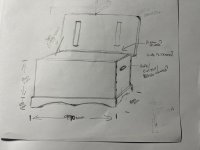
JPEG image.jpeg

Oak isn’t a problem but I’m wondering also whether Sweet Chestnut may be an alternative. The finish will be similar but slightly less durable?

Side thickness - 20mm and lid 24mm?

I am thinking I will use half blind dovetails so the front and back face are clean?

Are the proportions right?

Should I ditch the plinth base and just have the box sitting on the floor?

If I stick with the plinth base is there anything wrong with this approach?
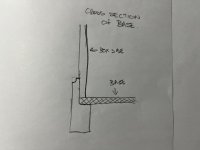
JPEG image 2.jpeg

I am thinking that a piano hinge with a soft closing strut is the best way to attach the lid?

Handles - cut out, rope or brass?

Anything else?

Cheers

Robert
 
The one thing I would certainly do for a kid's toy-box is to have a pair of rubber stops to keep the lid from closing completely. This could save fingers one day.

The rest of the design looks fine to me. I'm not sure about having the gaps under the plinth.......because unless this box is moved often that's where the spiders and the missing lego bricks will mingle. I would do through dovetails, unless there is a really good reason not to. I think they look better, for a start, and they're easier.

Finally, chestnut is beautiful to work with. Particularly to plane. It's every bit as hardy as oak. It can break out a little when chiselling, but not enough to stop you using it. It's a hugely under-rated wood in my view.
 
Nice project to make, I know from experience that little care will be given to all your careful hours of work, but as long as you are resigned to the damage to come it won’t hurt too much, and of course it will be used for all sorts of games except the one that involves putting toys away.
Plus one re the saving fingers. A traditional way for the underside was to put the box on two front to back battens but then you have the spiders and Lego problem again but to a lesser extent.
I have always liked rope handles myself, built so that the knots are hidden in blocks which are fastened/screwed onto the ends, there’s a few different ways to do it.
Proportions ok but personally I wouldn’t have square ends I don’t think. I think I would mock it up to check it looked right.
Ian
 
I knocked one up 10 years ago for my granddaughter out of reclaimed t&g oak flooring, similar size but what I learned very quickly is that no matter what size it's never large enough because the little monkeys stuff in everything they can then jump on the lid to close it. :lol:
I fitted castors because my daughter in law wanted to move it around, I also rounded all the corners to make it a bit safer, I fitted a standard stay but used 4 kitchen soft close hinges with the mechanism built in so it couldn't be knocked off, as I had them from a previous job and they worked well.

No photos and they don't have it now, it was given, with my approval, to a relative who's cleaned it up a bit and it's now a coffee table, authentically stressed over the years by a boisterous child. ;)
 
Nice idea. I made one for my toddler years ago. He was a very active child undefeated by childproof gates or the side walls on his cot and the first thing he did with the toy box, when his mother wasn't looking, was get in it. She went berserk as she thought he had been kidnapped at first (tad paranoid :D )

She made me paint it and paint lambs around it. Took longer to paint the bl**dy lambs than to make the box.
 
IMG_1318.jpeg

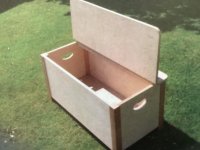
This is a quick and easy method using 18mm birch ply with solid corners/legs. Tenons and a full height tongue join the ply to the legs. The gas strut already suggested is vital I feel.
 
Nice project and I can't really see anything thats too daunting. Agree with Mike about through shovetails and definitely soft close hinges of some sort. The plinth is a nice 'to have' but again, as Mike has mentioned, the space underneath is where the missing Lego bricks 'go walkabout', so I would have said plinth but make it so that it touches the floor all the way round without any fancy shaping. As somebody else mentioned, the little'ns will tend to use this as a climbing/jumping off box so I'd also make sure that the joints on the lid timbers are well built (doms, ply tongue etc) with bracing (I think I saw this in the sketch) on the underside - Rob
 
Great project.

Have you thought about the longer term, when the recipient has grown out of toys?

Your sketch looks very much like a toolchest to me, so you might want to look at online info or books on toolchests. (They generally have a T&G base plus a pair of battens to keep it just off the floor, away from damp, with the surrounding trim level with the bottom of the sides.)

Sweet chestnut is lovely stuff, with the big advantage that it's much lighter in weight than oak. Most toolchests are softwood, which is plenty strong enough if finished thickness is 12 - 18mm.
 
Thanks gentlemen.

The decorative curve on the plinth has been dropped and through dovetails will be used. It’s useful to hear positive views on Sweet Chestnut (I’ve heard it called poor man’s oak) and will be making a strong recommendation to use it.

Soft closing hinges or lid stay are definitely needed as are rounded corners. I am aiming for something that can have a use beyond toy storage.

I should be making a start in a few weeks and will post some pictures as I go along.

Thanks again.

Robert
 
Soft close stays on both ends would give twin benefits of increased damping and avoid damaging torque on your hinge(s). Growing up I managed to trap my fingers in the doors of both a ford capri and a Citroen 2CV. Applying the lessons learned there I'd also be inclined to reduce the mass of the lid as far as possible within your design concept.

Will your lid be frame and panel? I used softwood for a pair of six board type chests and despite screwed on battens the lids have cupped. If I built them again I'd at least orient the growth rings the other way up if not going the whole hog.

I left the gap under ours, and find it a convenient way to pick the thing up when it needs moving about. I wouldn't trust screwed on side handles although through bolted with good sized washers would be ok.

Sweet chestnut ought to be lovely and a bit easier to work than oak. Watching with interest.
G
 
As I was waxing this today I realised it's had a rather long gestation!

My original design (incorporating the suggested tweaks) was accepted but then just as I was about to begin I was asked to change it! It's then had a couple of pauses during the build as it was decided first it was not needed until the first birthday and then to align with some building work being completed.

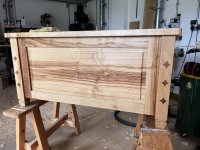
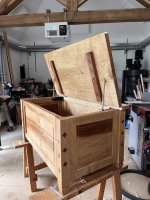
The boards were ripped on the bandsaw but all planed square by hand. I'm claiming it as a hand tool project as the only other electrons used were in drilling pilot holes for the hinges.

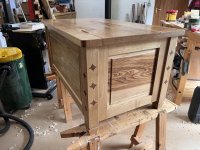
The wood is Sweet Chestnut. I cannot get the pictures to replicate the colour accurately - the lighter tones are actually quite a bit darker. I was asked to use pieces that made the most of the contrast.

IMG_9382 Large.jpeg
IMG_9379 Large.jpegIMG_9377 Large.jpegIMG_9378 Large.jpegIMG_9374 Large.jpeg
Cheers

Robert
 
Excellent Robert. I hope the recipient was thoroughly impressed and grateful. I love chestnut, but yours has got more figure and colour-contrast in it than I've ever worked with.
 
That does look rather wonderful!

What's the construction at the corners where the panels meet the uprights?
 
Thank you for the kind comments.

To answer the questions …

The stars weren’t my choice! I suggested inlaying something that signified it was a toy box - a snake on one face and ladder on the other, a flying saucer, or hearts, clubs, diamonds and spades but the thinking was to have something more generic.

The method was to draw the shape on graph paper stuck to a piece of card to make a template. It’s a diamond with the straight edges made concave using the base of a paint tin as the guide. This then was used to mark out each piece which I cut with a coping saw and cleaned up with a rasp.

Each inlay was done as I do an escutcheon on a jewellery box. The diamond is stuck to the leg with a small blob of superglue and a line cut around it with a scalpel. A bit of lateral force removes the diamond and it’s then just a matter of working carefully with a chisel (and I used my small router plane) to hollow out 4/5 mm. I find that it you work up to a couple of mm from the line it’s then easy to deepen the cut line with the scalpel which keeps a clean edge.

The faces attach to the legs using what is effectively a long half blind mortice and tenon. I did wonder about using a floating ply tenon but discounted it as I’d have had an extra set of mortices to chop out. Much as I love the Sweet Chestnut it behaves a bit like pine when being chopped with a chisel!
 
That's nice.

I think you've achieved two things in one go. A nice, functional toy box and a piece of heirloom furniture at the same time.
 
Back
Top