• Hi all and welcome to TheWoodHaven2 brought into the 21st Century, kicking and screaming! We all have Alasdair to thank for the vast bulk of the heavy lifting to get us here, no more so than me because he's taken away a huge burden of responsibility from my shoulders and brought us to this new shiny home, with all your previous content (hopefully) still intact! Please peruse and feed back. There is still plenty to do, like changing the colour scheme, adding the banner graphic, tweaking the odd setting here and there so I have added a new thread in the 'Technical Issues, Bugs and Feature Requests' forum for you to add any issues you find, any missing settings or just anything you'd like to see added/removed from the feature set that Xenforo offers. We will get to everything over the coming weeks so please be patient, but add anything at all to the thread I mention above and we promise to get to them over the next few days/weeks/months. In the meantime, please enjoy!

Trimble Towers Workshop - Fitting out begins...

Andyp":3ff13ywa said:
Yep, A place for everything and everything in its place. If only I could remember where that place is. :)

That’s my big problem and one I want to try and rectify as I stock the shop.

Going to have all ‘things’ of a certain type together and label that particular container/space. Not really worked out how as yet so it’ll be organic initially.
 
TrimTheKing":19f8az1l said:
Andyp":19f8az1l said:
Yep, A place for everything and everything in its place. If only I could remember where that place is. :)

That’s my big problem and one I want to try and rectify as I stock the shop.

Going to have all ‘things’ of a certain type together and label that particular container/space. Not really worked out how as yet so it’ll be organic initially.
It's the way to do it, but my problem now is that I'm starting to run out of space to put 'stuff' :D - Rob
 
Managed to sneak a little time this afternoon as son had mate round to play and wife was picking daughter up from Scout camp.

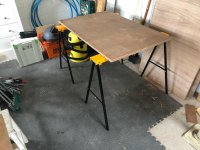
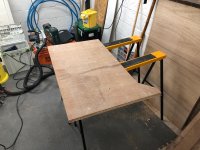
I 'designed' how I was going to make my workshop cabinets a few weeks ago and got to it today. They're being made from 1" thick ply that I've removed from our cellar floor. I haven't had time to make any nice wooden saw horses like Mike's yet but I did buy a pair of 'heavy duty' Rutlands fold up ones for £18 the other week so set those up to work on.

IMG_0501.jpg

IMG_0503.jpg

Little temp spray area for son's (new hobby) WarHammer 40,000 figures...

IMG_0502.jpg

Trimming it to shape...

IMG_0507.jpg

Offered it up to the wall, measured how far out the worktop will come out with a 50mm overhang and decided 700mm was too deep for the worktop, so skimmed 100mm off the back of the cabinet side...

IMG_0508.jpg

IMG_0509.jpg

Offered back up, put a temporary top on to and checked again. Too small! 700 mm was about right! :eusa-doh:

IMG_0510.jpg

I'll make up a bunch now at 100mm deeper. Going to rough cut them this time, screw them together (they are only workshop cabinets after all...) and final shape them 3 at a time rather than individually.

The plan is to just join these with braces at the top/bottom, back/front then screw them to the wall. That was I can add shelves or drawers at whatever heights I want. Not sure how I'm going to do the shelves yet but was thinking of either routing a load of holes for those little circle shelf supports, or domino a load of holes in the same configuration then use the smallest dom's, two on each side, as the shelf supports, any suggestions welcomed...
 
Ever considered these Mark.

Make them up on the mitre saw in pairs from scrap wood

164-795.jpg
 
Hi mate

Yes I’ve seen those and was thinking about those earlier today as another option. I just figured it might be quicker just using holes with the Dom with the supports taking more effort, but maybe not, I’ve never actually tried making them before.

Might have a go later.
 
Andyp":3qrhhht3 said:
Ever considered these Mark.

Make them up on the mitre saw in pairs from scrap wood

164-795.jpg

How on earth do you make those without leaving a circular cut ? :eusa-think:
 
Andyp":px63mgw1 said:
Ever considered these Mark.

Make them up on the mitre saw in pairs from scrap wood

164-795.jpg

I did those in my kitchen. They work nicely, but the shelf support bearer can fall off the toothed thingy, so you need a short dowel/ pin sticking out of the underside of the shelf to retain it.
 
9fingers":ka3dofp9 said:
RogerS":ka3dofp9 said:
Andyp":ka3dofp9 said:
Ever considered these Mark.

Make them up on the mitre saw in pairs from scrap wood

164-795.jpg

How on earth do you make those without leaving a circular cut ? :eusa-think:

As Andy says " using a mitre saw"

Could even do them at 45 degrees on a table saw.

Bob

Yebbut...my mitre saw has a circular blade :eusa-think:

And the blade has a kerf....and I see no sign of that in the photos.
 
The kerf is irrelevant as the two cuts overlap (with care)** and all my blades are round too but i can cut flat bottomed grooves with them.

Think about it Roger, it really is not that difficult if both Andy and I can do it. :lol:
Vertical cuts first and then angled cuts but it possibly works the other way too.
Bob.

If you are still stuck in the morning I might draw you a diagram.

Edit: ** that bit is strrictly wrong but very difficult to see the difference to be honest and a bit dependent on the tooth profile.
Bob
 
I’m very much struggling to understand how you’re struggling to understand this Roger...

Length of timber on edge on the mitre saw and make a series of spaced vertical, 90deg cuts. Next move the saw to 45/55/70deg (whatever takes your fancy) then make a series of spaced cuts that bottom out at the bottom of your previous vertical cuts.
 
Ahhhhh I think I get your puzzlement. These are separate inserts placed into the cabinet, not cut as part of it. Or am I wrong in that being your thought?
 
Thanks Andy as that video confirms what I thought. You can see the small square channel left at the bottom of the cuts ...after the diagonal cut's been made...where you can see the result of the width of the blade/kerf.

In the original diagram this was missing hence my confusion. Those are done using bandsaw IMO.
 
RogerS":55z4pycd said:
9fingers":55z4pycd said:
Those tins are great for storage. I have lots from when my son was a baby. He is nearly 32 now!

Bob

:eusa-doh: I knew there had to be a reason for having kids :lol:

Nope you've lost me......
 
Well it’s been a while since this was updated!

I won’t make any excuses, there’s been a lot happening in our lives over the past 2 years meaning the workshop has very much taken a back seat, but a lot of things have been knocked off the list recently and some mojo was found in the bottom of a cupboard the other day so I’m making the most of it...

As well as the shed/wood store addition I’ve shown recently we finally got round to sourcing a round window. I was going to make it but SWMBO got so annoyed at waiting for the workshop to progress that she made me measure up and she ordered a uPVC one, powder coated to match the cream of all other windows/doors on the house/workshop.

That arrived this week so after getting some more brickwork done yesterday I cracked on with the window this morning.

45d5bd6f8457832f4f1245edd47503c5.jpg


dc099042e06d651750b23ce03d98d021.jpg


Got it wedged in with plastic packers and SWMBO inspected my handiwork. Then in with the foam gun...

72ded95b2ba26802ffab48ce899052f5.jpg


5f326576fa88f5cb63cdb2cfb6d0c903.jpg


In and foamed in place.

a42d019be34faa1844959f308551c896.jpg


82bc5715e5ca9bfcc8937cc75b1b71f5.jpg


d5ecd051c87fe29fc771f42440a029b8.jpg


fcd7461d15322b4598837741096bf13f.jpg


Finally a shot through the new window into the mess that is the workshop!

A lot of the crap you can see is storage cases containing painting gear and gardening stuff so that will go into the two new sheds I’m putting up, hence the focus on getting those sorted.

b43fb439400073a7fa0188da1b413dad.jpg


Hopefully get some more done this week but focus on finding a new job and helping my nearly 12 year old daughter with her first ever business venture will take precedence.
 
That’s going to be a lovely light space to work in, it’s tedious sometimes isn’t it having to do one thing to be able to get another thing done to finally get to where you want to be but that’s what it takes. Just slightly concerned about your planes crashing to the floor, Ian
 
Cabinetman":2q3qcq0x said:
That’s going to be a lovely light space to work in, it’s tedious sometimes isn’t it having to do one thing to be able to get another thing done to finally get to where you want to be but that’s what it takes. Just slightly concerned about your planes crashing to the floor, Ian

Yeah it is nice and light with the 2 front windows, the Velux and now the porthole.

Planes should be fine, the cabinet is fixed up with a big French cleat which held it fine in the old workshop for 5 years so fingers crossed...
 
Well it’s been a week or two since I last posted in this thread…

It’s not been all still in there as per other posts and I have managed to get some decent benching and storage in there, but it’s accumulated more crap taking up space which hasn’t helped!

There’s an old chest of drawers in there which was storing all kinds of random stuff and that will free up some good space if I can get rid.

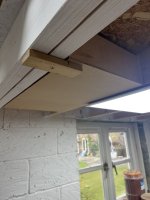
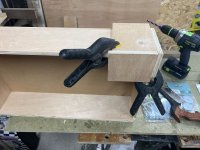
I looked for some storage ideas and someone recommended storage boxes hanging from between the joists of the mezzanine so I cracked on with measuring and making some at the weekend.

First I made a small jig that could be placed across the two rear corners to make sure the pivot holes were in the right place on each side and make it repeatable across any future boxes I make, which there will be a few.

IMG_2739.jpeg

It’s hung with an M8 bolt through from the outside of the joist, a couple of large washers between joist and box side then a nut inside the box. For wear protection I’m going to put a tee nut into each hole in the box sides but I thought I’d ordered some and hadn’t so that will have to wait.

Here is the first one hung…

IMG_2741.jpeg

IMG_2742.jpeg

IMG_2740.jpeg

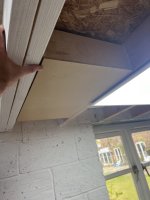
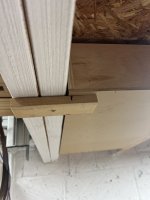
I am forever over engineering stuff and spending money on stuff that I really don’t need to, so I went all pragmatic this time and used an off cut, a washer and a screw and here we have a perfectly serviceable stop to hold it up and allow easy access.

IMG_2743.jpeg

IMG_2744.jpeg

And finally with some stuff in. I’m going to knock up some spacers that can be pinned in from the sides to act as ‘shelves’ inside to create some compartments and stop everything from piling up on itself.

IMG_2745.jpeg

I’ve made another two boxes up ready for mounting and I’ll knock up a few more to fill the available space.

There won’t be anything particularly heavy in them and the aim is to use them for storing fixings and stuff that needs fairly regular access but that might change as I get to work in there.

I’ll also paint the bottom of them so they keep the reflective property of the rest of the white walls.
 
Last edited:
Well that's a nice pragmatic solution.

My solution to an overcrowded workshop was to build another shed, and put everything which isn't woodwork-related out there.
 
Do those boxes have a stop to prevent them from swinging down just before the perpendicular? Would that help prevent stuff from falling out?

And you do know that stuff expands to fill the space made available for it😀
 
Well that's a nice pragmatic solution.

My solution to an overcrowded workshop was to build another shed, and put everything which isn't woodwork-related out there.
Yes I’m helping my son Ben soon with his overflow shed, he has acquired a big pile of 8x2”s which we are halving for the wall frames.
I do like this sort of make it up as you go along sort of work. Obviously the back of an envelope will come into it somewhere.
Good to see things progressing, the offcut used to support the boxes, if it were just slightly longer and you had one on every joist you could support both sides of each box.
Good solution and not over engineered at all! And believe me iI know all about the problem, haha.
 
Last edited:
Do those boxes have a stop to prevent them from swinging down just before the perpendicular? Would that help prevent stuff from falling out?

And you do know that stuff expands to fill the space made available for it😀
No, but as you can see from pic 2, I played around with the pivot point until they hung just shy of vertical for just that reason.
 
...the offcut used to support the boxes, if it were just slightly longer and you had one on every joist you could support both sides of each box...
Yep exactly what I plan to do in positions where boxes will meet. The light panels conflict this slightly so I might need to play around with those a little to make that work, but that's not a biggie.
 
Me too, so I'll be putting something on them as an aide memoire as to what's inside.
What I did in my previous place though it was a long time ago was use some of those see though A4 plastic sleeves ('cos they were free from work :) ) Stuck them to the door fronts with D/S tape and then printed off a quantity of sheets with empty boxed sections. I listed the contents using a sharpie then whenever I rearranged things, which was often I just slid in a new sheet.

I haven't done that here and know where everything is until I have a tidy up session then I'm stuffed. :ROFLMAO:
 
What I did in my previous place though it was a long time ago was use some of those see though A4 plastic sleeves ('cos they were free from work :) ) Stuck them to the door fronts with D/S tape and then printed off a quantity of sheets with empty boxed sections. I listed the contents using a sharpie then whenever I rearranged things, which was often I just slid in a new sheet.

I haven't done that here and know where everything is until I have a tidy up session then I'm stuffed. :ROFLMAO:
Labels are a big time saver in finding stuff and making sure things are put back where they belong.
 
Back
Top