• Hi all and welcome to TheWoodHaven2 brought into the 21st Century, kicking and screaming! We all have Alasdair to thank for the vast bulk of the heavy lifting to get us here, no more so than me because he's taken away a huge burden of responsibility from my shoulders and brought us to this new shiny home, with all your previous content (hopefully) still intact! Please peruse and feed back. There is still plenty to do, like changing the colour scheme, adding the banner graphic, tweaking the odd setting here and there so I have added a new thread in the 'Technical Issues, Bugs and Feature Requests' forum for you to add any issues you find, any missing settings or just anything you'd like to see added/removed from the feature set that Xenforo offers. We will get to everything over the coming weeks so please be patient, but add anything at all to the thread I mention above and we promise to get to them over the next few days/weeks/months. In the meantime, please enjoy!

Understairs storage - drawers and a cupboard

oddsocks

New Shoots
Joined
May 4, 2015
Messages
122
Reaction score
4
Location
Haverhill Suffolk
The next project on the list after the summerhouse that I finished a few months ago was to build under the stairs storage to improve on this (taken on a 'good' day)
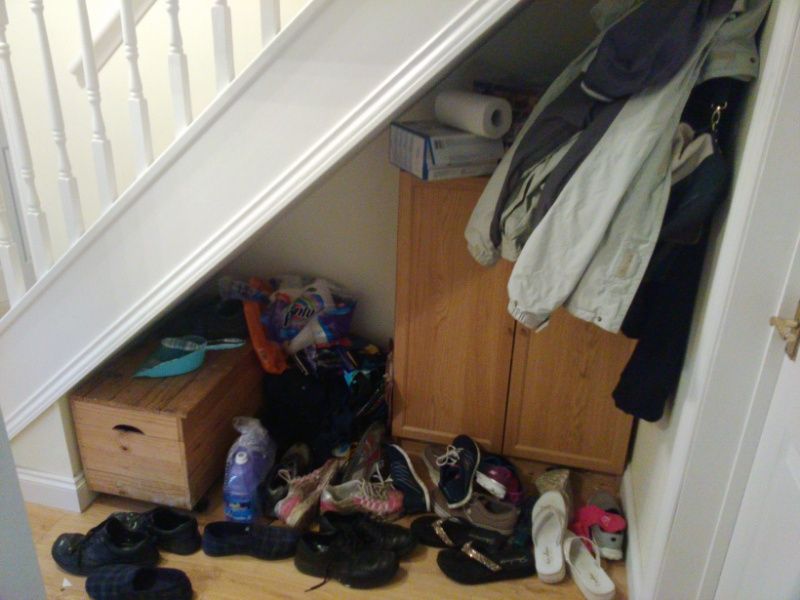

In recent months (probably due to searching for solutions) facebook had started pushing sponsored adverts for modular storage, so I looked into that, thinking that the flatpack option might end up cheaper /more cost effective, but it didn't meet my requirements - they are modular (can support different stair pitches and widths) but they need the 'small corner' to be lower than mine (I was told to knock out the infill that the house came with) and each drawer is a fixed width, so in my case, with a need for a cupboard at least 500m wide that meant too short for three verticals of drawers so only two could be fitted....which then meant two cupbard doors as the remaining gap was too big for just one. That and a 'sale' quote of £999 led to the make not buy decision (interesting that their website showed the 3 drawer (2 vertical) unit for euro 399 so they were expensive doors).....

here's the sketchup design I'm working to - all the MDF, ply, contiboard, drawer runners, door hinges, door push to open mechanism and confirmat screws have been purchased and the construction starts tomorrow. The total cost of materials including the specialist confirmat drill bit has come to almost exactly £300.
https://drive.google.com/file/d/0B23Hn0 ... sp=sharing

and some scene images from the design....
the frame including the door vertical and the salice under drawer runners (representative only but accurate dimensions)
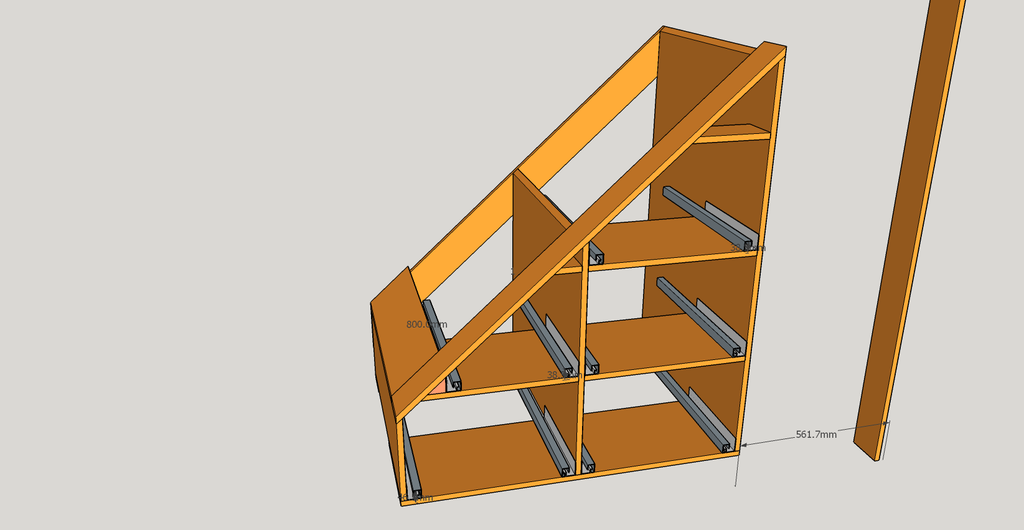
The frame will sit on 120mm high cabinet legs to ensure a tight fit to the stair (the front angle is 42 degrees to match my stair pitch)

view with the drawer fronts and infills
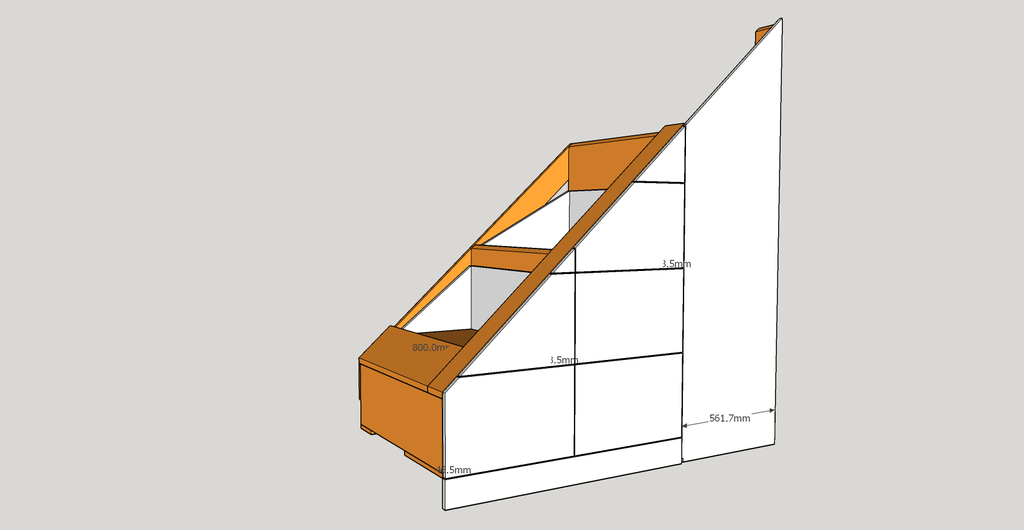

to fit my space the drawer fronts are 547mm wide and the vertical height is 357mm for the lowest drawers and 351mm for the others (this gives a 3mm gap between everything on the front face). The bottom ones are deep as they overlay the bottom of the frame by 15mm to give 3mm gap to the plinth). The door is nominally 558 wide by 1916 tall.

close up of the sketchup drawer runners and sides [edit] i realised that the image doesn't show the frame vertical between the runners (they are fitted to the vertical frame and sit on the horizontal components of the frame)
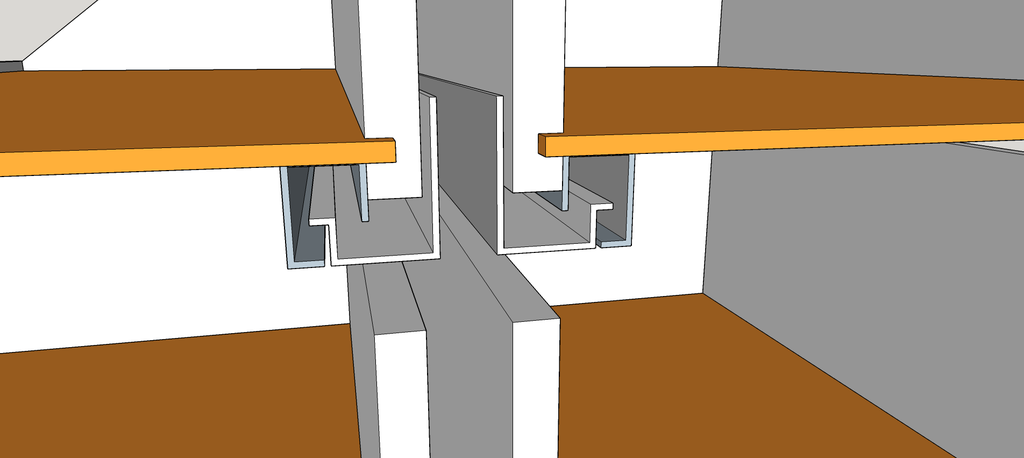
I chose to use Salice push to open under drawer runners with the clip fitting and adjuster as they are hidden and give adjustments of +/-2mm approx up/down and left/right. They are also very easy to fit and remove drawers (more expensive than side runners though at £23.81 pair for the 600mm fully extending ones).
The drawer runners are salice futura A6557/60 with integrated push to open mechanism. They are fitted to the underside of the drawer using A750 3D 3-way front fixing clips. 600mm was the longest I could find, yet the drawers are going to be 800mm deep (in an 820mm deep frame) - I think I know how to fit the deeper drawer to the runner, will confirm this weekend!

As usual, after I've done the design in sketchup I use cutlist to export to csv then import into Optimik to give me the board cut printouts for my local timber supplier (Bradnam &Sons). This design takes 2.5 sheets of 18mm MDF, 1 sheet of 6mm ply and 3 lengths of 305mm wide 15mm contiboard from B&Q (for the drawer sides as the runners max is 16mm thick).

Heres the MDF as collected from Bradnam & sons - all 22 pieces cut to size within 0.5mm. All I have done is put the 42 degree bevel on the 3 vertical frame components (in the background) using the festool rail and saw.
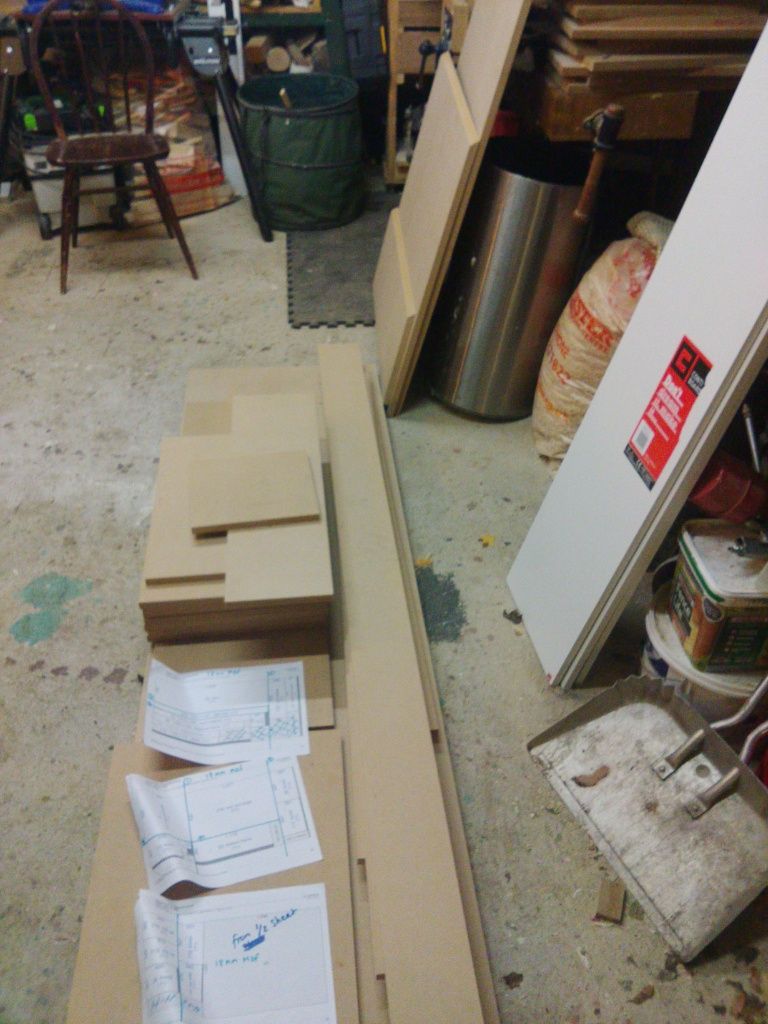


I'll assemble the frame in the workshop tomorrow using dowel jig and confirmat screws (aka ikea!). Its too big to fit through the front door assembled, so it will be flat packed and brought inside. I've a few cuts to make on the MDF as all components are rectangles from the timberyard and some need diagonals cutting.


Hopefully I'll be able to update on progress tomorrow night.

Dave
EDITED 12/3/17 to fix some photo links
 
Well you certainly seems have this very organised. Nice sketchup drawings, you seem to be a bit of a dab hand at it (sketchup).

Mark
 
Thanks for the comments - i'm a dab hand at sketchup for a very specific subset of what it can do!
Today has been a pretty good day - started with excellent bacon sandwich then out to the garage (well workshop as no car would get in there now).
First job was to cut the angles on 3 drawer fronts and the door using the festool rail

Then I decided it made sense to paint the primer/undercoat on the drawer fronts and door. A few years ago (after reading a forum thread) I bought a 100m of MDF iron on paintable edging (it feels like paper and can bend 90 degrees without cracking). This makes it a lot easier to get a smooth paint surface on the drawer front and drawer edgings. I did find that the normal stanley edging trimmer was not good as it snagged, so a sharp chisel was used.


After a few hours the first coat of primer was applied and time for lunch whilst it dried (pic shows after lunch when it was stacked)


So now to the frame construction - main tools for the day are dowel genie, confirmat drill and the sketchup app on the nexus 9


the next few hours were just about focus and making sure the reference edges were followed


Where I needed to drill dowel holes in the middle of the verticals I used a straight edge MDF and dismantled the dowel genie but kept the spacing...


to help ensure the spacing of the components i used an offcut and put the dowel holes in the appropriate places..


Finally late afternoon came the time to start the frame assembly. This is always hard to start with. I decided to use the confirmat drill to make the holes in the vertical components first, then assemble with the dowels and drill through the hole and screw in the confirmat screw. This is the first time I've used them (other than ikea fltpack) and they are really solid. Clamps hold the first components square while the confirmat holes are drilled through.
.


And this is where I've got to...The main part of the frame is built. The clamp is holding the top MDF (the bit that actually anchors the frame to the stairs) as I need to work out how to cut the 48degree angle at the ends (that's when Strictly was about to start :-) so i've left until tomorrow). The frame will be dissembled once the drawers are fitted, as it won't fit though the front door as is. I'm toying with the idea of reducing the depth on most of the verticals, but need to see the impact when the drawers are fitted. The drawer runners are approx 340mm long hence will register against the front horizontal pieces in the frame.


in case you are wondering - the left hand horizontal components are not in the last image! They will be dowelled into the middle vertical and fixed with pocket screws and then supported on the left hand side by screws into the MDF currently held by the clamp.

Tomorrow is another day :-) so maybe progress and more pics

Dave
 
Today's progress. Not much to really look at but lots of thinking was involved! I lost this morning being the family IT person (had a printer with a failed printhead) and needed to finish early, so I've only got to the point where the frame is fully completed and all the salice drawer runners fitted. I also gave all the drawer fronts and infills the second coat of undercoat.
Pictures from today...

The first challenge was how to cut the angle from yesterday - rather than overthink it i did it with a handsaw using the frame to clamp against. I don't like hand sawing MDF but wore a mask, had the ambient extractor on and hoovered up


Next came the task of fitting the runners. The horizontal components acted as a reference, so it was a case of using the 2mm spacer (from the front) and a hinge pilot followed by 5mm drill for the euro screws. The runners can be fitted with either euro screws or 3.5mm countersunk screws but for me, in MDF, the euro screws are so much stronger.


here's the finished item. Where runners are either side of a vertical, different holes were selected. The framing on the left is to support the drawer runner.

Most of today was spent getting the frame ready for the left hand upper drawer left hand runner, as it needed something to screw to!


the festool short rail came in useful (its nonslip base is helpful when using the bandsaw like this)


the runners are 'push to open' and with no load on them a simple gentle push in (2mm) shoots the rail out


Work will prevent much progress until at least Thursday evening. I hope to put the first top coat on the panels Tues evening and a second coat Wednesday. I've also realised I need to "gluepaper" the front of the frame so that the shadow gaps are white - that will get done once the drawers are made and the frame dismantled for final assembly (hopefully next Saturday, when I'll probably post the next update).

Dave
 
Andyp":34kk7p4p said:
Having all those boards cut to size is a real bonus and time saver. Do you have to pay per cut?
Andy,no extra cost. The sheet price is dearer than BandQ (about £10) but the MDF seems to be better quality and they take my optimik printouts and normally I can collect and pay later the same day. The biggest cut list I've given them has been just over a 100 pieces from 6 sheets if oak veneered MDF some years ago (that project write-up was lost with the old forum posts)

Sent from my Nexus 9 using Tapatalk
 
Andyp":38bkgfkr said:
What!. I wish I could fond a service like that around here.

Andy, Sadly, I don't think many of your fellow countrymen even know the word let alone understand the concept of adding value to a business.

There are lots of things they do well but it is what it is and there never seems to be any "extra mile" concept.
I enjoy visiting the country and go nearly every year but I just could not live there.

Bob
 
Indeed Bob. We are a net beneficiaries of so many thing here but there is a lack of appetite for people to DIY bought on in part perhaps by unwillingness for business to engage with the non professional market.
 
Today's progress......
During the week I decided I'd reduce the depth of the frame by 30mm (guess who forgot about the skirting board!). I've not yet done that (will do it when I 'flat pack' it to take indoors) but I did adjust the depths of the drawers as I cut them, which was the first job this morning. My mitre saw cannot cut 305mm wide drawer contiboard, so it was a case of cutting most of the width, flipping over, aligning the blade in the cut and finishing it.


I hadn't got the timber yard to supply the MDF for the drawer backs as I had a spare half sheet already, but getting the 5 pieces involved a bit of thinking to make them all fit. Space is a premium in the garage, and most machines and worktops are on wheels, so it was a case of moving the frame out of the way and popping up the excellent table from Screwfix (takes less than 10secs to set up). Once I'd cut the first slice, I could do the rest on my new Scheppach TS105 sawtable bought a few weeks ago at the D&M Show for £200 (show offer). I used to have a Electra Beckum PK200 which was better quality but took up too much space due to the fixed rails. This saw has slide out rails (can rip to 560mm) and performed very well. It also has wheels and is light enough to be lifted onto the table. it did come with a stand but that is still boxed as I store it on end when not in use.


Once all were cut, I then used the router table to groove for the base, in both the sides and the fronts. I took the measurements from sketchup and took time setting the fence to get the cut exact, as for the fronts the bottom two drawers have the groove further from the bottom edge (photo shows a bottom and middle drawer front)


Next job was to dowel the sides to fit the drawers - the joint genie was used, along with the snug fitting 8mm metal dowel I made to keep the register as I worked along the length (I think this should be included in the kit).


The corresponding holes were drilled in the front. I used a piece of ply to register the bottom of the side and marked it...


then used a set square to reference the jig


Once the first side was dowelled, I dry fitted it then used the back as a spacer to reference the jig for the other end......A bit later in the day I realised that the drawer runner statement of distance between the sides of -0 and +1mm was critical! On the left hand set of drawers the spacing was as per design, but on the right hand side I'd had to trim the horizontal rails a few mm to compensate for MDF verticals that were more than the nominal 18mm. This meant that the first drawer I did sat on the runners ok but rubbed against the fixed bit. Good job I did one drawer first as a dry run, as it was easiy resolved with the table saw taking 2mm off the back and base.

The drawer runners are 600mm long (the longest) and the drawers are 770mm, so I needed to make a hole in the drawer base for the hook to fit into. Normally the drawer is made 10mm shorter than the runner and the hook locates in a hole drilled into the drawer back. I knew that the base was recessed into the front by 8mm so cut the holes at 598mm and marked on the drawer side at the 590mm point. It worked well ....


...but.....

The salice drawer runner instructions said to leave at least 5mm from the top of the drawer and anything above it , which I had done (just 5mm!). However, this meant that I couldn't lift the drawer up high enough to allow the hook to slide underneaththe back of the drawer, unless I worked from the back (easy in the garage but not when installed). So once again the first drawer was dismantled and 10mm sawn off the side and back width (I also did this for the others at the same time). now I need to iron on some white edging which I will need to order.

Finally the drawer was ready for the front fittings that the runner clicks into and gives the range of adjustments. Each is just held in by two screws and once the back hook is in the hole, the runner is just clicked into the fitting.


And the first drawer fitted (not yet aligned)


a gentle push and it opened this amount...


Once the first drawer was completed and the issues sorted, the remaining drawers shouldn't take more than about 15mins each to drill the dowels in the fronts and confirmat screws into the back- so far I've done two and will do the remaining three tomorrow morning, but doubt I'll get the frame dismantled and assembled in the hall until next weekend as the grandchildren are sleeping over and we need to collect them at lunchtime.....

Hopefully finished pics will get posted next weekend.

Dave
 
This is a good post Dave, at least it's helping me.

I never heard of confirmat screws before reading this thread but after listening to how you used them decided to have a go myself....... Brilliant! You can keep putting stuff together and taking it apart again and again and it always goes back in the right place and it's rock solid.

Any chance you could post a picture of the drill bit. I tried to obtain one but could not find one so used a 5.5mm drill bit and it worked.

Cheers Mark :eusa-clap:
 
Mark, thanks for the comment. I'm not near the garage at the moment so can't take a picture, but I bought 500 screws from this seller and they came with a drillbit - here's the current auction that has the image
http://www.ebay.co.uk/itm/CONFIRMAT-SCR ... AVDjVvMzSQ
I did already have some 7mm confirmat screws but couldn't find any ebay seller with the 7mm drillbit in stock, just the 6.4mm, so ordered 500 @6.4mm that included a drill bit. If you search wider then the snappy drillbit is almost £60! There is another ebay seller that lists just drillbits at £9.99 each, but the 7mm is still showing out of stock but may be worth messaging them.

The 6.4 /7 refers to the hole in the face wood - both 6.4 and 7mm screws use a 5mm pilot into the 'anchor' piece (the thread on the 7mm is slightly fatter than the 6.4mm version but both use 5mm pilot). The head is recessed by a 10mm countersink, so you can do it with three drills if you don't have the specific confirmat one or drill the holes without the items clamped/dowelled together (6.4 or 7mm to start then 5mm using the centrepoint from the first to drill full depth, then the countersink).

You can also buy 5 x40mm screws, which are probably better if working in 12mm MDF or ply, but these screws are actually more expensive as they don't get the volume of sales.

Dave
 
oddsocks":3txevgbn said:
Mark, thanks for the comment. I'm not near the garage at the moment so can't take a picture, but I bought 500 screws from this seller and they came with a drillbit - here's the current auction that has the image
http://www.ebay.co.uk/itm/CONFIRMAT-SCR ... AVDjVvMzSQ
I did already have some 7mm confirmat screws but couldn't find any ebay seller with the 7mm drillbit in stock, just the 6.4mm, so ordered 500 @6.4mm that included a drill bit. If you search wider then the snappy drillbit is almost £60! There is another ebay seller that lists just drillbits at £9.99 each, but the 7mm is still showing out of stock but may be worth messaging them.

The 6.4 /7 refers to the hole in the face wood - both 6.4 and 7mm screws use a 5mm pilot into the 'anchor' piece (the thread on the 7mm is slightly fatter than the 6.4mm version but both use 5mm pilot). The head is recessed by a 10mm countersink, so you can do it with three drills if you don't have the specific confirmat one or drill the holes without the items clamped/dowelled together (6.4 or 7mm to start then 5mm using the centrepoint from the first to drill full depth, then the countersink).

You can also buy 5 x40mm screws, which are probably better if working in 12mm MDF or ply, but these screws are actually more expensive as they don't get the volume of sales.

Dave

Thank you for the very detailed reply Dave. I took a look at the ebay site you linked too and can see the type of drill bit from there. It was the countersinking of the head I was curious about and I can see that the drill bit does the countersinking in one go.

Cheers Mark
 
This weekend's progress - The main drawer unit is fitted and already filled!

Yesterday was spent 'tittivating' the fitting of the drawers, adding iron on edging, taking the main frame apart to trim 30mm off the back (as per earlier post to give space for the skirting board) and fitting the sockets for the legs.

Today the frame was moved indoors and reassembled - the dowels and confirmat screws meant this took less than 15mins as all the runners remained attached.

The frame on its side showing the leg sockets - The pack came with 8 not 9 , so I never fitted one in the middle of the smallest section


Then the legs were fitted, the frame moved into place and the legs adjusted so that the front was vertical and the top touching the plasterboard (this took about 10mins to get perfect). The frame was set back about 5mm from the front and we opted to align the plinth line with the run of the flooring rather than perfectly equal inset under the stairs. The frame was secured with 2 x 50mm screws through the top diagonal to the staircase.


And fitted, with drawers in place, the two triangular infills fitted, stair trim and plinth fitted. Now its in I realise I need to make an infill for the bottom corner. I also realised that because the drawers need a 2-3mm push to open space, the two triangles are recessed compared to the drawers. If it becomes an annoyance I'll replace them with thicker pieces.


A view of the drawers (bottom ones are fully open)


Because the drawers overhang the runners, I noticed that the weight tilted the drawer fronts. This was resolved by using 4mm spacers under the base by the runner hook (so that the base touched the hook)


I still have to fit the door (maybe one night next week and give the drawer fronts a final coat of paint.

Dave
 
Andyp":xfk3z6mk said:
Very Nice Dave. Are you not tempted to put a door on the RHS?

Andy, yes, that is the plan - the door is already cut and painted but still in the garage. Depending on work, I hope to fit it tomorrow night....but I've got some push to open magnetic catches so may need to experiment with them first. Photos will follow once done :-)

Dave
 
Just watch the tolerance on those push-to-open catches. The ones I had were the Devil's own to adjust and I ended up being inside the cupboard while my wife shut the door so that I could adjust them properly. Even then I found that their tolerance of alignment was about 1mm (if that) and with the general movement of the door (I was using elm) it proved impractical and I abandoned the idea.
 
Today's progress - the door is fiited :-)
(for some reason some photos are rotated in the post but look correct in photbucket)

The first task was to drill the hinge holes - centres recessed in 22.5mm to give an inset of 5mm. I decided that 4 hinges would be needed, partially for the weight of the door but also to counteract any bow in the mdf. I've currently only got two push to open hinges so have ordered two more (When I fitted the door with the two I have, I had to adjust the clearance because the door caught the frame where the two new hinges will go).

I also needed to make the doorpost - this is 2 thicknesses of 18mm MDF (i'm running out so used offcuts for the bit that won't be seen). One thickness was to come level with the lving room door architrave, the second thickness is the overlay frame. The photo shows the transferring of marks (I'll create a separate post for the blum template I used).


The bottom of the door is offset 5mm from the door post to give clearance.


My technique for getting the hinge screw holes lined up..


The door post fitted (Laser level used to ensure it was vertical)


The door catches - these are magnetic and counteract the hinges desire to spring open. These are Salice catches in a carrier that enables easy adjustment. this picture is teh top one that has the centre pin that when you push the door 1-2mm breaks the magnet and allows the door to open. The door just had a metal pin fitted, but Salice also do a 10mm insert that itself is magnetic if more 'catch' is needed.


Because of the size of the door, I also fitted a slave magnet lower down - this does not have the centre pin but helps keep the bottom secured. Again fitted in the carrier that made adjustment easy


The door closed

and opened


I did have to trim the top of the door to allow it to miss the architrave..Not easy to see from the photo


All that is left now is to do the bottom left infill (i'ver actually ran out of 18mm MDF!), fettle the drawers now they are loaded and give it a final coat of paint
 
Seeing the drawer units on legs I was just wondering how secure it is. If someone opened a weighty drawer all the way too fast is there any chance of the whole thing moving?

Had to smile at the laser level comment above a picture posted sideways :)

Like the nice clean look of the front elevation with no handles.
 
Robert":r0veb4od said:
Seeing the drawer units on legs I was just wondering how secure it is. If someone opened a weighty drawer all the way too fast is there any chance of the whole thing moving?

Had to smile at the laser level comment above a picture posted sideways :)

Like the nice clean look of the front elevation with no handles.

I know :? I tried a few times to work out why it keeps posting sideways - I even deleted it from photobucket, rotated it correctly in my local copy and uploaded it again - some of the other pics were also rotated and they display correctly so eventually gave up with it!.

Re the security, the frame is screwed to the underside of the stairs via the top front diagonal in three places so doesnt move (the legs were also adjusted so that front 120mm MDF was a tight fit before being screwed). Also the drawers are 770mm deep and the runners only 600 so there is always a minimum of 170mm inside.

Dave
 
well all good things come to those that wait! I just looked at my last post and (almost a week later) the pictures are actually showing the right way up (and I never touched anything!).

I have now made and fitted the left lower corner infill (even routed a fake skirting board line). The two extra salice hinges arrived today so I'll fit them tomorrow and hopefully apply the final paint finish on Sunday.
 
Great job and nicely executed. Consider that idea for use of a Fessie rail to support work whilst doing a bevel cut on the bandsaw nicked! :)
 
Nice to see the project come to fruition. I have managed to gleam quite a few ideas from this post so cheers :eusa-clap:

What's the next project ;)

Mark
 
Thanks Mark, I've just caught up with your post for the bedroom cupboards and noticed the mention of confirmat screws :-).

At the moment projects are mainly non-woodworking - such as painting the stairs, replacing the battery on my wife's HTC M19 (that was a challenge!), family PC fixer, sorting the central heating out, and doing car DIY. I may possibly complete the wardrobe drawers for my daughter (not quite year overdue yet!) and obviously being christmas will need to turn some more snowmen and trees!!

Dave
 
oddsocks":779ge5ha said:
Thanks Mark, I've just caught up with your post for the bedroom cupboards and noticed the mention of confirmat screws :-).

At the moment projects are mainly non-woodworking - such as painting the stairs, replacing the battery on my wife's HTC M19 (that was a challenge!), family PC fixer, sorting the central heating out, and doing car DIY. I may possibly complete the wardrobe drawers for my daughter (not quite year overdue yet!) and obviously being christmas will need to turn some more snowmen and trees!!

Dave

Thank you for the reply Dave, I have enjoyed this thread very much and learnt something too. I'll keep an eye open for any new projects you may have on the go in the new year.

:text-goodpost:

Mark
 
Back
Top