• Hi all and welcome to TheWoodHaven2 brought into the 21st Century, kicking and screaming! We all have Alasdair to thank for the vast bulk of the heavy lifting to get us here, no more so than me because he's taken away a huge burden of responsibility from my shoulders and brought us to this new shiny home, with all your previous content (hopefully) still intact! Please peruse and feed back. There is still plenty to do, like changing the colour scheme, adding the banner graphic, tweaking the odd setting here and there so I have added a new thread in the 'Technical Issues, Bugs and Feature Requests' forum for you to add any issues you find, any missing settings or just anything you'd like to see added/removed from the feature set that Xenforo offers. We will get to everything over the coming weeks so please be patient, but add anything at all to the thread I mention above and we promise to get to them over the next few days/weeks/months. In the meantime, please enjoy!

What I have fixed today

On the 7th May I retrieved a large Bonsai pot from the local recycling centre. Checking it over showed a crack running down in one corner and then splitting across two sides lower down.
View attachment 55457 View attachment 55458 View attachment 55459
After a good clean to remove the old grime I used some 'super glue' into the cracks and left until this Wednesday gone, 17th June, when I got out a 'dremel' type machine to follow and deepen along the crack lines. Sorry, no photos of that stage.

I then mixed up some epoxy resin to run into the now 'grooved' cracks and dusted over with a false gold dust... a process based on a Japanese method known as 'Kintsugi': https://en.wikipedia.org/wiki/Kintsugi
View attachment 55460 View attachment 55461 View attachment 55462 View attachment 55463 View attachment 55464
Using epoxy resin (Araldite type) is certainly a whole lot quicker - and less expensive - than true Kintsugi. Quick mix of epoxy and either add the 'gold' dust - or some coloured powder of choice - or brush on as the epoxy is going off. In the past I've mixed it in but this time just brushed over.

Yesterday I repot one of my (Yamadori) English yew trees as this reclaimed pot is deeper than the one it was in. This tree suffered from root rot with the wet winter we had in my area in 2024. Seems to be gaining health so 'slip potted up'...
View attachment 55465

Time will tell how long the pot will last but should the frost get into it another attempt at a Kintsugi repair can be done.
Is that a Ginko bonsai I see on the right side of the last pic ?
 
Yes Scott ☺️. I was lucky to win it in an online bonsai raffle about 5 years ago - along with a Japanese Deshojo maple. The Ginko biloba is around 38" (inc. pot) - or 34" from pot surface. Sorry for the glare, bottom left in the photo... the sun is directly in line with it...20260621_140518.jpg
 
Last edited:
I'm coming round to your way of thinking Rob... they are time consuming...

Weeding and wiring aside, it's trying to do the repotting of those that need it - against the pressure of weather during those times, pinching back to get smaller leaves and ramification... trimming back - pressures of whether to use those 'trimmings' for cuttings, as well as root cuttings, and propagating those on... airlayers and such. Protecting from the late frosts we seem to get... seem to be fighting against the weather a great deal of the time 😕

I became quite taken with Paul's Scarlet Hawthorn about four years ago. After getting one (grafted stock) I was going to airlayer the long, straight branches - got told they don't airlayer very well nor do cuttings take. I had to find out for myself. Haven't yet tried to airlayer but did try cuttings in 2024 and '25. From '24 I've had 4 successful 'offspring' and from '25 around 10... I'm a glutton for punishment.

Sunday 26th July I will be taking some other 'starter trees' and, possibly, some others I can get in the car, to a 'Bonsai Boot Sale' taking place just outside of Westbury, Wiltshire... 🤞that I reduce what I have and take others in 2027 🤞
 
I started noticing there was water under my dehumidifier in the workshop. Ahah, I thought. That'll be something wrong with that magnetic switch thingy that turns the machine off when the float reaches the right height.

Was it 'ell as like! I cleaned all round the switch and made sure the float pivoted freely, but the floor was still getting wet.

So I had to get my screwdrivers out. But I should have guessed from the condition of the water container, because it not only contained water, but also a clear gel substance. I had already cleaned all that off before.

I unscrewed the casing and separated the two covers and there all around the exits where the condensed water came out was clear gel stuff and a lot of it mixed with saw dust as well, most of it Padauk coloured. So this all got cleaned out, everything got put back together and I plugged it back in. It seems to work. I can hear whirring, so it was good I didn't pull any wiring connections off.

I'll just have to wait til tomorrow to see if it's leaking again.

That gel stuff; cellulose?
 
More likely to be a type of mould, seen sometimes in refrigeration units and often a pink colour. It will need to be killed off or it will come back - -sorry. Don’t know the cure, bleach?
It's absolutely clear, no colour at all.
 
A fix of sorts.
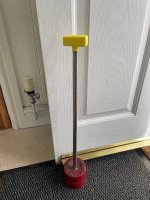
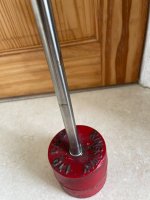
My wife struggled to move a heavy weight I had repurposed as a doorstop, I got fed up listening to whingeing and needed a few brownie points so a length of old chrome pipe, a 10mm long bolt from the bottom countersunk flush and a 3D printed handle and it's all smiles again. I pinned both the handle and bolt into the tube as well as using epoxy.

Typical though what I thought would be an easy drill through cast iron proved to be difficult and I broke 2 drill bits and after the first 30mm it seemed very hard metal. I used a drill press, slow speed and cutting fluid..

IMG_3484.JPGIMG_3485.JPG
 
Last edited:
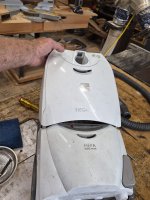
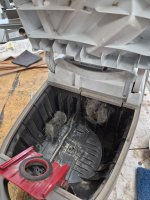
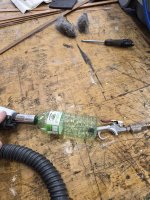
This machine had a wadd of cat hair bunged up in the hose, took a while to get it out. While at it removed the motor lid and blew out all the dust.4693.jpg4694.jpg
 
Cat hair? Wow.

Do you keep a leopard?

Being serious for a sec, having unbunged my late MiL's Dyson several times (both she and her daughters had long hair), it's the only domestic brand I've refused to have in the house.

Thus we've had Henries* for decades: they've been brilliant, and spares are easily sourced and inexpensive. I've also modified my two shop vacs to take the same hoses, which has been really useful.
 
Last edited:
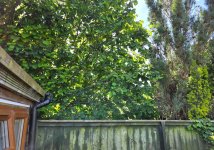
Got round to starting to trim back the lazy neighbours overgrown and overhanging bush... and brambles...

20260613_140907.jpg

20260630_093320.jpg

20260630_093330.jpg

20260630_142544.jpg

Next is to trim back some of the Hazel's, yew tree and a Scots pine. Not suitable trees for the small gardens in this location...
20260613_140923.jpg

20260613_140854.jpg

Trimmed back the Hazel, which was overhanging the small summer house/retreat I built for SWMBO, in the spring - but strong winds have blown some thin, long branches into the Scots pine so they'll beging to spread over the fence...
 
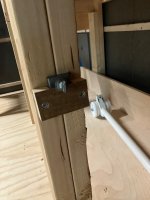
Today I came across the vice dog that I had removed as I kept tearing my thumb nail on it, very rarely used it but don’t want to lose it so I made a little pocket for it to live in near the vice.

IMG_4604.jpeg

IMG_4605.jpeg
And for you Europeans who might be wondering about the vice it’s an American made Yost vise very similar to a record, it measures 9” across the top. Works pretty well.
Ian
 
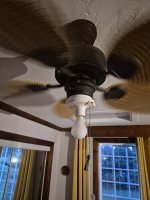
This has to be my ultimate MacGyver job. Didn't have a shallow electrical box so I modified a plumbing part to be the box. Found an old pull type lamp holder and fastened it to the bottom of the fan.
Wife was most impressed but I hope you will paint it black.
 
Today I came across the vice dog that I had removed as I kept tearing my thumb nail on it, very rarely used it but don’t want to lose it so I made a little pocket for it to live in near the vice.

View attachment 56165

View attachment 56166
And for you Europeans who might be wondering about the vice it’s an American made Yost vise very similar to a record, it measures 9” across the top. Works pretty well.
Ian
Great idea Ian, right close to the vice and not in a drawer or shelf where you might not remember where you put it.
 
Last edited:
Not exactly 'fixed' but... After trying to recharge my massive Disston that I was using for chainsaw duties I stupidly listened to some YT channels about flattening the blade. Before that I'd just sharpen precisely against the orientation of the teeth. If that makes sense.

Not changing anything about the saw. But, then I decided to remove the breasting (I learnt that after!!) of my £250 or thereabouts, saw. What an idiot. It never cut the same again and I ordered a saw set and put both away for a rainy day.

Yesterday when starting to cut down some lengths to make the base of a cheap bathroom cabinet bottom (under the sink drawers, crap as crap comes but my wife likes em so its fine!!) that we ordered for £300, I decided enough was enough of using my cheap Irwin that I'd bought in the interim.

Pulled out the Marples which was blunt as anything but I didn't fancy continuing to wear out my cheap Irwin on some long rips. So, out came the saw Holder, vice, files, saw set. After a quick check on a few channels and ensuring I don't do something stupid again, I got to work.

Filed the teeth from either side so as not to cause, erm, tracking issues. Before thar I did a very brief grind of the tops of the teeth to bring em all flat (the Marples is not breastfed thankfully). Then got to work with the saw set which didn't really do much as I'm only about 3 or 4 sharpenings in since buying it refurbished (the Disston was an NOS so harder to swallow when I scr*wed it over).

The results... the brown board on the left had an almost square cut that tracked precisely in a straight line. Happy with that and I'll treat myself by making a quick bird feed holder bracket... before getting on with cheap bathroom cabinet/sink duties!!

20260708_090511.jpg
Sorry, there's alot of info in that pic and I'll get on with repairing the Disston once I've read up more on how to 'breasting' again.
 
I just looked back at your other thread and the beginning of the sad story of your rip saw.
I'm glad you are trying again with it and have got encouraging results so far.

Incidentally, thinking that £250 was a lot to pay for a saw, I checked the prices from Thomas Flinn, for an equivalent, properly made in Sheffield saw.

While their "Centenary Edition" 28" rip is £240


their Pax branded saw is 'only' £159.79.

 
Thanks @AndyT thankfully (I just checked) I got my 'new old stock' in excellent condition from Tool Bazaar for the measly sum of only £95. I started looking at replacements from TF after I'd knackered it but then decided >£120 was probably way more than I could afford at the moment (alot going on where money needed elsewhere and my wife would kill me if she found out!! haha).

I think the cheapest i found was about £120, same saw (TF) but from another reseller.
 
Well... realise I'm stretching it a bit... NOT something I've fixed today - yet - but looking towards future needs?

Shopping at Lidl this morning... £1 off with Lidl Plus... so... £4.99...

I can never find a sharp needle when needed so I'm thinking these will come in handy *when* I get a wood splinter in a finger or hand... So long as I remember where I put them...
20260708_121443.jpg
In case it's not clear what they are because of the plastic tube sleeves... Tweezers X10..
 
Mine doesn't 😂... thats why I'm usually trying to find a suitable sharp needle to dig out the darn things
 
With that many you you can afford to leave a a pair in each room, tool box, overalls etc.
Differing 'heads' (?) Andy... some curved, some pointed, some flat... if I did spread them around in different places I'd most likely not have the one needed and be searching all over the place. Putting the case in a drawer/storage suitably marked on the drawer front - safest 😉
 
Not exactly 'fixed' but... After trying to recharge my massive Disston that I was using for chainsaw duties I stupidly listened to some YT channels about flattening the blade. Before that I'd just sharpen precisely against the orientation of the teeth. If that makes sense.

Not changing anything about the saw. But, then I decided to remove the breasting (I learnt that after!!) of my £250 or thereabouts, saw. What an idiot. It never cut the same again and I ordered a saw set and put both away for a rainy day.

Yesterday when starting to cut down some lengths to make the base of a cheap bathroom cabinet bottom (under the sink drawers, crap as crap comes but my wife likes em so its fine!!) that we ordered for £300, I decided enough was enough of using my cheap Irwin that I'd bought in the interim.

Pulled out the Marples which was blunt as anything but I didn't fancy continuing to wear out my cheap Irwin on some long rips. So, out came the saw Holder, vice, files, saw set. After a quick check on a few channels and ensuring I don't do something stupid again, I got to work.

Filed the teeth from either side so as not to cause, erm, tracking issues. Before thar I did a very brief grind of the tops of the teeth to bring em all flat (the Marples is not breastfed thankfully). Then got to work with the saw set which didn't really do much as I'm only about 3 or 4 sharpenings in since buying it refurbished (the Disston was an NOS so harder to swallow when I scr*wed it over).

The results... the brown board on the left had an almost square cut that tracked precisely in a straight line. Happy with that and I'll treat myself by making a quick bird feed holder bracket... before getting on with cheap bathroom cabinet/sink duties!!

View attachment 56171
Sorry, there's alot of info in that pic and I'll get on with repairing the Disston once I've read up more on how to 'breasting' again.
Well you’re a braver man than me! All these years I’ve never spent the time to learn to sharpen a saw so all credit to you, my rationale was that it’s a job best left to experts or Shafiq !
I’m a hard point saw man, wickedly sharp but yes unfortunately throw away after a few months.
Ian
 
Good point Ian. To be honest when I messed up my Disston I really was gutted and felt like a right prat. Especially after having processed x amount of the sycamore tree with it. But am hopefully I'll come out of this stronger.

Problem with hard point is that when I need them, they're blunt and I don't have the money to go buy another (an endless cycle) cos I spent too much on tools/gear in the first place 😆.

Its ripping nicely at the moment (the Marples).
 
Back
Top