• Hi all and welcome to TheWoodHaven2 brought into the 21st Century, kicking and screaming! We all have Alasdair to thank for the vast bulk of the heavy lifting to get us here, no more so than me because he's taken away a huge burden of responsibility from my shoulders and brought us to this new shiny home, with all your previous content (hopefully) still intact! Please peruse and feed back. There is still plenty to do, like changing the colour scheme, adding the banner graphic, tweaking the odd setting here and there so I have added a new thread in the 'Technical Issues, Bugs and Feature Requests' forum for you to add any issues you find, any missing settings or just anything you'd like to see added/removed from the feature set that Xenforo offers. We will get to everything over the coming weeks so please be patient, but add anything at all to the thread I mention above and we promise to get to them over the next few days/weeks/months. In the meantime, please enjoy!

WIP Tall unit, AV cupboard and coffee table

Robert

Moderator
Staff member
Joined
Jul 21, 2014
Messages
2,683
Reaction score
63
Location
Woodford Green
Name
I'm not Bob
Some time ago back before our new extension was built I made a couple of built in units to fill wall recesses near the patio doors to the conservatory.

The sketchup drawing I made it from-
builtin1.JPG


and the finished item -
builtinetc-2.jpg


This proved a useful cupboard so it has stayed in use and is positioned in roughly the same place but the room has changed completely and there is no longer a recess for it and the wall has got a bit thicker too.
So project 1 is to make this cupboard with ugly sides that were never seen look good as a free standing unit. It also has to look like previously made furniture.
In particular the sideboard -

Sideb-83.jpg


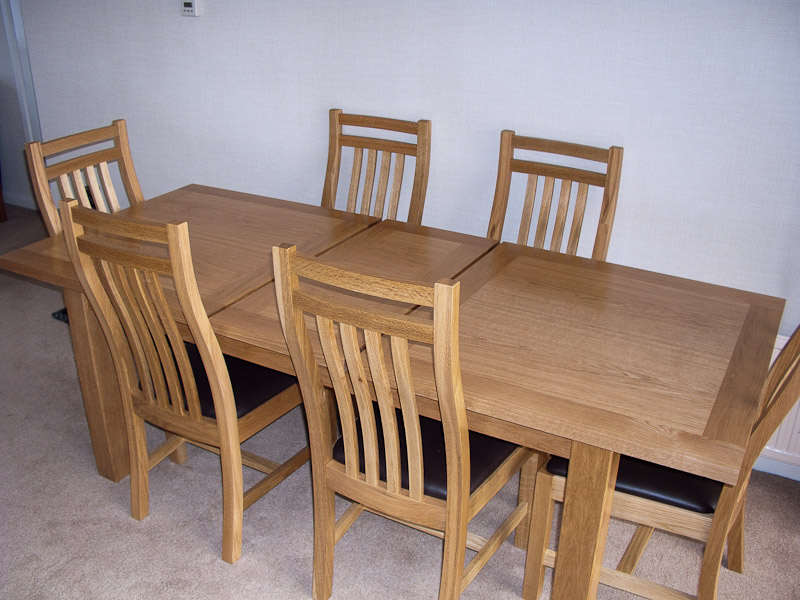
and dining table -
dtable-69.jpg


Next to the modified unit we need a cupboard for the cable box, media computer and AV amplifier so that is the second project. Again the style is similar.

Here is my incomplete sketchup with the side cladding for the tall unit, the new build AV cabinet and the final project a replacement coffee table that I'm still drawing.

setof3.JPG


I'm not in any great hurry with this but I have bought some White Oak (£130 worth) and made a start on the bits that don't need too much thinking about.

First bit of sawing
newstuff-100.jpg


Unused 1" boards - they are about 230mm wide
newstuff-101.jpg


And the 1 1/2" thick board for edging the tops
newstuff-102.jpg


Then I resawed most of the pieces on the bandsaw
newstuff-103.jpg


And ended up with a lot of curved wood after the cut released stresses in the planks.
newstuff-104.jpg


So most of it was thicknessed to size as it is not flat enough to plane easily
newstuff-105.jpg


Curve in the long strips
newstuff-106.jpg


All these thin bits are sides of the 'legs' - box legs for the table and AV cabinet and fake box like corners for the tall unit.

Hopefully the way this all goes together the curve in the strips shouldn't be a problem.

To be continued..
 
Good stuff. Glad it is not just me that seems to end up with bendy wood on re-sawing.

Your post does suggest to me that I need to upgrade my bandsaw however, as I couldn't do that on mine without the cut wandering all over the place :oops: I presume you are re-sawing the 1 1/2" boards to end up with 3/4" which are then thicknessed down to what, 1/2"? I always seem to end up buying 1" (25mm) timber and wanting 12mm so wasting a lot of the board - looks like I should go for thicker and rip it in 2 before thicknessing to final dimensions.

Steve
 
No :)

I resawed the 1" into thin boards. Final thickness after resawing is 11mm. All have at least one good side and both edges. The other side is also good on most of them but a few still show some small rough areas on one side. the good side will be seen the other side will not.

Just set the router table up to rebate the edges for joining into box legs. Should be obvious when I get more pictures up rather than trying to explain in words.
 
I hope you thicknessed equally off both sides (apologies to Grandma if applicable!)
 
I well remember your side-board build, and you making those chairs, Robert. That was one of those thoroughly enjoyable WIPs somewhere or other. Good luck with this one.
 
Robert":2xh5mdgv said:
and the finished item -
builtinetc-2.jpg

Given the other prices you show in your post really looking forward to following this.

On the cupboard as is, what is the panel on the left hand side of the middle section? Doesn't look like it features in the reworked design.

Terry.
 
That panel was for the drop down flap and drawer to clear the curtain and was a late addition when I made it :)

The drawing never got updated and I didn't bother changing it when I added the rework cladding. The front is staying as it is but the vertical long edges will be overlaid with the new strips... hopefully looking as if it was always like that.
 
Robert, out of curiosity, why is the middle section of your cabinet offset ?
 
RogerS":3kqlqa52 said:
Robert, out of curiosity, why is the middle section of your cabinet offset ?

The answer is 2 posts above yours :)

A full width drop down flap would have hit the curtain in its original use. Changing it back to drawing (full width) crossed my mind but its not worth the effort.
 
Deeping boards to yield 2 is always risky. Because the drying process draws moisture from the faces of the board there is likely to be a subtle moisture gradient where the centre of the retains a bit more moisture. Boards are therefore under a bit of tension and will move as dictated by grain direction when cut. The ideal situation is to start with boards that are close to a finished dimension. Sadly often not possible as timber is rarely available less than 1inch thick. It seems such a waste machining down a 1inch board to 12mm or whatever required, but often the only option.
 
I totally agree with Podengo on this. It does seem sacrilegious but thicknessing down equally on both sides is the only way IMO (to maintain one's sanity as well as straight boards). I had a long discussion with Peter Sefton on this and he is also of the same view.
 
I'd agree with you normally but for what I'm doing the curve is a irritation when machining but not a problem for the product.

A little more progress...

The router table wasn't giving me as clean an edge as I'd have liked so I switched to the table saw. I don't like not having a crown guard on so I made sure I could do it all with push sticks.
newstuff-107.jpg


coffee table leg to be. It will be 70mm square and look solid. Joint lines will be lost in corner chamfers. Might have to resort to a chisel scraped down the corner to complete the rebate. never noticed the slight unevenness I can see in the picture.
newstuff-108.jpg


Here's that tall unit again. It is still in about the same place but no recess for it now. In addition to screw heads on the side there are scallops out of the face frame where it was scribed around skirting.
newstuff-109.jpg


And this is the plan for covering the cut outs and the rest of the vertical face frame pieces.
newstuff-110.jpg


The face strip has the blue paint on the end. the large rebate will be glued to the face frame eventually.
newstuff-111.jpg
 
So I've been glueing up the legs. Been a bit of a slow process as it is cold in the workshop and the glue takes its time to dry.

I had some 60mm sq beech that used to be table legs. I machined 2 of them down to fit inside the leg section then cut them into pieces for top and bottom fillers. The top one gives me solid wood to make joints into.
newstuff-112.jpg


One of the long 'legs' for the AV unit in clamps.
newstuff-113.jpg


5 done and last one in the clamps. Can you spot the minor mistake? One foot plug is set in too deep. I had a small offcut of the beech so its sorted now. You can also see the remains of tenons in the filler piece on another one back from when it was a table leg :)
newstuff-114.jpg


One before and 4 after clean up. You can still see the join lines but once the corners are chamfered they will be hard to notice.
newstuff-115.jpg


Waiting on the last one to dry now so I can get them all cleaned up. I'm just running them through the planer to get a flat face and square side side then I'll thickness for the other 2 sides. Finished dimensions are not that critical really but they'll all be the same this way.
 
I made a groove for a panel in the post, top and bottom rails and back vertical rail and got then ready for gluing.
newstuff-117.jpg


When I did this construction before I made proper mortice and tenon joins on the top and bottom pieces connections. I've been a bit lazier this time and just used the groove for a shallow tenon like the panel.

Glued up
newstuff-116.jpg


And the first side assembly out of the clamps.
newstuff-118.jpg


I'm making it up as I go along which is dangerous but my workshop never got properly sorted after the building work and I've nowhere to put the computer back so I can refer to and complete the sketchup drawing as I go.

I've started on the bottom fixed shelf panel and have an idea for an internal top panel to help join the 2 sides together. I don't want a back on this AV unit.
 
There was a second tall cupboard that was not required so I'm cannibalising it for panels and in this case, doors. The doors were too wide so I've cut them down and will biscuit the rail back on.
newstuff-119.jpg


The bottom shelf is edged with oak and those oak pieces are tenoned into the sides. I cut a rebate into the top of each side with multitool and router and have inset a panel into the top where it is glued and screwed. The final top for the cuboard will be secured to this panel.
I glued some softwood blocks to the underside of the bottom shelf where they become feet, bracing to keep it rigid and mounts for runners for a plinth drawer. You can only see them from the back.
newstuff-120.jpg


Then I went for a drive to Beckton and Capital Crispin veneers. I was expecting to get a 10ft x 1'3" sheet of 1.5mm AWO veneer like last time I went but they only has narrower stuff. There was a bundle of 7 pieces 180mm x 1200mm and as I don't need long lengths I took them for what seemed a reasonable £15
newstuff-124.jpg


It was a bit of an Alladins cave in there with stacks of veneers everywhere including exotics and burrs. Kind of makes you want to make something just to use them.
 
So biscuits to join the door rail back on
newstuff-126.jpg


newstuff-127.jpg


And a test fit
newstuff-128.jpg


Then I made a drawer box for the plinth
newstuff-129.jpg


And I have the frame pieces for the table tops (coffee table and AV unit) prepared to 32mm x 90mm section.
newstuff-130.jpg


Should get round to putting veneer onto the panels for the middle of the tops tomorrow.
 
So the only thing to hand that was straight that i could use as a guide for planing the veneer edges was the back panel from the old bookshelf unit. I screwed a piece of shuttering ply to it as a surface to run the plane along. A piece of the thicker oak became the clamp bar.
newstuff-132.jpg


clamped for planing
newstuff-133.jpg


My very old plane and Veritas low angle are the only planes I have. I don't like hand tools but no alternative for this. there is a stupidly small side surface on the veritas but it does cut nice so I used it for the final cuts only.
newstuff-134.jpg


done.
newstuff-135.jpg


paper veneer tape on the face side. Masking tape on the reverse pulled off just before gluing.
newstuff-131.jpg


The smaller panel veneers taped before turning over for paper tape.
newstuff-136.jpg


I don't use a vacuum bag. This is a piece of damp course plastic. thick strong and cheap. You can see the 6mm nylon tube at the fold on the right. It has wet silicone around it and a small spring clamp to keep it there.
newstuff-137.jpg


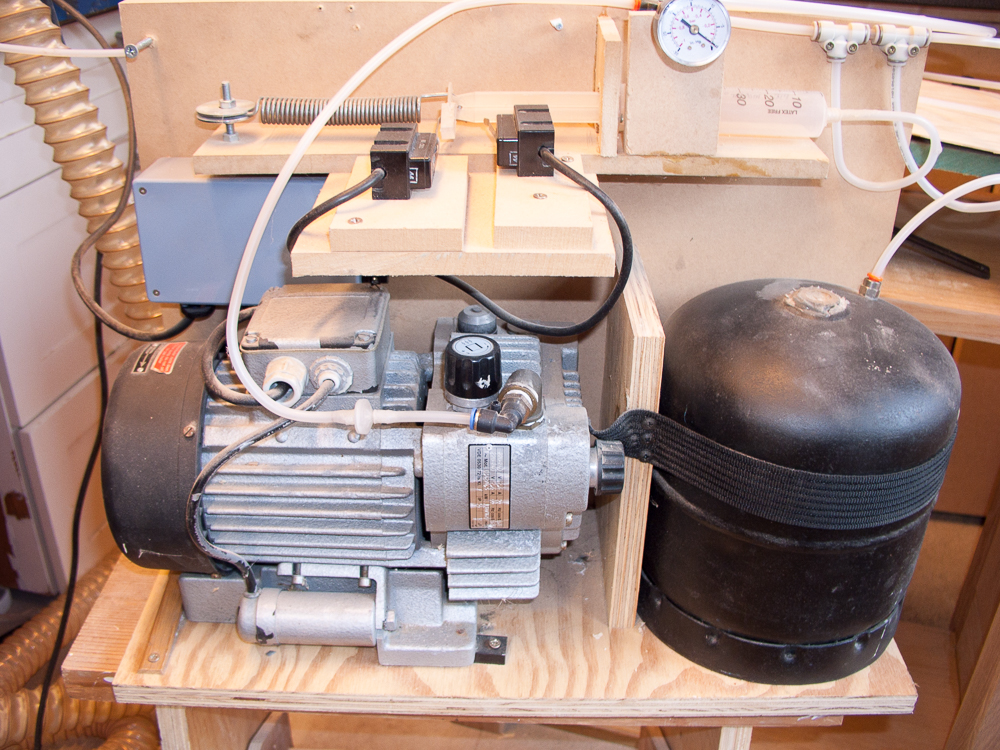
My vacuum pump with home made regulator and ex calor gas vacuum storage vessel.
newstuff-138.jpg


Glue applied then a quick bead of silicone round the outside
newstuff-139.jpg


Then turn the pump on and fold the plastic over. I had to squirt a bit more silicone in one of 2 places as the plastic was quite creased but once it seals the air pressure keeps it together.
newstuff-140.jpg


My regulator turns off the pump at -25 and turns it back on at -18. The pump is off for about 30 minutes and only on for 1 minute to restore the vacuum for another half hour.
newstuff-141.jpg


I gave the 10 minute PVA an hour then opened the plastic for a look and it didn't look completely set so I'm leaving it for another couple of hours so no after picture yet. The glue is new so I think its down to temperature that it is taking its time.
 
I veneered the larger panel for the coffee table and spread some varnish over it before trimming the veneer as I've found it is enough to stop the veneer splintering during cutting.
newstuff-142.jpg


And did the smaller panel for the AV unit
newstuff-143.jpg


Machined a tongue all round then glued on the end rails
newstuff-144.jpg


then trimmed them back and cut tenons to match the tongue on the panel. unlike me to use the tablesaw with no crownguard but it seemed the easiest way.
newstuff-145.jpg


groove routed in the side rails then glued. this is the small one. Larger one tomorrow
newstuff-146.jpg
 
Think the lack of replies may be something to do with me forgetting to pick up the camera. I seem to have been talking to myself for a while in this thread. Not that it bothers me really but it is interesting that it has had an effect.

Anyway after a bit of a gap some more pictures..

I hung the doors on the AV cabinet and stood the top on before it was trimmed and sanded.
newstuff-147.jpg


And the coffee table legs got generously glued. the pairs got joined together too but no pictures.
newstuff-149.jpg


The 2 items were ready for finishing so out comes the spray kit.
newstuff-151.jpg


behind the net curtain (which catches a lot of overspray) is my plate fan that extracts through the wall. A filter protects the fan from overspray. The backlight is essential for seeing how the spray coat is.
newstuff-155.jpg


All parts for the AV cabinet and coffee table have had one coat. Once it is dry I'll sand it back and do the second coat.
 
Robert

No replies certainly does not mean no interestfrom me, just I can't think of anything to say, given my lack of knowledge. Particularly interested in both the veneering and the spraying as I have not seen much in the way of discussion of that (maybe I don't look at the right boards).

One question though, what was it that you were spraying?

Terry.
 
Wizard9999":1ublz90b said:
Robert

One question though, what was it that you were spraying?

Terry.

Satin polyurethane floor varnish onto everything that was completed. I use Flag branded stuff from Toolstation. Thinned with just under 10% of white spirit it sprays well. It has lasted well on all the other items I have finished with it in the past. It doesn't store well though. Needs to be bought and used as some I've had for a year or maybe less has turned to jelly in the tin.

3 coats usually does it but might be 4 needed of table tops. The first coat is a grain filler and most gets sanded off. Sometimes the second coat needs sanding too if the grain in the wood has deep texture.

As to the comments thing, I've said exactly the same as you in the past. It's just interesting that the lack of replies, just to know someone is looking, does demotivate keeping the thread updated a bit. Makes me realise I should reply to others I've read a bit more often.
 
I'm following too Robert!

I must have a go at spraying sometime. SWBMO has "ordered" several items of furniture for our re-organised lounge so I will benefit from something more efficient than brush finishing.

Keep the faith Robert and continue the write up please.

Bob
 
It wasn't a concious decision to stop taking pictures as some sort of protest at no replies. It more kind of dawned on me why I'd not gone for the camera as often. I only posted those thoughts as a reminder to me and anyone else that replies are appreciated and you can't always leave them to someone else.... so I'll try and comment more on other threads when I can.

Anyway, encouragement received with thanks :)
 
Robert,
I too follow with interest far more than my responses might indicate. Many times I have prepared responses to threads only to delete them thinking they were too trivial or of no interest.
The thread count is a fair indication that people are watching.

Keep the faith.
 
Robert":1oghbo7i said:
Think the lack of replies may be something to do with me forgetting to pick up the camera. I seem to have been talking to myself for a while in this thread. Not that it bothers me really but it is interesting that it has had an effect.

Know the feeling. Start talking to myself. Not yet reached the point of answering or debating with myself! :lol:

Robert":1oghbo7i said:
And the coffee table legs got generously glued. the pairs got joined together too but no pictures.
newstuff-149.jpg

How long do you leave the glue like that and what do you use to scrape it off?

Cheers
Phil
 
I've been popping in although not made any comments yet. 8-)

I've wondered before, and like Phil writes, do you not remove the excess glue before its cured? I must admit, sometimes I don't, but this is mainly when I can't get to it until the clamps have been removed.
 
Phil":2bnmof9c said:
How long do you leave the glue like that and what do you use to scrape it off?

Cheers
Phil

It's supposed to be 30 minutes but it is so cold this time of year i leave it at least 4 hours and usually overnight.

And yes i did wipe the excess off with paper wipes before it was left to dry. Clean up afterwards was random orbit sander for the bits I could use it on and chisel/ scraper / mouse sander for the rest.

Everything has had 2 coats of polyurethane now. once it is touch dry I've had to bring things into the house for warmth to ensure the second coat will be hard enough to be de-nibbed in the morning ready for what should be the final coat. The smell in the house of drying oil based varnish has gone down well... not.
 
So I screwed the top in place and fitted the doors and drawer
newstuff-156.jpg


Inside I used some wire mesh shelving that used to be part of a garden run for our long deceased tortoise. Cut to length and sprayed black it does the job and gives the best possible ventilation.
newstuff-157.jpg


Plinth drawer
newstuff-158.jpg


there is another problem though :)
newstuff-159.jpg


Then I put the coffee table together. there is not much in the way of frame holding the 2 long sides together.
newstuff-160.jpg


So each corner has 2 fixings into the very solid tabletop
newstuff-161.jpg


Drawers for remote controls and junk fitted
newstuff-162.jpg


And the 2 items together.
newstuff-163.jpg


I've tidied some of the mess of wires but have to do some more to make it how I want it. The control side of things all works though. The Harmony ultimate remote radios to an IR emitter inside the cabinet to operate the things inside with the doors closed. Another slave IR emitter that you can see as a black dot on top of the cabinet broadcasts IR into the room to operate the TV.

Making side cladding for the tall unit next.
 
Nice units, I love oak. Cables are always a problem, I have used spiral wrap to good effect, it does take a lot of sorting to make it look neat.
 
Excellent wip Robert. Love your thriftyness with making those legs. Thanks for posting.
 
They look like stunning pieces of furniture. I do like the coffee table. :D
 
Very nice Robert. I was wondering about those drawers in the end of the coffee table but the last shot of it situ makes it obvious why.

Do you have a solution for all those cables?
 
Andyp":1alzwv4f said:
Very nice Robert. I was wondering about those drawers in the end of the coffee table but the last shot of it situ makes it obvious why.

Do you have a solution for all those cables?

Yes :) Drawers in the side would crash into your legs.

I'm going to make a cover/ shelf to go in the bottom. The excess wire and extension lead with plugs can be underneath it and the 3 small items (wireless access point+switch, IR blaster for the remote and the Intel NUC computer) can sit on top of it.
 
Back
Top