• Hi all and welcome to TheWoodHaven2 brought into the 21st Century, kicking and screaming! We all have Alasdair to thank for the vast bulk of the heavy lifting to get us here, no more so than me because he's taken away a huge burden of responsibility from my shoulders and brought us to this new shiny home, with all your previous content (hopefully) still intact! Please peruse and feed back. There is still plenty to do, like changing the colour scheme, adding the banner graphic, tweaking the odd setting here and there so I have added a new thread in the 'Technical Issues, Bugs and Feature Requests' forum for you to add any issues you find, any missing settings or just anything you'd like to see added/removed from the feature set that Xenforo offers. We will get to everything over the coming weeks so please be patient, but add anything at all to the thread I mention above and we promise to get to them over the next few days/weeks/months. In the meantime, please enjoy!

Woodstalker’s garage workshop.

woodstalker

Nordic Pine
Joined
Apr 16, 2016
Messages
629
Reaction score
33
Location
Amesbury, Wiltshire
I haven’t posted much for a while because I’ve been living in Cyprus for 18 months and I’m currently sat in Norway with work.

However I have finally got somewhere with sorting out my workshop situation by getting a small extension on the front of the garage. I have done none of the work myself so can’t take credit but I have been away so much that my free time has been spent with my daughter and wife rather than on my hobby.

I thought I’d try and post some pictures of progress.
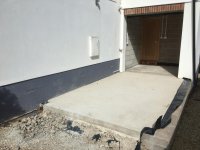
 
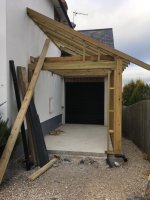
So here is the front of the existing garage. The back half has been incorporated into the house so the idea was to extend out to the front to give a reasonable space. The slab has been poured here so you can see the footprint. The half of the existing garage to be incorporated is about half the size of the slab so the slab is two thirds of the size of the final floor space if that makes sense?
 

Attachments

  • 090632B2-992E-487A-B844-CDEFBE413C06.jpeg
    090632B2-992E-487A-B844-CDEFBE413C06.jpeg
    306.3 KB · Views: 11,934
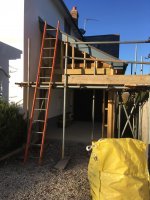
Wall frames up and roof started. Daughter for scale.
 

Attachments

  • D4F361A6-1BEC-432C-87CC-896C05AEF2B0.jpeg
    D4F361A6-1BEC-432C-87CC-896C05AEF2B0.jpeg
    104.9 KB · Views: 11,930
  • 17669BD8-03C4-4DE4-BC2B-05CA0AD2A054.jpeg
    17669BD8-03C4-4DE4-BC2B-05CA0AD2A054.jpeg
    96.7 KB · Views: 11,930
Roof on, walls wrapped and cladding started.
 

Attachments

  • 36A663E0-551B-4094-8A55-6629FED4BCCC.jpeg
    36A663E0-551B-4094-8A55-6629FED4BCCC.jpeg
    112.9 KB · Views: 11,929
  • C8AE1DC2-80C5-4443-8E99-ACCE7FA6A4A7.jpeg
    C8AE1DC2-80C5-4443-8E99-ACCE7FA6A4A7.jpeg
    194.2 KB · Views: 11,929
  • 95AC35C8-A384-458F-AC94-60BEE6648D72.jpeg
    95AC35C8-A384-458F-AC94-60BEE6648D72.jpeg
    98.1 KB · Views: 11,929
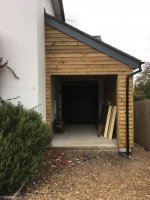
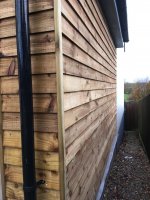
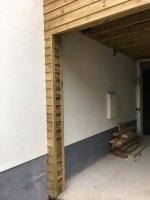
Where we are now. Clad and insulated. The plan is to reuse the electric roller door from the original garage and I’ll eventually put some wooden doors in front of that to improve the aesthetics. Currently I can’t enclose it due to the existing boiler glue coming into the garage space; we are going to move the boiler to the outside wall of the existing garage but the plumber we had lined up has not come back with a quote despite repeated attempts to chase him up so I’ll have to find someone else when I’m home again next week. Frustrating because the door could be moved by my builder but now I’ll have to wait.
 

Attachments

  • 72B1A476-E434-4064-887E-F3459C8B044D.jpeg
    72B1A476-E434-4064-887E-F3459C8B044D.jpeg
    117.7 KB · Views: 11,927
  • 2C70457C-409A-4632-A28B-BCC8C0D89790.jpeg
    2C70457C-409A-4632-A28B-BCC8C0D89790.jpeg
    135.7 KB · Views: 11,927
  • B19EABE5-8626-4F37-90AF-DC70B61D7994.jpeg
    B19EABE5-8626-4F37-90AF-DC70B61D7994.jpeg
    56.9 KB · Views: 11,927
  • A2AFF215-BD75-4281-9549-BC31E8D64D92.jpeg
    A2AFF215-BD75-4281-9549-BC31E8D64D92.jpeg
    69.9 KB · Views: 11,927
marineboy":2ceg94hk said:
Are you still using your CH boiler? If so is the position of the terminal a problem pending your plumber moving it?

Yes, you can just see the flue in the last couple of pictures top left of the garage door at the back sticking out of the wall. The boiler was supposed to be moved a month ago but as I said we’ve been let down so can’t close up the front yet. The boiler needs to be moved into the existing garage onto the external wall and the flue to come out there.
 
Yes, I understand where it is but I would guess that it doesn’t conform with building regs due to its proximity to the new ceiling. I don’t know whether it’s permissible to have such a situation if it is only temporary, as in your case.

The build looks very nice, btw.
 
marineboy":22h19s6c said:
Yes, I understand where it is but I would guess that it doesn’t conform with building regs due to its proximity to the new ceiling. I don’t know whether it’s permissible to have such a situation if it is only temporary, as in your case.

The build looks very nice, btw.

No it can’t stay where it is because it would be venting into an enclosed garage. It will be moved as soon as I can.
 
Yes, I know that is your intention, but even in the short term I would worry that the position of the terminal could cause problems, eg discharge of heat so close to your new joists (regs specify it must be at least 300mm below eaves) and dangerous gases within a semi enclosed space. I don’t wish to be a killjoy and I appreciate your scheduling issue but there are safety risks as well as the chance of a passing building inspector sticking his neb in.
 
Afternoon Woodstalker

Do the reg's allow you to extend the flue and run it up through the new roof?

Cheers

Dave
 
Deejay":rn2mt5ky said:
Afternoon Woodstalker

Do the reg's allow you to extend the flue and run it up through the new roof?

Cheers

Dave

A horizontal flue run straight across and out through the new extended garage wall would be the easiest solution. Prefer coming out of a wall then through the roof and making it weather tight. Certainly the length of run would be well within the regs if the boiler is indeed just the other side of the wall. (obviously there are regs on the length and the number of bends, and I believe now also any joints need to be accessible for inspection)

Got to be so much easier than moving the boiler and all the associated pipe work !!
 
Hi all, thanks for the feedback and advice. As I mentioned the garage door won’t be moved until the boiler situation is sorted.

The boiler has to move because of some internal works we are planning on the kitchen in the future so we want to move if now rather than extend the flue and have to make good the resulting holes.

It should have been moved already but we have been let down. It happens again and again with tradesmen coming to look at the job and never coming back to you so you waste weeks waiting for a quote before starting the process again with a new tradesman. Very frustrating. If they just said they didn’t want or couldn’t do the job then no worries I can look elsewhere. It’s the leaving me hanging that I hate.

As for the building inspector; not sure what he would say other than “that flue will have to move” and that’s what I’m doing.

Glad you like the space, I had planning for a bigger workshop in the garden but it appears that area is now a play area so don’t fancy my chances battling with my daughter. This should suit my meagre needs until I get bit better and get a bit more time...
 
So the boiler is now being moved and should be complete this week. I can start moving my tools and kit up from my temporary space. Does anyone have any suggestions about what I could put down as a floor covering? It’s bare concrete at the minute and I was hoping for something inexpensive but easy on the feet and legs :)

Maybe some foam tiles, if so does anyone have a cheap source?
 
My workshop floor consists of dpm 25mm tiling battens at 400mm centres as mini joists, 25 mm foam insulation and 18 mm ply on top. 2 coats water based pu varnish. I find it comfortable to stand on and yet strong enough for largish machines.
It's been done 9 years now and the varnish has worn in some places but generally acceptable.
Bob
 
My floor is concrete covered, where I can put it and definitely where I stand, the rubber/foam
Children’s interlocking floor mats.
My daughter gave me a load of them and I put them around my machines etc, they are very easy to cut to shape if necessary.

Rod
 
Cheers Bob & Rod,

Bob The slab has a DPM under it. I was thinking something like the child’s play area interlocking tiles just straight over the concrete but I was a bit concerned about durability. Have you had any problems with them Rod?
 
My bench, Table Saw, lathe and BS are pretty static so I’ve just laid the matting around them.
Other things on wheels have not caused any damage and the mats have been down for more than 5yrs.

Rod
 
So the boiler is now moved and i have bought some rubber gym matts from Amazon that seem pretty good; they are just settling in a stack in the garage now after being unrolled.

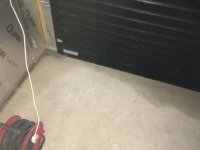
The garage door has been moved but i have a slight problem with water ingress. The water is pooling on the lip of the concrete slag at the door and there must be a slight slope and it is coming back under the door.

I was thinking of options:

1. I could try and grind/sand a slight profile on the concrete to make the water fall away; could a coarse belt sander do this?
2. I could purchase a pre-made rubber 'ramp' that meets the 12mm rubber floor i'm putting in; i could stick it down and seal the edges to create the fall.
3. I could fix some sort of weather strip into the concrete just in front of the door?

Has anyone got any other suggestions or advice?

Thanks

Woodstalker
 

Attachments

  • IMG_8769.JPG
    IMG_8769.JPG
    277.6 KB · Views: 11,386
  • IMG_8770.JPG
    IMG_8770.JPG
    579.7 KB · Views: 11,386
I had an issue with one of my doors that was not pooling but was the wind blowing the drips backwards from the rip bar under the door. It only occurred with certain direction winds, other times the rain dripped off and down the slope of the threshold.
 
Malc2098":o3ut2aft said:
I had an issue with one of my doors that was not pooling but was the wind blowing the drips backwards from the rip bar under the door. It only occurred with certain direction winds, other times the rain dripped off and down the slope of the threshold.

Hi Malc,

How did you fix it?

Woodstalker
 
woodstalker":1zddrab6 said:
Malc2098":1zddrab6 said:
I had an issue with one of my doors that was not pooling but was the wind blowing the drips backwards from the rip bar under the door. It only occurred with certain direction winds, other times the rain dripped off and down the slope of the threshold.

Hi Malc,

How did you fix it?

Woodstalker

Hi Woody,

I haven't yet. The other doors 90 degrees different don't get so much wind in that direction and after I sealed the whole door frame, threshold etc and angled the threshold down like you get on commercially bought door frames, that one hasn't blown under.

The other one, I've yet to fully seal all around the door and frame, but some winds blow it under, so I would say a drip bar with a good size groove so the normal drips get heavy and fall onto the angle threshold. Then I've got to find a seal for the bottom of the door, some sort of rubber insert, if I want to maintain the level of the threshold and stop the drips that get blown in.
 
Back when I had a factory there was a roller shutter door that closed onto flat concrete. When it rained the rain would run down it and soak inside under it. We stuck some EPDM closed cell foam gasket to the underside of the shutter edge. It kept most of the water outside. What still came in wasn't enough to worry about.

your suggestions..
1 Grinding concrete is no fun and will look crude even if you could. Guess you could grind some drainage grooves if the floor puddles at the shutter
2 if your rubber floor is closed cell maybe cut it up to the shutter base and silicone it down so it makes a water barrier. Could test the idea with offcut strips first.
3 if water is running down the door the strip would be better inside the door as on the outside it guide the water in and under.

Good luck.
 
I found a rubber strip that is glued to the slab and lines up with the door. I went the entire width of the wall with the garage door opening tucking it under the DPC the wall is sat on so water flows back out under the wall if it gets in.
 

Attachments

  • IMG_8781.JPG
    IMG_8781.JPG
    283.1 KB · Views: 3,985
Ended up buying these floor matts designed for the gym:

https://www.amazon.co.uk/gp/product/B00E0MF2RU/ref=oh_aui_detailpage_o09_s00?ie=UTF8&psc=1

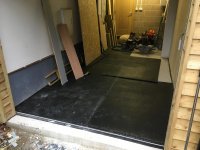
12mm thick rubber matts, i cut them to fit and they look and feel pretty good I think:

IMG_8844.JPG

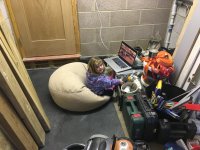
Was supervised throughout the fitting process although my supervisor was a little distracted by the Christmas Movies available on demand!

IMG_8845.JPG

Just waiting for the BCO to sign it off now.

Managed to purchase a Workshop Extractor from eBay today too so pretty happy with that. I just need to keep Mrs Woodstalker from filling it with her stuff now, it has a door from the house so it is way too easy for her to find her way in. :D
 
Back
Top