• Hi all and welcome to TheWoodHaven2 brought into the 21st Century, kicking and screaming! We all have Alasdair to thank for the vast bulk of the heavy lifting to get us here, no more so than me because he's taken away a huge burden of responsibility from my shoulders and brought us to this new shiny home, with all your previous content (hopefully) still intact! Please peruse and feed back. There is still plenty to do, like changing the colour scheme, adding the banner graphic, tweaking the odd setting here and there so I have added a new thread in the 'Technical Issues, Bugs and Feature Requests' forum for you to add any issues you find, any missing settings or just anything you'd like to see added/removed from the feature set that Xenforo offers. We will get to everything over the coming weeks so please be patient, but add anything at all to the thread I mention above and we promise to get to them over the next few days/weeks/months. In the meantime, please enjoy!

Work in Progress: brass and walnut try square for travel chest

SteveMP

New Shoots
Joined
Jun 18, 2026
Messages
199
Reaction score
232
Name
Steve
LOCATION
San Diego
Yeah I know, the travel chest is only partway built and already getting sidetracked. But i went to the metal store to get some bits and bobs of metal for the chest like planing stops etc. and found a cheap piece of brass in the “artist’s scrap bins”. So decided i wanted to try making a wood and brass try square. I had previously made an all wooden roubo style one.

Cut out the piece of brass thanks to help in my other theead on how to cut it. Then found a scrap of walnut in my scrap bin. Cut to length and the shot square.


IMG_2261.jpeg

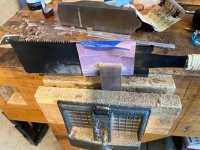
Marked out lines for kerf in center and then used a ryoba to cut, flipping over and using the triangle technique to keep it straight.
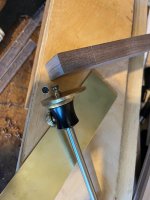


IMG_2262.jpegIMG_2263.jpeg
 
After kerf was cut, folded some sandpaper to smooth it out and open it a tad.
IMG_2265.jpeg

Then did the old sandpaper ryoba trick to keep the kerf flat and straight and open it up a bit more until the brass would not pry open the kerf.


IMG_2266.jpeg
 
already getting sidetracked

It sounds like you're just like me: starting one project and then starting another three before the first one's finished! I'm going to be a terror once I eventually get a bigger workshop and having multiple projects on the go gets even easier :LOL:

Looks like it'll be an interesting project.
 
It sounds like you're just like me: starting one project and then starting another three before the first one's finished! I'm going to be a terror once I eventually get a bigger workshop and having multiple projects on the go gets even easier :LOL:

Looks like it'll be an interesting project.
well, yeah then you add in my wife's honey-do list and its even more stuff. And anything she sees on Pinterest she assumes that I can do, so now needing to figure out a timber-framed sort of pergola for some outdoor lighting too!
 
Sanded kerf enough to where the brass is not wedging, dry fit: i still have a lot to do, as i want to chamfer all the edges of the stock. And my good friend has my drill press (he makes battery packs for parking meters and has to drill lots of holes), so need to find a time to take this over to his house to drill the holes for the pins or see if he is done with it.


IMG_2267.jpeg
 
Looking good but if you want to get really sidetracked, now could be the perfect time to look into how to cut the traditional decorative shapes into the stock, to fit decorative surrounds to rivets that secure the stock.

First, you'll need to make yourself a passer drill... 😏
 
Looking good but if you want to get really sidetracked, now could be the perfect time to look into how to cut the traditional decorative shapes into the stock, to fit decorative surrounds to rivets that secure the stock.

First, you'll need to make yourself a passer drill... 😏
I did that on my roubo wooden one from Chris Schwarz plans. This one i am going for a simple design, loosely based on the Seaton chest square but with a brass blade instead of tapered wood, and without the complex joinery.

 
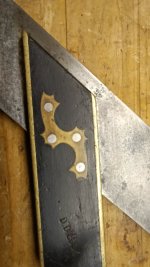
No, I mean the cut-out to fit a fancy bit of brass, as seen here:

IMG_20260901_193334474.jpg

Ok, that's on a mitre square but that's because it's the only fancy one I have. A passer drill was a production tool to rout out that sort of shape, by muscle power, quickly and precisely.

There's a good explanation here

 
No, I mean the cut-out to fit a fancy bit of brass, as seen here:

View attachment 58056

Ok, that's on a mitre square but that's because it's the only fancy one I have. A passer drill was a production tool to rout out that sort of shape, by muscle power, quickly and precisely.
Oh geez, that is WAY beyond my skillset lol. Never heard of a passer drill, would have to look it up. I have seen those french saws for marquetry in wood, i forget the name, like chaveliet or something like that.

Found this demo of a passer drill. I still don't quite understand how it works...
 
I thought you'd like it!

I think it works because of the relationship between the holes in the template and the twin tips of the tool, sprung apart. One tip will be against an edge of the hole and the other will be cutting arcs across the opening.

I hope that makes sense, it's easier to imagine than it is to describe!
 
I thought you'd like it!

I think it works because of the relationship between the holes in the template and the twin tips of the tool, sprung apart. One tip will be against an edge of the hole and the other will be cutting arcs across the opening.

I hope that makes sense, it's easier to imagine than it is to describe!
Yeah, kind of makes sense that way. I could probably do a square plate, which i've never actually seen before. I have seen ones that have for example 3 or 4 diamond shaped separate inserts, that could be doable but a time sink for me.
 
I was joking really... I think it's probably a fairly challenging bit of blacksmith work to get the tips the right shape and hardness, and the middle bit just springy enough. There aren't very many originals to borrow for copying!
 
I wonder if after managing to make the business end it could be put into a battery drill? Or is that sacrilegious lol.
Ian
Oh man, that would be like duct taping a chisel to a reciprocating saw lol
 
Back
Top