Phil
Old Oak
Xmas Trees - Take 2
I found a picture on the web (maybe Pinter…..) which looked good and doable.
I hauled out my small drawing board and did some old fashioned drawings, the base a length of 130mm and then the first ‘branch’ 125mm and sloping up to the top star piece.
The base for the one of the other, smaller tree was used, right size, 130mm.
http://www.thewoodhaven2.co.uk/viewtopic.php?f=25&t=6791
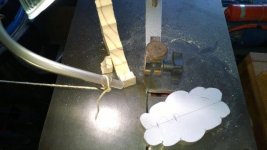
The central axis on which it all will fit and revolve is a 3mm bamboo kebab skewer.

The stock is the old slats from the Weber shelves that I replaced last year.
http://www.thewoodhaven2.co.uk/viewtopic.php?f=19&t=4689&p=71048&hilit=weber#p71048
As I still had the old planer knives in, I did not think twice about shoving them through the machine.
Thicknessed down to 15mm and the width down to 38mm.
It is a very ‘white’ timber with very fine straight grain. (The Weber contact said it could be American Red Wood?)
I needed to cut each one down the middle, +- 19mm
Not having a bandsaw, I then improvised.
Clamp a straight edge onto the large Hegner table and whoopee - a very-mini bandsaw!
[Fence1]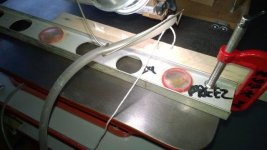
[Fence2]
Cut a couple of pieces. The small thin #12 blade tended to drift a bit (to be expected), so not all cut pieces were 19mm in width.
There was a very close call: using my fingers as hold-down and push sticks.
http://www.thewoodhaven2.co.uk/viewtopic.php?f=30&t=6756
The finger is just about recovered.
Again back to the Hegner, without the fence, cut the various lengths required for the tree, 125mm, 105mm, 88mm, 70mm, 55mm, 37mm and left the top block till I could draw a star.
Each piece then had 5mm cut off each end to give the slope
Each piece then had a 3.5mm hole drilled in the middle for the skewer.
The star would get a 3.5mm hole deepened with a 2mm - the top of the skewer is a point which would then be a good fit.
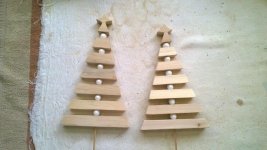
The finish was one coat of Wooddoc 5 (really going to have to ditch the tin as it is getting thick! Will get the last bit out that I can)
Final sanding of 1000 grit
No picture of the star, same timber, painted white.
Assembly:
Glue the star onto skewer
1 - 10mm round bead
First 37mm
10mm Bead
Repeat till all the pieces are skewered and beaded.

Final Quality Check:
Check that all the pieces can easily move, skewers not consistent thickness. Re-drill hole if required.
Final finished trees will be posted.
Thank you for reading
Phil
I found a picture on the web (maybe Pinter…..) which looked good and doable.
I hauled out my small drawing board and did some old fashioned drawings, the base a length of 130mm and then the first ‘branch’ 125mm and sloping up to the top star piece.
The base for the one of the other, smaller tree was used, right size, 130mm.
http://www.thewoodhaven2.co.uk/viewtopic.php?f=25&t=6791
The central axis on which it all will fit and revolve is a 3mm bamboo kebab skewer.
The stock is the old slats from the Weber shelves that I replaced last year.
http://www.thewoodhaven2.co.uk/viewtopic.php?f=19&t=4689&p=71048&hilit=weber#p71048
As I still had the old planer knives in, I did not think twice about shoving them through the machine.
Thicknessed down to 15mm and the width down to 38mm.
It is a very ‘white’ timber with very fine straight grain. (The Weber contact said it could be American Red Wood?)
I needed to cut each one down the middle, +- 19mm
Not having a bandsaw, I then improvised.
Clamp a straight edge onto the large Hegner table and whoopee - a very-mini bandsaw!
[Fence1]
[Fence2]
Cut a couple of pieces. The small thin #12 blade tended to drift a bit (to be expected), so not all cut pieces were 19mm in width.
There was a very close call: using my fingers as hold-down and push sticks.
http://www.thewoodhaven2.co.uk/viewtopic.php?f=30&t=6756
The finger is just about recovered.
Again back to the Hegner, without the fence, cut the various lengths required for the tree, 125mm, 105mm, 88mm, 70mm, 55mm, 37mm and left the top block till I could draw a star.
Each piece then had 5mm cut off each end to give the slope
Each piece then had a 3.5mm hole drilled in the middle for the skewer.
The star would get a 3.5mm hole deepened with a 2mm - the top of the skewer is a point which would then be a good fit.
The finish was one coat of Wooddoc 5 (really going to have to ditch the tin as it is getting thick! Will get the last bit out that I can)
Final sanding of 1000 grit
No picture of the star, same timber, painted white.
Assembly:
Glue the star onto skewer
1 - 10mm round bead
First 37mm
10mm Bead
Repeat till all the pieces are skewered and beaded.
Final Quality Check:
Check that all the pieces can easily move, skewers not consistent thickness. Re-drill hole if required.
Final finished trees will be posted.
Thank you for reading
Phil


 )
)