• Hi all and welcome to TheWoodHaven2 brought into the 21st Century, kicking and screaming! We all have Alasdair to thank for the vast bulk of the heavy lifting to get us here, no more so than me because he's taken away a huge burden of responsibility from my shoulders and brought us to this new shiny home, with all your previous content (hopefully) still intact! Please peruse and feed back. There is still plenty to do, like changing the colour scheme, adding the banner graphic, tweaking the odd setting here and there so I have added a new thread in the 'Technical Issues, Bugs and Feature Requests' forum for you to add any issues you find, any missing settings or just anything you'd like to see added/removed from the feature set that Xenforo offers. We will get to everything over the coming weeks so please be patient, but add anything at all to the thread I mention above and we promise to get to them over the next few days/weeks/months. In the meantime, please enjoy!

Two layers of floorboards?

Windows

Old Oak
Joined
Jan 25, 2022
Messages
1,433
Reaction score
433
Location
Cumbria & West Kent
A MANUAL OF CARPENTRY AND JOINERY
by J. W. RILEY (1905)

p. 210

“Floors are frequently laid with two thicknesses of boards, the lower one consisting of rough boards about 1" thick. The top layer may be conveniently left until the plastering is finished and the building fairly dry, there is then less liability of the finished floor surface being affected by dampness.”

Anyone seen two layers of floorboards in use in old properties?
 
I have worked on a few old upmarket houses in Cheshire over the years and never seen double floor boards. It may have been a regional or local thing.
 
Also on p 212: “When two thicknesses of boards are used, the lower layer can be laid and used as the floor, and the upper layer need not be laid until the building is dry and the plasterers' work is finished. With this class of floor the square-edged joints are generally used. With floors laid with only one thickness of boards, the tongued and grooved joint is to be preferred.”

The author was a teacher at a technical school in Rochdale.
 
Does the author say if the two layers are parallel, or is the upper layer at 90 degrees to the lower layer?
 
Does the author say if the two layers are parallel, or is the upper layer at 90 degrees to the lower layer?
Not that I’ve seen. I think this is the only other mention
“Floor cramps are used for cramping the joints of floor boards together when being laid in position. Many different types are obtainable, especially for use with single layers of boards. Figs. 221 and 224 are types which clip the joist when being used. For the upper layer of a double-boarded floor, iron dogs are often driven over the middle of joists into the floor previously laid; and the floor boards are forced into position by folding wedges of hard wood bearing against the edges and the dogs.”
 
Not that I’ve seen. I think this is the only other mention
“Floor cramps are used for cramping the joints of floor boards together when being laid in position. Many different types are obtainable, especially for use with single layers of boards. Figs. 221 and 224 are types which clip the joist when being used. For the upper layer of a double-boarded floor, iron dogs are often driven over the middle of joists into the floor previously laid; and the floor boards are forced into position by folding wedges of hard wood bearing against the edges and the dogs.”
Sounds counterintuitive as surely the extra strength and stability by laying at 90° would be beneficial ?
Cheers, Andy
 
For the upper layer of a double-boarded floor, iron dogs are often driven over the middle of joists into the floor previously laid; and the floor boards are forced into position by folding wedges of hard wood bearing against the edges and the dogs.
That's both interesting and confusing. As a teenager in the 1970s I worked Saturdays and holidays for my grandfather, who was a builder. We used large heavy iron devices called dogs to force floorboards tightly together before they were nailed to the joists, but I don't remember wooden wedges being involved. These dogs clamped onto the joists and then swivelled about the clamping points to push the boards together and close the tongue & groove joints. These dogs could not have been used on top of a lower layer of floorboards because they required access to the joists. So the author must refer to some other tools also called dogs and used for the same purpose as the devices I used.
 
One of our old cafés had a wood floor that was worn away by the clogs of the customers, I’m sure that there were three layers of boards put down over 150 years, but can’t remember if they were put down at right angles or not, but obviously this isn’t what Windows is referring to.
 
Yes, I have seen it a couple of times. We lived for a short while in a very old house called Mare Pond House in Surrey. It was originally a smallish hall house that was converted into a larger house in the early C18th. Most of the ground floor was sandstone slabs and in certain areas brick laid directly onto sand. The upper rooms were largely added later and they used pitch pine laid at right angles onto joists (exposed from below) and painted the underneath with milk paint or something like that in patterns, (ie the ceiling of the room below), laid some kind of rough cloth on top of that pitch pine which was tucked up round the edges (looked like old sail cloth to me) and then cross laid wide oak boards on top and nailed them down. No T&G. We didn't live there for long as I found I could not tolerate the low beams everywhere. 🤕

We also bought a development property near East Grinstead that had been a manor house. GII. In the rooms originally designed to be impressive, they had softwood boards laid, and then parquet on top of that. It may have been a common method for parquet - I don't know, but they used a lot of tar. We only found out because we had to remove a wall and it was really difficult to patch.
 
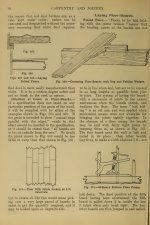
I found this in Carpentry and Joinery by Paul Hasluck, published around the same time as Riley, which might help.

This page has a picture (Fig 369) of using joiner's dogs and wedges to get the boards snug together:

CJp88.jpg


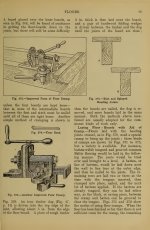
There's a diagram (Fig 371) of a mechanical floor board cramp, which grips a joist, at the bottom of that page and engravings of two types on the next page:

CJp89.jpg

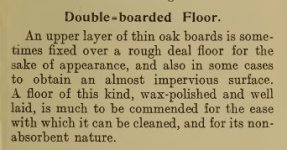
But this is all it says about having two layers of boards:
CJp91.jpg
I expect Trevanion will have something else in his extensive library of old carpentry and joinery books.
 
Anyone seen two layers of floorboards in use in old properties?
Yes, quite frequently. It is particularly common in mill buildings, warehouses and (some) large public buildings (e.g. libraries and large theatres) where heavy floor loadings are to be expected. On occasions I have come across THREE layer floors, but those are more often the result of extra strengthening being put in at a later date to counteract wear IMHO. The accepted approach is that each layer is installed at right angles to the previous layer - doing otherwise would reduce the stiffness and strength of the floor and might well result in cupping, gaps opening up being transmitted through to the layer above. Sometimes if a decorative finished floor (e.g. non-structural figured oak planking) the finished flooring might be installed running in the same direction as the planks below, but that can be risky as the aforementioned cupping or shrinkage of the under layer can telegraph through to the surface

In large houses and lesser public buildings it is more common (in my experience) to find "double floors" where a floor is traversed at 8 to 10 foot spaced large section "primary beams" (say 12 x 8in) which in turn are connected by joists housed at the ends into the primary beams on 16in (approx) centres. We often refer to these as "cogged" joints. These joists can be in the order of 6 to 8in wide x 3in thick.

When laying the first layer of floor planking it is a lot easier to use flooring cramps which attach to the joists and pull up gaps easily. The second layer requires the use of dogs and folding wedges, because flooring cramps can obviously no longer work. The dogs are driven into the lower layer of floor at the joists (indicated by the nails) then spiked into one half of a pair of folding wedges (not quite what Hasluck says but then he wasn't a carpenter. Folding wedges are used with two hammers to pull the planks up tight u til you nail them. It doesn't matter that you mar the lower boards because they all get covered over. Prior to these mechanical contrivances being invented I have no doubt that even single skin floor boards would have been pulled tight using the dog and folding wedge method. I have occasionally come across lost or discarded dogs beneath floors.

Interesting what Riley has to say on the subject. His college in Rochdale was about 100 yards away from Rochdale Town Hall which despite being such a grand building has relatively few double skin floors (from having worked on it), although it has more than its' fair share of flagged floors (including upstairs on public corridors). They involve a different installation technique

What I've found in a lot of Victorian large houses and public buildings is pugging beneath planked floors. Pugging is a mixture of lime mortar, half bricks, building rubble, etc which is poured into the gaps between joists to improve sound proofing and insulation. Installation involves nailing 2 x 1in laths to the sides of the floor joists several inches below the tops of the joists. Odd pieces of timber are then cut and laid between the laths to form a platform onto which the pugging is shovelled. Removing this stuff after 100 or more years when you need to reroute a pipe or soil stack isn't the most pleasant of tasks!

Incidentally you see this progression from the 1860s to 1920s through the types of nails used - wrought nails, to cut nails, to French (round) nails and finally ovals. You never know what you'll find when the carpet comes up
 
Last edited:
^^ Very interesting post. It's good to have someone with this knowledge on here.
 
^^ Very interesting post. It's good to have someone with this knowledge on here.
Agreed. Interesting to have some of the advanced construction details confirmed from actual experience.

I've been shown round the restored Rochdale Town Hall and can confirm what an impressive place it is.
 
I've been shown round the restored Rochdale Town Hall and can confirm what an impressive place it is.
Yes, it's a fascinating building. I was told that the interiors were supplied by the same firm August Pugin used to furnish the Houses of Parliament. If you ever go again ask one of the guides to show you one of the spiral staircases (there are two, one at either end of the building). They have stained glass windows and are well worth seeing now that the glass has been cleaned, but sadly they aren't normally accessible to the public due to them being relatively steep.
 
That’s really interesting. Thanks everyone. Sounds like it’s more common in large buildings and not so common in houses built for the middle classes then?

I just came across the word “pugging” for the first time today in Carpentry & Joinery in the section on sound proofing where it refers to “slag wool”. I guess we call this mineral wool or rock wool today.
 
I just came across the word “pugging” for the first time today in Carpentry & Joinery in the section on sound proofing where it refers to “slag wool”. I guess we call this mineral wool or rock wool today.
The Victorian pugging I mostly see in Lancashire and Yorkshire really is a mixture of lime mortar, masonry waste and in some cases readily available cinder ash from the ubiquitous coal fires of the era. "Slag" is the term used for waste from a process, e.g..colliery slag heaps (non-combustible waste), steel slag (mixture of calcium carbonate and impurities from steel making), and the like. "Wool" seems to have been used to describe a variety of insulating materials other than the sheep variety, e.g. "wood wool" which is a jumble of narrow wood shaving balled up and used to pack (insulate from damage?) tools, equipment, etc in packing cases and boxes during transit. Nothing like mineral wool or Rockwool, however.

When we dig the stuff out these days it is necessary to vacuum out the floor, replace the timbers and reinstate the soundproofing using tightly fitted mineral wool batting (e.g.Rockwool or Earthwool batting). Batting is denser than mineral wool roll and provides better sound/heat insulation. Can't recall seeing it before the 1980s, when it started to displace fibre glass insulation
 
When laying the first layer of floor planking it is a lot easier to use flooring cramps which attach to the joists and pull up gaps easily.
Ah, that is interesting and maybe solves a mystery for me. I posted above about how my grandfather's flooring dogs could not be used for the second layer as described in the text. This would make sense if the items you call "flooring cramps" are what my grandfather called "dogs". I have to say that your terms make more sense to me than my grandfather's. It could have been a regional difference in terminology I suppose but it sounds more like my grandfather was wrong. Possibly he started using dogs then changed to flooring cramps but didn't update his vocabulary.
 
The project i am involved in at present in the North East of Scotland has involved removing an early 1900s skittles alley, the ball pit in the alley has been built with a double layer floor the first layer being 1 1/2" thick T&G pine laid onto 6" x 1 1/4" (on edge) which has been set full depth into concrete with the 1" thick upper or finished layer being laid in the same grain direction as the lower layer with just the T&G joints staggered both layers nailed with cut nails. The best guess that we have had on this is to absorb some of the energy from the lignum bowling balls and skittles.
 
Last edited:
The project i am involved in at present in teh North East of Scotland has invlved removing an early 1900s skittles alley, the ball pit in teh alley has been built with a double layer floor the first layer being 1 1/2" thick T&G pine laid onto 6" x 1 1/4" (on edge) which has been set full depth into concrete with the 1" thick upper or finished layer being laid in the same grain direction as the lower layer with just the T&G joints staggered both layers nailed with cut nails. The best guess that we have had on thsi is to absorb some of the energy from the lignum bowling balls and skittles.
Now that's a specialist bit of woodworking I've never seen described in a book!
I wonder how modern bowling alleys are constructed?
 
The project i am involved in at present in teh North East of Scotland has invlved removing an early 1900s skittles alley, the ball pit in teh alley has been built with a double layer floor the first layer being 1 1/2" thick T&G pine laid onto 6" x 1 1/4" (on edge) which has been set full depth into concrete with the 1" thick upper or finished layer being laid in the same grain direction as the lower layer with just the T&G joints staggered both layers nailed with cut nails. The best guess that we have had on thsi is to absorb some of the energy from the lignum bowling balls and skittles.
I think you've hit the exception which proved the rule, there! Bowling alleys obviously need to have the grain running length ways. They always seem to have masses of nails and loads of glue to stop them moving too much, as well as being made from very narrow strips for stability, so they end up more akin to a piece of glue laminated joinery than a suspended floor (which we very rarely glue). They are also narrow, which makes it easier to cramp them up firmly whilst the glue sets, I imagine.Top layer often seems to be a very hard close pored timber such as maple. Is yours? I tried ripping one out to recycle the top layer (rock maple) many years ago and had to admit defeat after wrecking 4 or 5 saw blades on the job. So much for free timber!

Not seen a modern one being installed (have any been installed since the 1970s in the UK?), but I know the old ones were hand planed/scraped, which is what those big stand up scrapers like the Stanley #74 were for. There were also floor planes like the Stanley #11-1/2 which you use on your knees, looking for all the world like a washer woman. These days you'd use a floor sander
 
Now that's a specialist bit of woodworking I've never seen described in a book!
I wonder how modern bowling alleys are constructed?
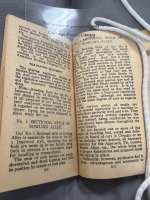
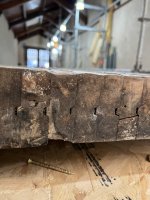
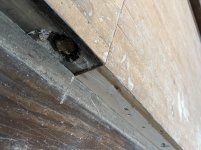
Turns out I can help you with that, after some back and forth with the Library of Congress and subsequently the specials collections unit at Chicago Public Library I managed to get hold of this, its and excerpt from the catalogue of Brunswick Baulke and Collandar from around 1900 (when this alley was made) it describes the timbers and manufacturing process, ours is a Number 2 Sectional Alley which I have lifted along with conservators and it is now in their workshop for a full conservation restoration.

IMG_4488.jpgIMG_4490.jpg
 
I think you've hit the exception which proved the rule, there! Bowling alleys obviously need to have the grain running length ways. They always seem to have masses of nails and loads of glue to stop them moving too much, as well as being made from very narrow strips for stability, so they end up more akin to a piece of glue laminated joinery than a suspended floor (which we very rarely glue). They are also narrow, which makes it easier to cramp them up firmly whilst the glue sets, I imagine.Top layer often seems to be a very hard close pored timber such as maple. Is yours? I tried ripping one out to recycle the top layer (rock maple) many years ago and had to admit defeat after wrecking 4 or 5 saw blades on the job. So much for free timber!

Not seen a modern one being installed (have any been installed since the 1970s in the UK?), but I know the old ones were hand planed/scraped, which is what those big stand up scrapers like the Stanley #74 were for. There were also floor planes like the Stanley #11-1/2 which you use on your knees, looking for all the world like a washer woman. These days you'd use a floor sander
Yes ours is maple but the sections are not glued rather they are held together with nails and through bolts running the width of the lane at around 40" centres.
IMG_0973.jpgSkittles alley 3.jpg
 
Yes ours is maple but the sections are not glued rather they are held together with nails and through bolts running the width of the lane at around 40" centres.
Same sort of general effect - the floor becomes a rigid element. Interesting that the top skin components are machined with a tongue and groove presumably to limit movement and increase stiffness :View attachment 29403
 
the lanes are in 3 sections each around 1100mm wide and approx 6.0m long we estimated the weight to be around teh 400Kg per slab and each one fixed down the edges and middle of the lanes at 24" centres with what looked like 4 1/2" No14 steel screws which were counterbored and plugged with 1/2" maple plugs. oh and they were all rusted solid into the wood below.
 
oh and they were all rusted solid into the wood below.
That sort of goes with the territory on old buildings/joinery, I'm afraid. This side of the pond we often replace with modern BZP 6mm or 8mm wood screws or coach screws (Pozìdriv or Torx socket heads), at least where they aren't visible/obvious. Occasionally we get told to use stainless steel screws, but only if the client budget can take it!
 
Back
Top