• Hi all and welcome to TheWoodHaven2 brought into the 21st Century, kicking and screaming! We all have Alasdair to thank for the vast bulk of the heavy lifting to get us here, no more so than me because he's taken away a huge burden of responsibility from my shoulders and brought us to this new shiny home, with all your previous content (hopefully) still intact! Please peruse and feed back. There is still plenty to do, like changing the colour scheme, adding the banner graphic, tweaking the odd setting here and there so I have added a new thread in the 'Technical Issues, Bugs and Feature Requests' forum for you to add any issues you find, any missing settings or just anything you'd like to see added/removed from the feature set that Xenforo offers. We will get to everything over the coming weeks so please be patient, but add anything at all to the thread I mention above and we promise to get to them over the next few days/weeks/months. In the meantime, please enjoy!

Tiny Workshop Shed meets Ambitious Upgrade Project

Hypnotic Chimera

Seedling
Joined
Aug 11, 2025
Messages
41
Reaction score
28
Name
Mark H
LOCATION
nr Lincon
I've posted some of the very beginning stages of this ambitious project on another forum, but I thought you may also be interested in it over here too.

I have a Tiny Shed that I've "converted" into a "workshop"... It's not much of a workshop, really, but it's where my little projects take place. At present it's a single layer shiplap "building"... kind of a building, anyway... in reality it was an rear-end-extension of an existing self-built car port. (There are a few pictures in my Introductions thread).

I've been using it for a couple of years (although not much this year since I've been working away from home for most of it and had to catch up on other things since I've been back).

I have a couple of issues with it that I want to rectify:

The floor was originally laid as a frame on gravel (on compacted driveway hardcore) and there is now several years later a bit of movement and sagging - possibly from adjacent tree's roots - possibly from rodent burrow...
It gets cold and damp in winter - not a massive deal breaker for a DIY workshop - but my hand planes are picking up a bit of surface rust, so I'm looking to insulate and damp-proof.
The last two things are kind of linked - my workshelf (can't in any conscience call it a workbench!) is built attached to the wall frame - and I am cognisant that my tools can be noisy - and the thin timber-wall-borne shelf exacerbates the sound transmission of router and little PT - so I'm really looking to make the project first and foremost around sound-isolation.
1790851127213.jpeg

Which means I'll be making my Tiny workspace even tinier... because any and all of the internal thermal and sound insulation will be competing with the space constraints = and I want to retain as much of the internal space in my Tiny/Tinier Shed while filling the existing wall frame with insulation and covering them with internal boards.

I already have a really detailed - and I mean extremely detailed - plan. And I'm doing this solo - and also on the tightest budget possible. £NormalRules means least expense for most function available :)

Oh - and I also want to demonstrate and quantify the actual amount of sound-isolation that the project wins me. Not just an overall number - but over different stages and over the (measurable) frequency range.
 
Last edited:
Sounds interesting, I'd be keen to see the progress. Obviously I don't know the details but as well insulation you need to think about airflow, and while that doesn't help with warmth, keeping air flowing through it does as much to stop damp as the insulation does so if you haven't already, look into that. It can be as little as a low level vent and a high level fan running a couple of times a day to pull air through and stop it from stagnating.
 
Sounds interesting, I'd be keen to see the progress. Obviously I don't know the details but as well insulation you need to think about airflow, and while that doesn't help with warmth, keeping air flowing through it does as much to stop damp as the insulation does so if you haven't already, look into that. It can be as little as a low level vent and a high level fan running a couple of times a day to pull air through and stop it from stagnating.

You are absolutely correct. Airflow or ventilation needs to be a part and parcel of a coherent plan.

And it is.
Did I mention I have an absurdly detailed and coherent plan for my absurdly Tiny Shed?

Here is a summary of all the elements that I have spent the last 6-8 weeks weaving together so that all of it converges, works together, and nothing fights any of the other parts of the project. It kind of reads like a "sounproofing 101":

1. Plug the gaps in the building;
2. Seal the small air gaps;
3. Upgrade windows to double-glaze and seals (DIY windows - DIY upgrade);
4. Upgrade the door with extra mass and seals;
5. Remove old floor (&bench) and build a new isolated "floating" floor;
6. Fit insulation boards/batts to wall frame and ceiling (retain cold-side gaps/ventilation);
7. Fit vapour mamebranes;
8. Add mass - hybrid plasterboard & MDF;
9. Add decoupled wall layer (Constrained Layer Damping);
10. Final acoustic elements in interior.

And measure acoustic transmission after each stage.

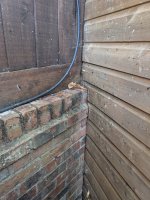
Since you mentioned airflow - some kind of ventilation is necessary due to stages 2, 3, 4 & 7 - all which add to the air sealing from outside - and the plan is to fit a baffled outside intake box on the outside of the front of the shed, a boxed and filtered fan, suspended by strops in the interior, and a suspended loosely S-bend duct exhausting to the rear. In my favour - immediately behind the rear wall of the shed is a brick retaining wall and a feather-board fence sitting on top of the wall. The shiplap boards on the sides of the shed are installed and scribed to be within millimetres of the wall and fence - and the roof is flash-banded to the feather-board fence- so there is only a very small air gap venting on each side of a relatively confined micro-climate area between shed and rear boundary.


1790855740652.jpeg

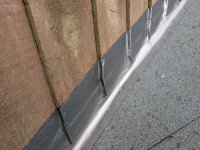
I've only recently finished replacing the entire carport roof - this fresh flash-band will be protected by a timber barge-board:

1790855818074.jpeg


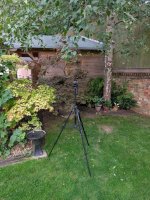
This is the long side of the shed - 2.4m (roughly 8ft). The opposite short side is only 1m (roughly 3ft). The tripod is the sound recording repeatable position for acoustic measurements.

1790855861894.jpeg

1790856052725.jpeg
 
Last edited:
A 30mm slab of 900x600 tumbled stone underneath your power items would have solved any transmitted vibration issues.
 
Wow that is tiny! Looks similar to the sauna that my wife wants me to build!. It looks great so far!

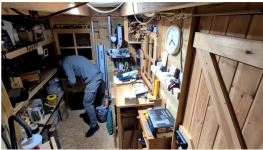
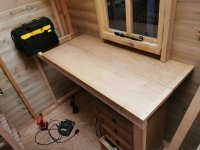
Yep - it really is very bijou... here's me in the gallery between worktop and funky triangular shelving, viewed from joist level at the narrow end - door opens inwards, too.
I've got a fair amount crammed in there and it isn't very "organised" - although I know where everything lives...

On the plus side, everything is just an arm reach away.

1790871895564.png
 
Last edited:
A 30mm slab of 900x600 tumbled stone underneath your power items would have solved any transmitted vibration issues.

That might've reduced the noise a wee bit, maybe some of the structure-borne vibrations - but not so much the airborne sounds escaping through the holes and single skin and thin 4mm single acrylic glazing...


The acoustic measuring I've done so far includes custom test audio files played via AUX lead from a tablet into a Roland MicroCUBE mini guitar amplifier. Test files were created by my Project Co-designer (ChatGPT) - One is a sine sweep going through the frequency range from 30Hz to 16kHz. The other is a broadband pink noise generator. 10 sec quiet, 30 sec pink noise, 10sec quiet, 30 sec pink noise, 10sec quiet, 30 sec pink noise, 10sec quiet. The reproducibility of these is helped by the MicroCUBE removing all of the audio control - even the voilume control - when playing via AUX cable. Consistent speaker position on the worktop. Consistent position of the tripod mount of the mobile phone recording the noise - software called Sound Recorder (by hardcoded joy) - with settings WAV file/stereo/24bit/48kHz bit rate/+10dB/UNPROCESSED recording.

I'm using both ChatGPT (Technical level "Plus" subscription) as well as my own software downloads to process and analyse the recordings. So far I have a set of baseline recordings with sound levels across the frequency spectrum for the unmodified Shed MkI.

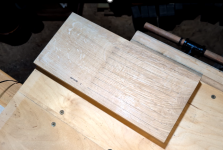
I've also prepared a solid oak board as my test piece - marked out with space for 10x router grooves - and have already recorded the baseline router cut (6mm flute bit) - plus vacuum at the same time - and it's *loud* outside.

1790873409097.png

How's this for a spectrogram of the noise from small trim router, plus vac, cutting a 6mm groove into oak:

1790872882656.png

Hopefully you'll be able to decipher the vac main frequency (tails off 6 sec after router switch off) and the main router base frequency trail (unloaded spins at 30,000rpm = 500Hz and tails off around 78 sec) and the dip in the frequency of the router when it's cutting through the oak - at which point the frequency spectrum also fills up brightly with broadband noise as the cutter noise pulses through the oak.
That was a recording outside - about 2.5m from shed.

That's the quantifiable baseline sorted.

Highlights:

Analysis shows that overall the background noise floor is around - 74.3 dBFS (t1).
Shop vac free running is around −65 to −66 dBFS (t7). - that's Plus 9dB over quiet background.
Shop vac plus router free running is around −58 to −60 dBFS (t3) - that's Plus 15dB over background.
Router cutting noise over vac background lifts the exterior level dramatically into roughly the −42 to −45 dBFS region (t4). A stiff Plus 31dB over ambient noise floor.


Using the very crude +10dB (recorded difference - not actual Sound Pressure Level) - that "every +10dB equates to *roughly* a doubling of sound volume to the human ear" - that means a +30dB difference is roughly 8 times as loud as the ambient recorded garden soundscape sound level. Crude, but illustrative... That router cut is dominating the local soundscape.

And this tells you all you need to understand about why I want to put some sound deadening into my tiny workshop...

I'm not sure whether to re-create this sound recording with my TITAN planer thicknesser - what do you think?
 
That might've reduced the noise a wee bit, maybe some of the structure-borne vibrations - but not so much the airborne sounds escaping through the holes and single skin and thin 4mm single acrylic glazing...


The acoustic measuring I've done so far includes custom test audio files played via AUX lead from a tablet into a Roland MicroCUBE mini guitar amplifier. Test files were created by my Project Co-designer (ChatGPT) - One is a sine sweep going through the frequency range from 30Hz to 16kHz. The other is a broadband pink noise generator. 10 sec quiet, 30 sec pink noise, 10sec quiet, 30 sec pink noise, 10sec quiet, 30 sec pink noise, 10sec quiet. The reproducibility of these is helped by the MicroCUBE removing all of the audio control - even the voilume control - when playing via AUX cable. Consistent speaker position on the worktop. Consistent position of the tripod mount of the mobile phone recording the noise - software called Sound Recorder (by hardcoded joy) - with settings WAV file/stereo/24bit/48kHz bit rate/+10dB/UNPROCESSED recording.

I'm using both ChatGPT (Technical level "Plus" subscription) as well as my own software downloads to process and analyse the recordings. So far I have a set of baseline recordings with sound levels across the frequency spectrum for the unmodified Shed MkI.

I've also prepared a solid oak board as my test piece - marked out with space for 10x router grooves - and have already recorded the baseline router cut (6mm flute bit) - plus vacuum at the same time - and it's *loud* outside.

View attachment 59081

How's this for a spectrogram of the noise from small trim router, plus vac, cutting a 6mm groove into oak:

View attachment 59080

Hopefully you'll be able to decipher the vac main frequency (tails off 6 sec after router switch off) and the main router base frequency trail (unloaded spins at 30,000rpm = 500Hz and tails off around 78 sec) and the dip in the frequency of the router when it's cutting through the oak - at which point the frequency spectrum also fills up brightly with broadband noise as the cutter noise pulses through the oak.
That was a recording outside - about 2.5m from shed.

That's the quantifiable baseline sorted.

Highlights:

Analysis shows that overall the background noise floor is around - 74.3 dBFS (t1).
Shop vac free running is around −65 to −66 dBFS (t7). - that's Plus 9dB over quiet background.
Shop vac plus router free running is around −58 to −60 dBFS (t3) - that's Plus 15dB over background.
Router cutting noise over vac background lifts the exterior level dramatically into roughly the −42 to −45 dBFS region (t4). A stiff Plus 31dB over ambient noise floor.


Using the very crude +10dB (recorded difference - not actual Sound Pressure Level) - that "every +10dB equates to *roughly* a doubling of sound volume to the human ear" - that means a +30dB difference is roughly 8 times as loud as the ambient recorded garden soundscape sound level. Crude, but illustrative... That router cut is dominating the local soundscape.

And this tells you all you need to understand about why I want to put some sound deadening into my tiny workshop...

I'm not sure whether to re-create this sound recording with my TITAN planer thicknesser - what do you think?
Back in the early 90s, I worked installing custom car audio systems, building custom subwoofers , fiberglass speaker pods and the like. Part of my job was ripping car interiors apart and putting in sound deadening material (DynaMat was the main product we used at the time). Taking measurements of road noise before and after, etc. I actually still have my db meter in my toolbox somewhere. I'll be curious what you use for this as I have seen everything from cheap foam panels to mid-century-modern looking walnut panels that have integrated sound dampening etc.
 
Back in the early 90s, I worked installing custom car audio systems, building custom subwoofers , fiberglass speaker pods and the like. Part of my job was ripping car interiors apart and putting in sound deadening material (DynaMat was the main product we used at the time). Taking measurements of road noise before and after, etc. I actually still have my db meter in my toolbox somewhere. I'll be curious what you use for this as I have seen everything from cheap foam panels to mid-century-modern looking walnut panels that have integrated sound dampening etc.

I've put some DynaMat-type stuff in my old Evo VI when I installed some speakers and stereo. Good stuff.

For what I'm calling the "critical wall" - the long side pictured above with the tripod facing it - I have a multi-faceted approach. Bearing in mind the walls are framed with 63mm-deep CLS - and I can't afford to lose much more than that for the "cavity" this wall will be 50mm Rockwool RWA45 batts. Leaving a small 13mm air gap to the shiplap.

That'll be topped with Tyvek Airguard Smart breathable vapour barrier. I got a few metres from eBay on a "per metre" order to keep costs as low as possible, but the sticky tape needed for this is eyewateringly expensive at around £30 per roll...

Then top internal covered with initially 12.5mm plasterboard, which will then be constrained layer damping (CLD) built-over with 12mm MDF.

The interstitial damping material isn't decided yet. I'll be testing AC50 acoustic sealant and 1mm butyl damping strips versus other materials - small test panels with AC50 Vs AC50 plus butyl tape Vs EBT+ Vs Silirub2 Vs roofing felt wildcard. Record a controlled impact sound and calculate ring-down time to find the winner. I'm expecting AC50+butyl to win, but the entire project is building on a concept - test - confirm/change tack - build - then measure approach. Quantifying results will be the important punchline.

(EBT+ and Silirub2 sealants are highly flexible and moveable - so called low-modulus - but they also "recover" that stretch so it's debated whether being low-modulus on its own will create much actual damping effect or whether it will actually more like an undamped spring?)
 
I've put some DynaMat-type stuff in my old Evo VI when I installed some speakers and stereo. Good stuff.

For what I'm calling the "critical wall" - the long side pictured above with the tripod facing it - I have a multi-faceted approach. Bearing in mind the walls are framed with 63mm-deep CLS - and I can't afford to lose much more than that for the "cavity" this wall will be 50mm Rockwool RWA45 batts. Leaving a small 13mm air gap to the shiplap.

That'll be topped with Tyvek Airguard Smart breathable vapour barrier. I got a few metres from eBay on a "per metre" order to keep costs as low as possible, but the sticky tape needed for this is eyewateringly expensive at around £30 per roll...

Then top internal covered with initially 12.5mm plasterboard, which will then be constrained layer damping (CLD) built-over with 12mm MDF.

The interstitial damping material isn't decided yet. I'll be testing AC50 acoustic sealant and 1mm butyl damping strips versus other materials - small test panels with AC50 Vs AC50 plus butyl tape Vs EBT+ Vs Silirub2 Vs roofing felt wildcard. Record a controlled impact sound and calculate ring-down time to find the winner. I'm expecting AC50+butyl to win, but the entire project is building on a concept - test - confirm/change tack - build - then measure approach. Quantifying results will be the important punchline.

(EBT+ and Silirub2 sealants are highly flexible and moveable - so called low-modulus - but they also "recover" that stretch so it's debated whether being low-modulus on its own will create much actual damping effect or whether it will actually more like an undamped spring?)
Fascinating stuff. And I know what you mean about the cost of tape. Sometimes I am shocked at the cost of the ancillary products needed for some projects. Same with screws. I was looking to do a patio cover and use standing seam metal roofing and the cost of the fasteners and butyl tape was going to be as much as the metal panels!

I am interested in the sound proofing as when I hit retirement age, may sell the house and down size into a condo, where i would need to do something to soundproof walls and such. So the neighbors don't complain about whacking chisels etc.
 
I'll keep quiet next time. You clearly have it all under control.


Please chip in with comments any time - There are bound to be things that could be improved - and things I've not got right in the plan - so all critique will be very gratefully received.
 
Fascinating stuff. And I know what you mean about the cost of tape. Sometimes I am shocked at the cost of the ancillary products needed for some projects. Same with screws. I was looking to do a patio cover and use standing seam metal roofing and the cost of the fasteners and butyl tape was going to be as much as the metal panels!

I am interested in the sound proofing as when I hit retirement age, may sell the house and down size into a condo, where i would need to do something to soundproof walls and such. So the neighbors don't complain about whacking chisels etc.

I forgot to add - those foam panels and slatted wall coverings you mentioned would be utter useless and worthless at sound-proofing and sound isolation. They *might* add a bit of in-room absorption - but really not very much.

There's an absolute ton of material on YouTube about sound-isolation for *studios* and *music rooms* - but practically nothing for woodwork workshops. So I've had to do a load of research to get to where I'm at with my plan.

{as an aside - I do have a bit of a head start on the technical aspects - I've got a degree in aeronautical engineering - many years ago and never employed in engineering, but I do work in a technical field (aviation) and I'm also qualified as an electronic warfare instructor - which includes some acoustic knowledge - and the principles of wave-form propagation are pretty generic anyway whether it's electromagnetic or sound radiation...}

The principles are probably very similar with car audio in some ways - with DynaMat you're adding both *mass* and *damping* at the same time.

Not all of the Shed MkI will get the same wall treatment - some of it is plain old Expanded Polystyrene boards (EPS) - Jablite - and plain polythene vapour barrier. But there will be some "trick" additions as the project progresses, hahaha...

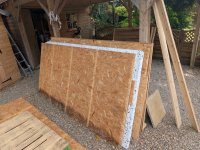
I've already stockpiled *most* of the materials for the job:

1790881779204.jpeg
 
Back
Top