• Hi all and welcome to TheWoodHaven2 brought into the 21st Century, kicking and screaming! We all have Alasdair to thank for the vast bulk of the heavy lifting to get us here, no more so than me because he's taken away a huge burden of responsibility from my shoulders and brought us to this new shiny home, with all your previous content (hopefully) still intact! Please peruse and feed back. There is still plenty to do, like changing the colour scheme, adding the banner graphic, tweaking the odd setting here and there so I have added a new thread in the 'Technical Issues, Bugs and Feature Requests' forum for you to add any issues you find, any missing settings or just anything you'd like to see added/removed from the feature set that Xenforo offers. We will get to everything over the coming weeks so please be patient, but add anything at all to the thread I mention above and we promise to get to them over the next few days/weeks/months. In the meantime, please enjoy!

4 panel door build WIP

Do we want a WIP thread on my 4 panel internal door?

  • Yes certainly interested.

    Votes: 29 93.5%
  • I'd like a summary rather than intimate details

    Votes: 2 6.5%
  • Not my sort of thing really, its not round!

    Votes: 0 0.0%

  • Total voters
    31
  • Poll closed .
I've had various distractions lately but in between other tasks I've been doing some prefinishing of the mouldings.
I've been using a water based varnish on this project so far and it does look different from oil based finishes so this door will get the same.
As I'd mentioned before is does raise the grain even after a few coats and sanding in between.

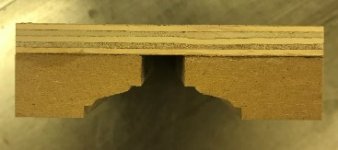
I made a sanding block with a complementary profile to suit the moulding.

Sanding block 1.jpg

Sanding block 2.jpg

Here is the batch drying after the 3rd coat of finish in the hope that the grain will be starting to calm down.
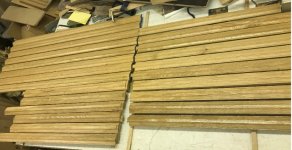
set aside to dry.jpg

Bob
 
Hi Bob, I have been using water-based poly varnish for years now and I hardly rub it down between coats at all, just a very light and I mean extremely light de-niB with some extremely worn out stuff that looks like it should’ve been thrown away years ago but it just keeps going and doing the business, and of course it doesn’t leave scratches. Ian
 
Cabinetman":28jr537m said:
Hi Bob, I have been using water-based poly varnish for years now and I hardly rub it down between coats at all, just a very light and I mean extremely light de-niB with some extremely worn out stuff that looks like it should’ve been thrown away years ago but it just keeps going and doing the business, and of course it doesn’t leave scratches. Ian

Interesting Ian, My experience has been the complete opposite. Oil based, single coat, de-nib and a couple of extra coats and all is fine but water based is awful to use.
I've tried sanding sealer first, rub down and still water based raises the grain 2 to 3 coats on.
I don't know if it is relevant, but the problems have always been with oak.
I'll be going back to oil based PU diluted 2:1 after this project.

Bob
 
Looking good Bob.

Have you tried just raising the grain on the oak before finishing to see if that makes any difference? Have to say, like Ian I’ve never experienced this after the first de-nib even on oak.

Not that I use water based finishes any more.
 
Whilst I wait for supplies of stainless steel headless pins to attach the mouldings, yesterday I decided to cut the mitres on the ends.
4 panels per side, 4 mouldings per panel so that 64 mitres to cut.
Out came my Incra mitre gauge, the absolute dogs danglies for accurate angle cuts and I set to cutting everything.

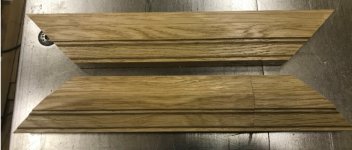
Here is the first set of four dry fitted to a panel.

panel moulding.jpg

Quite pleased with the look and nice tight mitres

carried on cutting and all of a sudden the stargate infallibility drive went awry and I cut one point in the wrong direction. None of the offcuts long enough to make a spare one naturally. Grrrr.

Nothing for it but to try and grain match and join two off cuts.

It came out surprisingly well.

Comparing with a decent one

comparison.jpg

Yes the line is visible but I can fit it on the inside at floor or above eye level on the hinge side.

Not too bad in situ

in situ.jpg

Pins should turn up tomorrow according to Ebay.

Bob
 
Good work. It never ceases to amaze me how easy it is to cut mitres the wrong way (or perhaps it's just me...).
 
Seeing as how this cupboard door is going to be so much better than most people's front doors, I think you can cut yourself some slack there Bob!
 
Ahhhh, we've all done it Roger. Unlucky.

I always find that if you've got enough length of wood to do it, a simple scarf joint is harder to see than a butt joint. And from bitter experience, I now always make spare moulding because I know that if I don't, I'll stuff it up.
 
The moulding fitting all went well with glue and 23g headless stainless steel pine to secure all 32 pieces.

No WIP photos I'm afraid - I tend to forget them them when I'm on a run.

Made the hinge cutting jig as written up here viewtopic.php?f=20&t=7255

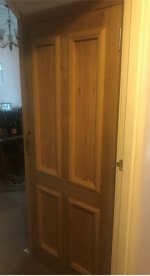
and hung the door.

hung.jpg

This is also the completion of the understairs project at long last which has been referred to in various places on THW2.

The rollut section has bee loaded up with the contents of the sideboard today so that veneered chipboard monstrosity can be disposed of and I can start thinking about a much slimmer version or a dresser or or or.... in the fullness of time to go on the wall opposite this understairs project.

overall.jpg

I'm quite chuffed with it and SWMBO likes it too!

Thanks for sticking with me this far :text-lol:

Bob
 
Very smart! :eusa-clap: :eusa-clap:

If I did something like that it would probably spark some sort of progressive upgrade domino effect, as the bits either side of it would look scruffy, so would need a similar treatment, then the bits next to them and so on... but I expect you have a plan for that already!
 
Thanks Andy,

That (dining) room is never going to match fully. The centre piece is an Ercol dining table in their mid range colour thay call Golden Dawn betwixt their traditional very dark (old Colonial) and their "natural" very pale (and modern in the 60s) shade.

We have had it for over 40 years and attached to it now and it is still immaculate! The old sideboard is a preowned Gplan I think redish teak complete with battle scars. That will go and just needs something to break up a blank wall. Might be some sort of very slimline dresser/ display shelves in the undressed oak style of the latest creation.
Still need the Eureka moment on that project so you will likely be sleeping in your new bed before I even make a start on it :lol:

Bob
 
Andyp":3e6lg4jh said:
Excellent job Bob and I am sure we are all glad you did the WIP.

Thanks Andy,

I'm not sure if I will have converted anyone away from those pesky hand tools but least it is an example for what can be done but it has created a bit of comment and of course some praise which is always nice to keep up the enthusiasm during the tedious bits.

Bob
 
Back
Top