-
Hi all and welcome to TheWoodHaven2 brought into the 21st Century, kicking and screaming! We all have Alasdair to thank for the vast bulk of the heavy lifting to get us here, no more so than me because he's taken away a huge burden of responsibility from my shoulders and brought us to this new shiny home, with all your previous content (hopefully) still intact! Please peruse and feed back. There is still plenty to do, like changing the colour scheme, adding the banner graphic, tweaking the odd setting here and there so I have added a new thread in the 'Technical Issues, Bugs and Feature Requests' forum for you to add any issues you find, any missing settings or just anything you'd like to see added/removed from the feature set that Xenforo offers. We will get to everything over the coming weeks so please be patient, but add anything at all to the thread I mention above and we promise to get to them over the next few days/weeks/months. In the meantime, please enjoy!
You are using an out of date browser. It may not display this or other websites correctly.
You should upgrade or use an alternative browser.
You should upgrade or use an alternative browser.
Diminished (gunstock) stile door
- Thread starter Planeiron
- Start date
Planeiron
New Shoots
All of the chamfers are roughed out with a mallet and chisel, firstly bevel down then flat until about 1/8" or 1/16" from final depth. Then it depends: the longest sections get a no4 skewed to take the worst of the high spots off. Then they're finished with a spokeshave down to the pencil line. The extreme edges next to the little step stops are free hand pared to depth with a 1" chisel.
The middle size sections and small window bars are just chiselled. I wasn't happy free handing these so I made a 45 degree guide to register the chisel against and made the guide long enough to do most of the middle sized lengths. I was happy with most of these straight off the chisel but a few needed a couple of short swipes with the spokeshave to even out any undulations.

A few slight gouge marks probably as the guide is on the long side and might flex a little:

Then literally 2 or 3 passes with a finely set spokeshave:

Finished horizontal bar:

The middle size sections and small window bars are just chiselled. I wasn't happy free handing these so I made a 45 degree guide to register the chisel against and made the guide long enough to do most of the middle sized lengths. I was happy with most of these straight off the chisel but a few needed a couple of short swipes with the spokeshave to even out any undulations.
A few slight gouge marks probably as the guide is on the long side and might flex a little:
Then literally 2 or 3 passes with a finely set spokeshave:
Finished horizontal bar:
Planeiron
New Shoots

Planeiron
New Shoots
Slow progress but another bit done. Waiting on the glass company actually just responding for a quote but had hoped to have the glass to hand at this stage.

Got holes drilled so I can now mark the offset on the tenons for drawboring. Prefer this to wedging but both work. One or preferably 2 squares do as good a job as this wee drill guide. Check the hole both sides for square...


And then in haste knock everything together and realise you've forgotten to chamfer a stile when looking through the photos...

Went back and finished it properly.


Double tenon holes are offset so the grain doesn't line up, reducing the risk of splitting the wood when pinning. If the grain is running off, the holes might not need offsetting. It's good practice but in reality as long as the pins are properly sized it'll probably be ok.

The pyramid stops look alright with the faceted panel


Bottom rail gets a through chamfer without stop so theres no ledge for water. Hope the glass guys get back soon. That's all the major shaping done anyway.
Got holes drilled so I can now mark the offset on the tenons for drawboring. Prefer this to wedging but both work. One or preferably 2 squares do as good a job as this wee drill guide. Check the hole both sides for square...
And then in haste knock everything together and realise you've forgotten to chamfer a stile when looking through the photos...
Went back and finished it properly.
Double tenon holes are offset so the grain doesn't line up, reducing the risk of splitting the wood when pinning. If the grain is running off, the holes might not need offsetting. It's good practice but in reality as long as the pins are properly sized it'll probably be ok.
The pyramid stops look alright with the faceted panel
Bottom rail gets a through chamfer without stop so theres no ledge for water. Hope the glass guys get back soon. That's all the major shaping done anyway.
duke
Old Oak
Wow, great workmanship with all the details.!
Cabinetman
Sequoia
- Joined
- Oct 11, 2020
- Messages
- 5,473
- Reaction score
- 1,178
- Location
- Lincolnshire Wolds + Massachusetts
- Name
- Ian
Yes that’s a stunning piece of work Dave.
Planeiron
New Shoots
Made some pins/pegs for drawboring. Pretty quick job. I keep all small offcuts from a job in a box until the piece is finished for things like this or maybe to match a repair needed. I split small blanks to a rough size and draw the diameter on the end for something to aim at.

Then a little taper.

This gets bashed through an old mortar lock faceplate with some holes drilled in. Slightly bigger one first l, then what should have been 3/8" but is actually metric and a little larger than 3/8" unfortunately.


I hammer them through 3 times each and it produces a reasonable pin.


Had hoped to have everything together but I'm waiting on a proper 3/8" metal drill bit in the post. Seems difficult to purchase one locally as everything in metric. I'll drill the proper 3/8" hole and do a final pass of the pins to size correctly.
Then a little taper.
This gets bashed through an old mortar lock faceplate with some holes drilled in. Slightly bigger one first l, then what should have been 3/8" but is actually metric and a little larger than 3/8" unfortunately.
I hammer them through 3 times each and it produces a reasonable pin.
Had hoped to have everything together but I'm waiting on a proper 3/8" metal drill bit in the post. Seems difficult to purchase one locally as everything in metric. I'll drill the proper 3/8" hole and do a final pass of the pins to size correctly.
Planeiron
New Shoots
The door is now glued and drawbored pinned. Everything cramped up and then the pins hammered home. Most went in easy except that bashed lower one. Drawbore was a little entusiastic on that one but it went through.


https://photos.google.com/photo/AF1QipMBwz95Kzm52EuZYBlXNAaYabxs7p25ISePEGNf
This little scrap wood wedged stand was great for tidying up the stiles after cutting off the excess tenon lengths and it was lovely to get to work outside again

While I've used mostly handtools for this build and most of the things I make (except for the bandsaw), I bought a tracksaw on a whim and it made cutting off the bottom edge a breeze. I previously would've handsawn this but can't say I miss that particular job. This is a cheap saw as far as these things go but the cut straight off the saw is great. I previously put a knife mark round the stile ends to prevent tear out.


I started cutting in hinges, gauged to width and depth. Chiselled out most of the waste and finished with the router plane.


However, after asking advice on this forum about what way to orientate the butt hinges ("most to the post, least to the piece"), several members noted the bearing hinges and mentioned that staining/bearing failure may be an issue. So I've sourced double phosphor bronze washered hinges to use instead. Hopefully they're at least the same minimum dimensions (or a bit more) of the recess chopped out already. So this is on hold until they arrive.
https://photos.google.com/photo/AF1QipMBwz95Kzm52EuZYBlXNAaYabxs7p25ISePEGNf
This little scrap wood wedged stand was great for tidying up the stiles after cutting off the excess tenon lengths and it was lovely to get to work outside again
While I've used mostly handtools for this build and most of the things I make (except for the bandsaw), I bought a tracksaw on a whim and it made cutting off the bottom edge a breeze. I previously would've handsawn this but can't say I miss that particular job. This is a cheap saw as far as these things go but the cut straight off the saw is great. I previously put a knife mark round the stile ends to prevent tear out.
I started cutting in hinges, gauged to width and depth. Chiselled out most of the waste and finished with the router plane.
However, after asking advice on this forum about what way to orientate the butt hinges ("most to the post, least to the piece"), several members noted the bearing hinges and mentioned that staining/bearing failure may be an issue. So I've sourced double phosphor bronze washered hinges to use instead. Hopefully they're at least the same minimum dimensions (or a bit more) of the recess chopped out already. So this is on hold until they arrive.
Dr.Al
Old Oak
Seeing that picture of it wedged in situ shows what a work of art that door is. Lovely job.
Cabinetman
Sequoia
- Joined
- Oct 11, 2020
- Messages
- 5,473
- Reaction score
- 1,178
- Location
- Lincolnshire Wolds + Massachusetts
- Name
- Ian
Seconded!Seeing that picture of it wedged in situ shows what a work of art that door is. Lovely job.
NickM
Old Oak
It looks great.
Planeiron
New Shoots
Several steps forward on the door over the past month but I'll do separate posts: this one is hinges.
I fitted double phosphor bronze washered hinges. Amazingly these were exactly the same length and a little deeper and wider than the wood that was previously removed for the bearing hinges so only minor fettling to fit. Thanks for the suggestion to use these, I think they look much better and don't have all those stamp marks. A few particular things to note. I first marked the height of the hinges from the door onto the frame. I knew how far from the front of the hinges I wanted the door stop to be (to leave a little gap so I made a little spacer to go between hinge and stop on the jamb (I couldn't use the actual post as it was installed green and while functionally fine, too twisted for accurate markings). A little mitre bond (tiny spot) holds the hinge in place to knife mark around the hinges and holes for screws. At this stage 2 screws per hinge is enough in case things need to move again.


Oh dear, 2 badly marked/drilled holes but not to worry...

Little piece of split off oak fixes a lapse in concentration

Holes plugged and ends flushed. You will note the glue spot on the hinge. The dark patch around the screw hole is from grease on the screw thread


A better fit.


I fitted double phosphor bronze washered hinges. Amazingly these were exactly the same length and a little deeper and wider than the wood that was previously removed for the bearing hinges so only minor fettling to fit. Thanks for the suggestion to use these, I think they look much better and don't have all those stamp marks. A few particular things to note. I first marked the height of the hinges from the door onto the frame. I knew how far from the front of the hinges I wanted the door stop to be (to leave a little gap so I made a little spacer to go between hinge and stop on the jamb (I couldn't use the actual post as it was installed green and while functionally fine, too twisted for accurate markings). A little mitre bond (tiny spot) holds the hinge in place to knife mark around the hinges and holes for screws. At this stage 2 screws per hinge is enough in case things need to move again.
Oh dear, 2 badly marked/drilled holes but not to worry...
Little piece of split off oak fixes a lapse in concentration
Holes plugged and ends flushed. You will note the glue spot on the hinge. The dark patch around the screw hole is from grease on the screw thread
A better fit.
duke
Old Oak
Nicely done with plugging the errant holes, done this often over the years.
Planeiron
New Shoots
Next is fitting lock, door knobs and cutting a keyhole. The rim lock was lipped over the edge of the door, marked off and the waste removed with chisel and router plane. Once the edge of the lock was flush with the edge of the door, the screw holes were marked and made allowing the spindle and keyholes to be marked. These marks are transfered on to the opposite side of the door. I use 2 right angles to judge plumb and drill halfway either side.

Not bad alignment.

Keyhole gets the lower part chiselled partway on both door faces but not up as far as the drilled hole as risk of breaking that edge. Coping saw helps here.

Not a bad result. Just a little cleaning up on the bottom edge

The door knobs have a clever base that hides the fixings.


Not bad alignment.
Keyhole gets the lower part chiselled partway on both door faces but not up as far as the drilled hole as risk of breaking that edge. Coping saw helps here.
Not a bad result. Just a little cleaning up on the bottom edge
The door knobs have a clever base that hides the fixings.
Planeiron
New Shoots
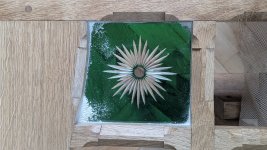
I do like coloured glass and use it when I can. As well as the cathedral glass, I quite liked the look of brilliant cut glory stars and found someone who could do this reasonably locally. So finally got the glass and spent today glazing the door. Tools and materials today are about 2 kg of linseed oil putty, a few bashed pieces of white chalk (whiting) and a paintbrush, glazing points (also maybe pliers and snips if the ends are a bit long), an old paint scraper with a tidied edge and face and a card scraper.
First thing is to take the skin off the putty and discard

Get kneading in your hand for the warmth and if it's too oily, then onto a piece of cardboard.
Putty goes in the rebate (the rebate should have barrier finish on it to stop the oils being sucked out of the putty too quickly. In this case they were finished with boiled linseed oil. This can be done immediately before if needs be)

Glass is shimmied into place. Cut side and textured side of cathedral glass always faces the rebate as you need as flat a side as possible to get a decent looking putty moulding: any undulations will transfer to the putty knife/paint scraper.

Glazing points are waggled home. Pressure on the glazing points with some side to side motion usually seats these. Wouldn't advise bashing the end of the scraper with a hammer or even a mallet, not just for the glass but as these are easy to bend. Oak can be tricky to penetrate with these but if so I just move the point somewhere else.

Get the chalk on straight away to get rid of oily marks and before the putty goes off. This is easy at this stage. The chalk also helps the putty skin a bit quicker. Just go easy with the brush on the edges. I try and line the putty up just a hair under the width of the rebate so a tiny amount or none of the wood shows. This is because paint applied later needs to go beyond the putty and onto the glass and at that stage should ideally line up the the rebate.

I find a card scraper on the other side good to get the corners clean. Don't forget to chalk this side too.


Here is oil smearing around the edges before chalk

And about 20 seconds later. Come back with the scraper to clean the chalk out of the corners

Needs a wee dusting but the outside is ready to finish


First thing is to take the skin off the putty and discard
Get kneading in your hand for the warmth and if it's too oily, then onto a piece of cardboard.
Putty goes in the rebate (the rebate should have barrier finish on it to stop the oils being sucked out of the putty too quickly. In this case they were finished with boiled linseed oil. This can be done immediately before if needs be)
Glass is shimmied into place. Cut side and textured side of cathedral glass always faces the rebate as you need as flat a side as possible to get a decent looking putty moulding: any undulations will transfer to the putty knife/paint scraper.
Glazing points are waggled home. Pressure on the glazing points with some side to side motion usually seats these. Wouldn't advise bashing the end of the scraper with a hammer or even a mallet, not just for the glass but as these are easy to bend. Oak can be tricky to penetrate with these but if so I just move the point somewhere else.
Get the chalk on straight away to get rid of oily marks and before the putty goes off. This is easy at this stage. The chalk also helps the putty skin a bit quicker. Just go easy with the brush on the edges. I try and line the putty up just a hair under the width of the rebate so a tiny amount or none of the wood shows. This is because paint applied later needs to go beyond the putty and onto the glass and at that stage should ideally line up the the rebate.
I find a card scraper on the other side good to get the corners clean. Don't forget to chalk this side too.
Here is oil smearing around the edges before chalk
And about 20 seconds later. Come back with the scraper to clean the chalk out of the corners
Needs a wee dusting but the outside is ready to finish
Attachments
Last edited:
duke
Old Oak
The glass looks great! How long does your putty take to cure?
Planeiron
New Shoots
I'll paint it the next day. Occasionally I've painted the same day but it'll need care not to indent it. In any case I use linseed oil paint with fresh putty and it seems to work well without having to wait. I think the tub probably says somewhere around 2 weeks to skin over but I suppose that also relates to modern paints. The door will be in an airy room with lots of sunlight which really aids curing. Using the chalk dust or whiting helps a lot with skinning over
Lovely job. I didn't know about using powdered chalk on the putty, but it makes sense.
I wonder what colour paint you are going to use? That will change the appearance so much, when we've all got used to seeing the bare oak.
I wonder what colour paint you are going to use? That will change the appearance so much, when we've all got used to seeing the bare oak.
Accipiter
Nordic Pine
- Joined
- Oct 16, 2025
- Messages
- 516
- Reaction score
- 434
- Location
- Frome, Somerset
- Name
- Frank
- LOCATION
- Somerset
Very educational... and quite a work of art following the processes used to make this door, install hinges, cutting the keyhole and also the glazing of. Thanks for sharing 
Cabinetman
Sequoia
- Joined
- Oct 11, 2020
- Messages
- 5,473
- Reaction score
- 1,178
- Location
- Lincolnshire Wolds + Massachusetts
- Name
- Ian
Yes that was very good thank you, about 20 years ago I was French Polishing a pair of Oak doors I’d made and needed to fill the grain, old Woodworker books said to use Whiting but at that time I couldn’t find any. ( I rubbed putty into the grain instead ) what make is that you used Dave? From memory it’s kept in a Ponse bag and a sort of vertical shake/drop is used to get the stuff through the mesh of the bag.
Ian
Ian