• Hi all and welcome to TheWoodHaven2 brought into the 21st Century, kicking and screaming! We all have Alasdair to thank for the vast bulk of the heavy lifting to get us here, no more so than me because he's taken away a huge burden of responsibility from my shoulders and brought us to this new shiny home, with all your previous content (hopefully) still intact! Please peruse and feed back. There is still plenty to do, like changing the colour scheme, adding the banner graphic, tweaking the odd setting here and there so I have added a new thread in the 'Technical Issues, Bugs and Feature Requests' forum for you to add any issues you find, any missing settings or just anything you'd like to see added/removed from the feature set that Xenforo offers. We will get to everything over the coming weeks so please be patient, but add anything at all to the thread I mention above and we promise to get to them over the next few days/weeks/months. In the meantime, please enjoy!

Drills & dovetails

Dr.Al":3q3kgy4k said:
I'm also pondering some sort of veneer (?) over the sawn edge of the two halves. It would cover up the gaps in the pin area...
Good box, nicely done. Covering those edges is actually a lot easier than it sounds and is an ideal outing for a mitre attachment on your new shooter, discussed earlier. The tricky bit is getting the first pair to sit exactly over the interior and external corners. I did exactly the same thing recently on a playing card box:

viewtopic.php?f=26&t=7339&p=121682&hilit=card+box#p121682 - Rob
 
Thanks for sharing the files. I’ll take a look.

Do you just use the template to cut the tails and then trace around the tails onto the pin board and saw the sockets freehand in the usual way?

Where you’re cutting through a dovetail joint, there’s a technique to ensure that there is no breaking of the end grain so that there are no gaps when you cut the lid off. I think it’s called “tenting” or something like that. Instead of chiselling straight down, you chisel at an angle so that you end up with a peak (or tent). You then pare the peak away. Matt Estela describes this in one of his toolbox series videos. I think Derek Cohen of this parish might also have something on it.
Thanks again

I k
 
NickM":2sf2eewz said:
Thanks for sharing the files. I’ll take a look.

Do you just use the template to cut the tails and then trace around the tails onto the pin board and saw the sockets freehand in the usual way?

I use the template to cut the tails, then use the tails to mark the pins, then use the template to cut the pins.

Two sides of the template are angled to suit the tails & two are angled to suit the pins. There are some photos at the link I shared that hopefully make it obvious, but I can share more pictures if it isn't clear.

NickM":2sf2eewz said:
Where you’re cutting through a dovetail joint, there’s a technique to ensure that there is no breaking of the end grain so that there are no gaps when you cut the lid off. I think it’s called “tenting” or something like that. Instead of chiselling straight down, you chisel at an angle so that you end up with a peak (or tent). You then pare the peak away. Matt Estela describes this in one of his toolbox series videos. I think Derek Cohen of this parish might also have something on it.

Thanks, that makes sense. To be honest, it wasn't something that even occurred to me before I cut the lid off. I tend to cut at a slight angle so that the base is concave (so that the edges sit flush), but of course that looks awful if cutting the pin in half & your suggestion sounds better in that case.
 
Concave normally makes sense for the reason you give. It’s only the one you’re cutting through which needs to be perfectly flat.
 
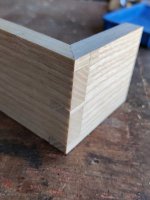
Still practising... this one was my first attempt at a dovetail corner with one end mitred:

IMG_20220807_155000 - Copy.jpg

This was the first one in a while that has needed a bit of adjustment to get it to go together and I think I adjusted in the wrong place (I find it hard to tell where to shave some wood off), so it ended up with a small gap:

IMG_20220807_155017 - Copy.jpg

Nevertheless I'm quite pleased given it was my first attempt.
 
Good attempt; those things are 'ticky' to set out, but what's normally done is to leave a separate section for the mitre:

IMG_4908.jpeg

...wot you can see in this box where the joints have been trial fitted. This also means that it's relatively easy to incorporate a panelled lid of some sort - Rob
 
Looking good Al.

A quick couple of questions if I may ...

Rob - presumably the first pin down is thicker to compensate for the saw kerf when you make the cut to separate the lid?

When you are using a solid panel for the lid (and base) do you glue it into the groove or is it left floating in case of movement?

I'd have put the tails showing on the front of the box (without thinking rather than as a considered design choice) and a quick Google of images seems to show most (but not all) boxes made that way - do you see pins to the front as more aesthetically pleasing? (For the avoidance of doubt I'm just curious and not looking to open a new version of the cutting tails or pins first debate :lol: )

Cheers

Robert
 
On the subject of mitred dovetail joints in general, I wonder if everyone knows about this excellent post from professional cabinet maker Custard? He posted it on another forum rather than on here as that's where he was active at the time, but the content is well worth a look.

https://www.ukworkshop.co.uk/threads/ho ... ip.112467/
 
AndyT":124ose8y said:
On the subject of mitred dovetail joints in general, I wonder if everyone knows about this excellent post from professional cabinet maker Custard? He posted it on another forum rather than on here as that's where he was active at the time, but the content is well worth a look.

https://www.ukworkshop.co.uk/threads/ho ... ip.112467/

I hadn't come across that post, but it looks (as you say) excellent.

I watched a Matt Estlea video (https://www.youtube.com/watch?v=zD8Ee_wy5D4) and was basing my approach on that (although I'd watched it a month or two ago and didn't go back and was doing it from memory rather than rewatching). The video was very good, but I'd much rather read a well-written description (with photos!) rather than watch a video: it's much easier to spend time on the bits that I want to and skip over the bits that are obvious to me and it's also much easier to go back and check a detail.
 
Blackswanwood":326z1e0h said:
Looking good Al.

A quick couple of questions if I may ...

Rob - presumably the first pin down is thicker to compensate for the saw kerf when you make the cut to separate the lid?

When you are using a solid panel for the lid (and base) do you glue it into the groove or is it left floating in case of movement?

I'd have put the tails showing on the front of the box (without thinking rather than as a considered design choice) and a quick Google of images seems to show most (but not all) boxes made that way - do you see pins to the front as more aesthetically pleasing? (For the avoidance of doubt I'm just curious and not looking to open a new version of the cutting tails or pins first debate :lol: )

Cheers

Robert

Yep, the first pin is deliberately left over thick to make allowance for separating the lid and subsequent cleaning up. I usually leave the lid floating in the groove and it's a snug fit so it doesn't slop around too much. To my way of thinking, it doesn't really matter where you put the tails. This was the final result:

IMG_5069.jpeg

...and the rosewood is so dark the joints are difficult to spot. C'est la guerre :D - Rob
 
I hadn't seen that Custard tutorial before. It looks very helpful.

The box I made in this thread (viewtopic.php?f=19&t=7140) was very closely based on Matt Estlea's toolbox series (the main difference is that I incorporated a flush veneered lid rather than a loose panel).

I think the difference between Custard's and Matt's approach is that the top/bottom pin has one flat side if that makes sense. You can see it on my box here:

IMG_0780.jpeg

Custard's (and I think it's the same on Rob's box) equivalent pin would be angled on both sides. I think this is why he mentions there is a "compound" angle to be sawn on that pin.

I think Matt's version might be easier to make, but Custard's (and Rob's) looks better. I'll have to give it a try!
 
Back
Top