
-
Hi all and welcome to TheWoodHaven2 brought into the 21st Century, kicking and screaming! We all have Alasdair to thank for the vast bulk of the heavy lifting to get us here, no more so than me because he's taken away a huge burden of responsibility from my shoulders and brought us to this new shiny home, with all your previous content (hopefully) still intact! Please peruse and feed back. There is still plenty to do, like changing the colour scheme, adding the banner graphic, tweaking the odd setting here and there so I have added a new thread in the 'Technical Issues, Bugs and Feature Requests' forum for you to add any issues you find, any missing settings or just anything you'd like to see added/removed from the feature set that Xenforo offers. We will get to everything over the coming weeks so please be patient, but add anything at all to the thread I mention above and we promise to get to them over the next few days/weeks/months. In the meantime, please enjoy!
You are using an out of date browser. It may not display this or other websites correctly.
You should upgrade or use an alternative browser.
You should upgrade or use an alternative browser.
Hully's Workshop Build - Summer Update
- Thread starter Hully
- Start date
Looking good mate.
French doors eh? Very posh!
Cheers
Mark
French doors eh? Very posh!
Cheers
Mark
TrimTheKing":kwn3fdbx said:Looking good mate.
French doors eh? Very posh!
Cheers
Mark
Haha...not really mate. But the only way I could get sign off from the Mrs was by making it look more like a "garden studio / office" than a shed / workshop so I went with the french doors.
I started putting it together over the weekend but was defeated by 4 missing screws so had to put it on hold until Wickes send me missing offenders.
Hi All
Apologies for the lengthy gap since my last update. Life has been pretty hectic over the last couple of months, but I have made some good progress on the workshop so here's the latest update
The roof is now tiled and has the dry ridge installed. I was pretty concerned about structural integrity as there is nearly 2 tonnes of tile up there but the walls haven't moved at all and everything seems solid :eusa-dance:
I've also installed the French door, caulked all the joints around the building and given it the first coat of paint...so this is how she's looking.

The aim is to get the building water tight before the end of October so next jobs are to make and fit the fascias and sofits, put up the dry verge, install the window and give the building a second coat (though I dont think it needs it). I'll then start to work on the inside, though my wife is about to give birth to our second child so unlikely to have much time to work on it over Autumn/Winter.
One bit of advice I was hoping to get is on the floating floor. The floor right now is a cement slab with no insulation so the plan is to put down 50mm Celotex and then 18mm T&G chipboard on top. Apart from the usual (gluing the joints, expansion gaps around the edge etc) is there anything I should be aware of when doing this?
Cheers
Hully
Apologies for the lengthy gap since my last update. Life has been pretty hectic over the last couple of months, but I have made some good progress on the workshop so here's the latest update
The roof is now tiled and has the dry ridge installed. I was pretty concerned about structural integrity as there is nearly 2 tonnes of tile up there but the walls haven't moved at all and everything seems solid :eusa-dance:
I've also installed the French door, caulked all the joints around the building and given it the first coat of paint...so this is how she's looking.
The aim is to get the building water tight before the end of October so next jobs are to make and fit the fascias and sofits, put up the dry verge, install the window and give the building a second coat (though I dont think it needs it). I'll then start to work on the inside, though my wife is about to give birth to our second child so unlikely to have much time to work on it over Autumn/Winter.
One bit of advice I was hoping to get is on the floating floor. The floor right now is a cement slab with no insulation so the plan is to put down 50mm Celotex and then 18mm T&G chipboard on top. Apart from the usual (gluing the joints, expansion gaps around the edge etc) is there anything I should be aware of when doing this?
Cheers
Hully

Mike G
Petrified Pine
Looking good! If you don't get your window in shortly, you could pin some polythene across the opening.
That floating floor sounds fine. You'll need skirting boards to hold it all firmly down around the perimeter, of course. One little tip is to walk around on the insulation before you install the boards, and if there are any hollows, places where the insulation moves under your feet, run a Stanley knife through it to get it to settle down properly.
That floating floor sounds fine. You'll need skirting boards to hold it all firmly down around the perimeter, of course. One little tip is to walk around on the insulation before you install the boards, and if there are any hollows, places where the insulation moves under your feet, run a Stanley knife through it to get it to settle down properly.
Malc2098":24m97m7r said:Looking really good.
French Grey seems to be popular this year; I shall be using it!
Thanks Malc. Yours is coming on real well also. I used a similar batten arrangement for my corners so as Mike said, it should work a treat.
Not sure if you've bought your paint yet but if not, I've used Bedec (as recommended by Mike) and its excellent stuff!!
Mike G":28swa6z4 said:Looking good! If you don't get your window in shortly, you could pin some polythene across the opening.
That floating floor sounds fine. You'll need skirting boards to hold it all firmly down around the perimeter, of course. One little tip is to walk around on the insulation before you install the boards, and if there are any hollows, places where the insulation moves under your feet, run a Stanley knife through it to get it to settle down properly.
Great, thanks very much (as always) for the tips Mike

- Joined
- Jul 21, 2014
- Messages
- 10,414
- Reaction score
- 165
Ed, I've been through your earlier photo links and tried to fix them with a "spell" that I found online.
Curiously it only seems to have worked on some of your pics and not others which is a real mystery to me.
Anyway some are now showing and I'll continue trying with the others if can get them sorted.
Bob
Curiously it only seems to have worked on some of your pics and not others which is a real mystery to me.
Anyway some are now showing and I'll continue trying with the others if can get them sorted.
Bob
9fingers":xrvzc66p said:Ed, I've been through your earlier photo links and tried to fix them with a "spell" that I found online.
Curiously it only seems to have worked on some of your pics and not others which is a real mystery to me.
Anyway some are now showing and I'll continue trying with the others if can get them sorted.
Bob
Thanks Bob, very kind of you. When I have time I'll try to re-upload them in one long update here, along with some lessons learnt that may help future DIY builders like myself

- Joined
- Jul 21, 2014
- Messages
- 10,414
- Reaction score
- 165
No problem Ed. in slow time I'm trying to fix the link of the more educational threads on here and we are getting a good collection of workshop builds accumulating to be able to inspire others to take the plunge.
A summary of key lessons learned when you are ready will be more than welcome.
Cheers
Bob
A summary of key lessons learned when you are ready will be more than welcome.
Cheers
Bob
Tusses
Old Oak
looking very good, and it sits well where it is 
Dan0741":2sl8n6x2 said:Hully - Looks fantastic matey - will be finished in no time - well done, love the colour
Cheers Dan
Tusses":fabdbalx said:looking very good, and it sits well where it is
Thanks Tusses, it sits better back there than I though it would
Hi All
After another long hiatus (mostly down to the birth of our second daughter) I’ve made a bit more progress on the workshop so thought I’d post what will probably the last update for this year!!
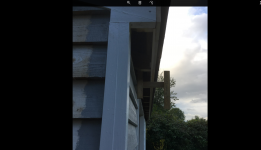
My first job since the last forum post was to make, paint and install the facias and sofits. The facias were made from some treated timber I had lying around from the build. I planned them down, glued them up and then attached a lip to the inside bottom edge so that the soffit has something to sit on. Fitting them by myself proved a challenge but manageable with the aid of a supporting arm that I screwed to a rafter near to one end that acted like a second pair of hands - see below pic.
After a test fit I gave them a few coats of paint and put them up.
The soffit’s are currently 11mm OSB that I also had lying around. These are just temporary so that I can get the building closed up for the winter and fit the insulation into the roof. Once I have some cash in the spring I’ll get them swapped out for proper PVC soffits.
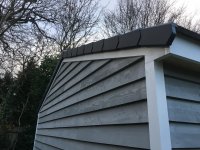
I then installed the dry verge which happily turned out to be a pretty straightforward task. The roof is now finished, which is a nice milestone to hit and I’m pretty happy with the results given that it was my biggest worry going into the build, mostly because of all the unknowns around having never touched a roof before.
The inflight task right now is the installation of the window. My naivety showed through a bit here as I was surprised when the frame turned up without the double glazing units pre-installed God bless YouTube as I now have a pretty good idea of how to install them. So as it stands right now the frame is in and I’ll hopefully have the units in before Christmas which will make the building nice and watertight.

Money and time permitting I’m hoping to get the guttering done over Christmas so that I can begin work on the inside from January. More updates to follow at my usual, leisurely pace
I may also use some downtime over Christmas to compile my first lessons learnt post to cover the external build. I appreciate my updates aren’t as detailed as some on here so I think there are a couple of nuggets of information that I’ve not talked about before that I can pass on.
Have a great Christmas.
Cheers
Hully
After another long hiatus (mostly down to the birth of our second daughter) I’ve made a bit more progress on the workshop so thought I’d post what will probably the last update for this year!!
My first job since the last forum post was to make, paint and install the facias and sofits. The facias were made from some treated timber I had lying around from the build. I planned them down, glued them up and then attached a lip to the inside bottom edge so that the soffit has something to sit on. Fitting them by myself proved a challenge but manageable with the aid of a supporting arm that I screwed to a rafter near to one end that acted like a second pair of hands - see below pic.
After a test fit I gave them a few coats of paint and put them up.
The soffit’s are currently 11mm OSB that I also had lying around. These are just temporary so that I can get the building closed up for the winter and fit the insulation into the roof. Once I have some cash in the spring I’ll get them swapped out for proper PVC soffits.
I then installed the dry verge which happily turned out to be a pretty straightforward task. The roof is now finished, which is a nice milestone to hit and I’m pretty happy with the results given that it was my biggest worry going into the build, mostly because of all the unknowns around having never touched a roof before.
The inflight task right now is the installation of the window. My naivety showed through a bit here as I was surprised when the frame turned up without the double glazing units pre-installed
God bless YouTube as I now have a pretty good idea of how to install them. So as it stands right now the frame is in and I’ll hopefully have the units in before Christmas which will make the building nice and watertight. Money and time permitting I’m hoping to get the guttering done over Christmas so that I can begin work on the inside from January. More updates to follow at my usual, leisurely pace
I may also use some downtime over Christmas to compile my first lessons learnt post to cover the external build. I appreciate my updates aren’t as detailed as some on here so I think there are a couple of nuggets of information that I’ve not talked about before that I can pass on.
Have a great Christmas.
Cheers
Hully

Congrats on number 2 daughter and no 1 workshop.

Malc2098
Sequoia
Well done, cracking job!
You tube and the supplier helped show me how to install the glazing units. The best thing to remember, I think, was - installing - start with a short bead and work round long, short and finish with a long - reverse order for taking them out.
Happy Christmas.
Looking Good!
You tube and the supplier helped show me how to install the glazing units. The best thing to remember, I think, was - installing - start with a short bead and work round long, short and finish with a long - reverse order for taking them out.
Happy Christmas.
Looking Good!
Andyp":1ksemqih said:Congrats on number 2 daughter and no 1 workshop.
Cheers Andy...makes for a busy life
Malc2098":2dgog2tb said:Well done, cracking job!
You tube and the supplier helped show me how to install the glazing units. The best thing to remember, I think, was - installing - start with a short bead and work round long, short and finish with a long - reverse order for taking them out.
Happy Christmas.
Looking Good!
Thanks Malc. The beads are a bit weird on these windows, only 1 end of each bead is mitred while the other is cut square and then hidden by the mitred end of the next bead. So you actually have to partially install all 4 beads at the same time and then sort of weave the square/mitred ends of the beads before banging them fully home. That's really badly explained, sorry
Safe to say I cocked up the first window as I didn't realise one end was square etc so I then had to take them back off which resulted in a lot of swearing and some damaged trim...never mind :eusa-doh:

DaveL
Old Oak
Mounting the window without the glass makes the job quite easy, for the last workshop I built, I bought some Windows that had been made up the wrong size for a job and were therefore reduced in price. The units were fitted and it took three of us to fit the now heavy frames into the wall.
Your workshop is looking good, getting it weather tight is a big step, the pressure then reduces.
Your workshop is looking good, getting it weather tight is a big step, the pressure then reduces.
Hi all
After another hiatus I’m back with my Winter update.
Since my last post I’ve now pretty much finished all the external build elements. The window glazing units have been installed and the door and window frames have been sealed from the outside and tightened up with expanding foam on the inside. I’ve also installed the guttering which was pretty straight forward thanks to YouTube. The only slight hiccup I had was that the bottom dry verge unit protruded out and down quite far, stopping me from bringing the guttering around the side of the workshop at fascia height. So instead I had to make a bit of a dog leg arrangement which looks a bit odd but does the job.

The final two jobs for the outside (third coat of paint and replacing the temporary OSB soffits with PVC ones) will get done in the spring.
So onto the inside, and the floor. 50mm EcoTherm insulation boards went down, followed by 18mm T&G OSB.

I left a 10mm expansion gap all the way around and glued the boards together using temporary blocks (screwed down) and clamps to hold them together while they dried.
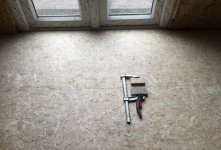
Once dry all the joints were sanded and screw holes/gaps were filled with glue and sawdust.

I then put down two coats of matt floor varnish using a 9” microfibre roller to finish it off. I was amazed by the immediate effect insulating the floor had. Before you could feel the cold coming off the concrete slab but that’s now completely gone and the air temperature is notably less chilly. I’ve also noticed that the heat from the sun stays around much longer and has more of an effect on the air temperature.
Once the floor was finished I then insulated the ceiling, so the workshop is now fully insulated and ready for plasterboard. The plan is now to plasterboard in March, plaster in April, paint and trim out the room in May and get the electrics done in June. Starting to feel like the home straight!
Cheers
Hully
After another hiatus I’m back with my Winter update.
Since my last post I’ve now pretty much finished all the external build elements. The window glazing units have been installed and the door and window frames have been sealed from the outside and tightened up with expanding foam on the inside. I’ve also installed the guttering which was pretty straight forward thanks to YouTube. The only slight hiccup I had was that the bottom dry verge unit protruded out and down quite far, stopping me from bringing the guttering around the side of the workshop at fascia height. So instead I had to make a bit of a dog leg arrangement which looks a bit odd but does the job.
The final two jobs for the outside (third coat of paint and replacing the temporary OSB soffits with PVC ones) will get done in the spring.
So onto the inside, and the floor. 50mm EcoTherm insulation boards went down, followed by 18mm T&G OSB.
I left a 10mm expansion gap all the way around and glued the boards together using temporary blocks (screwed down) and clamps to hold them together while they dried.
Once dry all the joints were sanded and screw holes/gaps were filled with glue and sawdust.
I then put down two coats of matt floor varnish using a 9” microfibre roller to finish it off. I was amazed by the immediate effect insulating the floor had. Before you could feel the cold coming off the concrete slab but that’s now completely gone and the air temperature is notably less chilly. I’ve also noticed that the heat from the sun stays around much longer and has more of an effect on the air temperature.
Once the floor was finished I then insulated the ceiling, so the workshop is now fully insulated and ready for plasterboard. The plan is now to plasterboard in March, plaster in April, paint and trim out the room in May and get the electrics done in June. Starting to feel like the home straight!
Cheers
Hully
:text-+1:
Hi All
Time for my Spring update
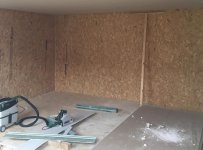
When I last left you I was about to start the Plasterboard so...first up was Plasterboarding the walls and ceiling, which turned out to be a relatively simple job. A friend came over to help with the ceiling, which took us around 2 hours to cover with the help of wooden ‘T’ brace (which you can see in the background below) that we wedged between the floor and ceiling to hold up the middle of the board while we held up each end. The brace stopped the board from bowing and breaking in half while we screwed it in place and while doing it this way was a bit of a challenge its actually very doable for anyone thinking of doing something similar.
I then trimmed out the loft hatch and window sill using some CLS I had to hand

The Plasterers then came in and did their stuff, leaving behind a very messy floor.

After brushing, washing down and sanding the floor I then put down another two layers of varnish.


Painting and skirting/architrave is next on the to do list and then hopefully the electrics at the end of June ready to move in in July.
Cheers
Hully
Time for my Spring update
When I last left you I was about to start the Plasterboard so...first up was Plasterboarding the walls and ceiling, which turned out to be a relatively simple job. A friend came over to help with the ceiling, which took us around 2 hours to cover with the help of wooden ‘T’ brace (which you can see in the background below) that we wedged between the floor and ceiling to hold up the middle of the board while we held up each end. The brace stopped the board from bowing and breaking in half while we screwed it in place and while doing it this way was a bit of a challenge its actually very doable for anyone thinking of doing something similar.
I then trimmed out the loft hatch and window sill using some CLS I had to hand
The Plasterers then came in and did their stuff, leaving behind a very messy floor.
After brushing, washing down and sanding the floor I then put down another two layers of varnish.
Painting and skirting/architrave is next on the to do list and then hopefully the electrics at the end of June ready to move in in July.
Cheers
Hully
Plastered walls. Very posh.

Rod
Old Oak
Looking good
Rod
Rod
- Joined
- Jul 21, 2014
- Messages
- 10,414
- Reaction score
- 165
Positively palatial!
Bob
Bob

Phil
Old Oak
9fingers":1tdu676p said:Positively palatial!
Bob
:text-+1:
Question - how do you get the plane inside through those small doors? Fold up wings and removable propeller?
That is huge!
Cheers guys.
Maybe the pictures make it look bigger than it is. Its 5m x 5m internally so a decent size but not massive...about the size of a double garage.
Either way, it'll get filled up quickly!
Its more for if/when we eventually sell the house and move on. Having plastered walls will hopefully make it easier to imagine as garden studio or office :lol:
Maybe the pictures make it look bigger than it is. Its 5m x 5m internally so a decent size but not massive...about the size of a double garage.
Either way, it'll get filled up quickly!
Andyp":3ufekzok said:Plastered walls. Very posh.
Its more for if/when we eventually sell the house and move on. Having plastered walls will hopefully make it easier to imagine as garden studio or office :lol:

Hully":2v63sx4j said:.....
Andyp":2v63sx4j said:Plastered walls. Very posh.
Its more for if/when we eventually sell the house and move on. Having plastered walls will hopefully make it easier to imagine as garden studio or office :lol:
SWMBO wanted me to get mine plastered up but I've resisted.
Very nice mate, look great inside. :eusa-clap:
Hi All
I've made some decent progress over the last couple of months so wanted to give you all a quick update.
With the plastering complete I started on the decoration and trim work, which like EVERYTHING on this project took me way longer than I expected but really happy with the results. Many of you will probably think this is a bit OTT for a workshop but as I've said before, when we eventually come to sell the house I want this to be viewed as a possible garden room/studio/office so I want it to look half decent. Plus, I used it as a dry run for a few tools and techniques ahead of our upcoming house renovation later this year.
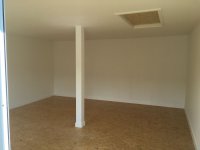
For those wondering what the post in the middle of the room is for, this isn’t structural...it’s just a way of being able to run power and extraction to the saws

Once the decoration was complete I then put in all the trunking for the electrics and ran all the cables for the lights and sockets. The electrician then came round to run the armoured cable from the house to the workshop, fit the electric panel and do all the second fix/testing. On the electricians advice I used 6 x Enlite 18W IP44 LED lights which are brilliant. I went for the 1200 lumen / 4000K versions which light up the space brilliantly and are super low profile so you can put them into the plasterboard under joists etc with no issue.
And with the electrics complete the workshop build is pretty much finished. I have a short snagging list but nothing major or urgent so it will probably have to wait until next year as our house renovation/extension is starting next month and I'll be kept really busy with that until at least next summer.
I’ve now moved all the tools in and set up the space. There's still lots to organise in the short term, including fitting the ducting system and building a quick and dirty outfeed table, and over the long term I’ll be rebuilding all the cabinets, building a proper split-top Roubo workbench and swapping out the Axi tools for Hammer equivalents but this it for now and I’m really happy with it.


I’m still aiming to do one final big post on this thread about lessons learnt and tips that might be useful to other people but in the meantime thanks to everyone for the advice and comments over the course of the last 2 years, it’s been massively helpful.
Cheers
Hully

I've made some decent progress over the last couple of months so wanted to give you all a quick update.
With the plastering complete I started on the decoration and trim work, which like EVERYTHING on this project took me way longer than I expected but really happy with the results. Many of you will probably think this is a bit OTT for a workshop but as I've said before, when we eventually come to sell the house I want this to be viewed as a possible garden room/studio/office so I want it to look half decent. Plus, I used it as a dry run for a few tools and techniques ahead of our upcoming house renovation later this year.
For those wondering what the post in the middle of the room is for, this isn’t structural...it’s just a way of being able to run power and extraction to the saws
Once the decoration was complete I then put in all the trunking for the electrics and ran all the cables for the lights and sockets. The electrician then came round to run the armoured cable from the house to the workshop, fit the electric panel and do all the second fix/testing. On the electricians advice I used 6 x Enlite 18W IP44 LED lights which are brilliant. I went for the 1200 lumen / 4000K versions which light up the space brilliantly and are super low profile so you can put them into the plasterboard under joists etc with no issue.
And with the electrics complete the workshop build is pretty much finished. I have a short snagging list but nothing major or urgent so it will probably have to wait until next year as our house renovation/extension is starting next month and I'll be kept really busy with that until at least next summer.
I’ve now moved all the tools in and set up the space. There's still lots to organise in the short term, including fitting the ducting system and building a quick and dirty outfeed table, and over the long term I’ll be rebuilding all the cabinets, building a proper split-top Roubo workbench and swapping out the Axi tools for Hammer equivalents but this it for now and I’m really happy with it.
I’m still aiming to do one final big post on this thread about lessons learnt and tips that might be useful to other people but in the meantime thanks to everyone for the advice and comments over the course of the last 2 years, it’s been massively helpful.
Cheers
Hully
Very smart, but way too tidy.
Rod
Old Oak
Very, very nice well done
Rod
Rod