• Hi all and welcome to TheWoodHaven2 brought into the 21st Century, kicking and screaming! We all have Alasdair to thank for the vast bulk of the heavy lifting to get us here, no more so than me because he's taken away a huge burden of responsibility from my shoulders and brought us to this new shiny home, with all your previous content (hopefully) still intact! Please peruse and feed back. There is still plenty to do, like changing the colour scheme, adding the banner graphic, tweaking the odd setting here and there so I have added a new thread in the 'Technical Issues, Bugs and Feature Requests' forum for you to add any issues you find, any missing settings or just anything you'd like to see added/removed from the feature set that Xenforo offers. We will get to everything over the coming weeks so please be patient, but add anything at all to the thread I mention above and we promise to get to them over the next few days/weeks/months. In the meantime, please enjoy!

Martin Guitar Kit (It's First Public Outing!)

Andyp":2aelnc6q said:
Methinks that is going to be more scary then the trimming you did earlier. Hope it goes well.

It's all scary at the moment, Andy. On the first guitar I made, I used my old Trend T with its trimmer guide, and by hand. It was scary, but also uneven. which is why I want to follow this route.

I've got the body wrapped up inside a pillowcase and put back in the box the kit came in, so I don't dent, ding or drop it while I work on this stuff.

I shall try and provide a video of the routing, but there's more of the tower to design yet. :)
 
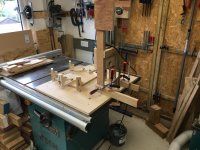
I've boxed the router so it should slide up and down the tower. Still haven't got a clue of how to make the tower, but one thing at a time.

IMG_4044.JPG

I now need to know how high the guitar body will sit on its cradle before I design the tower. So let's make a cradle.

IMG_4046.JPG

I'm quite chuffed because the ply and mdf comes from all the offcuts from making the mould. :)

And this is what it does. It allows me to maintain the guitar body stable and rotate it to let the router, which is in a fixed position laterally, bear agains the edge and cut the rebate it rotates.


IMG_4047.JPG

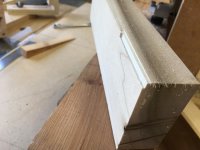
Unfortunately, it also demonstrated that my work in trying to keep the rim in the same plane all around its contour was not successful. If it's 90 degrees to the base at the neck end, it's about a degree out at the other end. and varies all the way round. Hey ho.
 
With apologies to Heath Robinson, here is the router tower, almost.

IMG_4056.JPG

The router sits in the 'drawer' shown in the previous post with horizontal and vertical bearings for the workpiece to bear against. The 'drawer' rides up drawer runners and is counterbalanced by a bucket of M10 bolts which are connected by a line that runs over two pulleys made of old castor wheels with grooves turned into them.

IMG_4057.JPG

I then 'tested' the movement of the router carriage by adding and removing bolts from the bucket until I felt that it was the right control of movement against the workpiece.

[youtube]eJMh3U7UtWI[/youtube]

After I was satisfied with the test, I screwed the feet into the uprights and screwed a diagonal brace across the back and improved the method of clamping to the tablesaw bench and it feels really rigid now.

Well, I'm going to have to bite the bullet and rout the binding and purfling rebates. I shall be routing to tolerances of 0.1mm, the binding depth is about7.3mm x 0.9 mm wide. The purfling will be about 0.7 wide x about 0.9mm deep. Oo-er!
 
9fingers":1gaovtfn said:
I'm usually the last one to suggest hand tools for a job! :lol:
However, cutting the groove like this I'd be looking at a scratch stock to enable you to take it very slowly and progressively.

Bob

He's not cutting a groove, he's taking off the whole top edge.

I love the ingenuity here, but would it not have just been easier to build a sled that slid on legs on the table top, fix the router to the top of the sled with a hole through for a bottom bearing guided bit, extend that down to the depth required then run around the whole body?

Same principle as you've gone for but would have been a heck of a lot less work I would think.
 
Cheers, Chaps.

Not sure how yours works, Mark. I was only trying to copy the commercial versions. My jig is not using a bearing guided cutter, it's using a trim guide which is attached to the router base, not the router bit. The router has to stay stationary in the horizontal plane, but be able to move vertically, and the workpiece's radii of the guitar's sides' curves need to stay in line with the cutter and the trim guide. That can only be achieved if the guitar body is handled manually, and therefore the router needs to be stationery (in the horizontal plane). I understand it, I think.
 
I had a quick search to see what other jigs are used for this and they all seem complicated :)

There was a tatty looking one for sale on ebay for a lot of money so I can see why it was worth putting the work in.

I'd suggest making some test cuts on some scrap with nice clean edges to see how consistent it performs. vibration when the router is cutting might show up some movement in those drawer slides. Not sure they are as accurate for guiding as they feel just sliding them back and forth.

Good luck :)
 
So, here went the test cuts. I've got no way of micro adjusting the vertical cut, I just have to be careful loosening the motor in th body, moving it and retightening, but there is a micro adjust on the horizontal, comes with the trim guide.

First try single deep rebate.

IMG_4065.JPG

First try adding the shallow rebate.

IMG_4067.JPG

Several micro adjusts later on another piece..........

IMG_4069.JPG

and from a different angle.....

IMG_4070.JPG

Those are three pieces of plastic; the single white piece is the binding. The black/white/black piece below is a purfling and the black/white piece on the top is a purfling.
 
Andyp":1noktfeo said:
Can you test an undulating cut to mimic the slight rise and fall of the guitar ?


That'll be the next trial.

BTW, it's nice downward spiral cutter from Whealdens.
 
Make yourself about 30 minutes of space, fix yourself up with a glass or two of your favoured lubrication and enjoy this video.

It has a certain resonance with me (see what I did there :) )

[youtube]58XJUQYLAio[/youtube]
 
I was in the process of videoing the live rout of the first rebate to the back of the guitar, having spent ages getting the adjustment right. The tower is successful for the most part, there are a couple of places near the waist that I cannot get the work right in and will have to manually increase the size of the rebate to match the rest.

I was on the last curve when this happened.

IMG_4081.JPG

I was doing a climb cut because I didn't want to tear out, but I wasn't holding cradle firm enough and the blighter bit me.

I've got another 1.0mm rebate to go which will reduce the width of the break, but I am open to advice as to how bet fill the defect. I've got loads of leftover mahogany to make dust to get a match and this is the back of the guitar and will not be noticeable in the most part. I am Ok with the repair being visible, but I would prefer it not to be too obvious.

Ideas will be gratefully received.
 
I often put some varnish on before routing a fragile edge as it stabilises the wood. Wish I'd said so earlier now.

Think I would try planing the damage flat and gluing a piece on with the grain matching rather than mess about with dust. If you have got spare material why not simulate the repair before doing it for real. Clean it up and wipe some finish on to see how it might look.
 
With the usual caveat that I have not done this, is there any mileage in making the second cut, fitting the banding, then filling the gap. If a slither of wood is used it will have a greater glued surface. Hard wax repair stick if the gap is small.
 
Thanks, Chaps.

My view so far is that the damage is still cosmetic and not structural. I'm reluctant to take any more wood out, which might take the damage beyond kerfed joint underneath which could, I don't know, affect the tonality of the completed box. I understand the principle is good for furniture, but I'm not so sure here.

I've done a dummy run with TB and sawdust and it's not a bad match and incredibly tough. So, what I might do is create a 'wall' around that part of the rim with tape and fill with the TB & dust compound and let that cure completely. The existing damage appears to show more gluing surface that a straight line.

Then sand the top of it down level with the back of the guitar and then rout both the first rebate, in case it sticks out that far, and then the second rebate, before fitting any of the binding or purfling.
 
I carried on and routed both rebates on the top.

This time, I didn't do any climb cuts, I just went anticlockwise a couple of inches then climbed back and so on all the way round and it turned out OK.

IMG_4084.JPG

The dust and shavings from the rout gave me loads to practise some glue/filler and I've just put the first layer on the damage.
 
So here's how the repair went using TBO and dust from the wood of the guitar.

IMG_4085.JPGThat was the second layer with dust brushed over the damp filling.
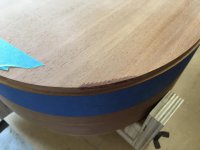


IMG_4086.JPG
That was the third last, third, very thin layer sanded when dry.


fullsizeoutput_9ab.jpeg
And that was with the purfling rebate.


IMG_4090.JPG
And this is what it looks like after I've done quite a bit of adjusting of the router in the tower to get the profiles of the binding and purfling to fit.


And this is what it's all for!
IMG_4091.JPG

This is the start of the dry fit of the binding and both purflings, one on the back and one on the side.

IMG_4092.JPG
I'm quite chuffed with that!

The edges of of the plastic have ripped the side of my thumb where you push down before the tape takes over the pressure. Next, I've got to do the same with glue!!
 
What type of glue do you use to stick plastic to wood?

Looking good :)
 
MattS":gpqms60j said:
That is looking extremely sharp and neat, good job. I’ve been nervous just reading this stage of the project! :o


Thanks, Matt.

You've been nervous?!! What about me?!!!! :D
 
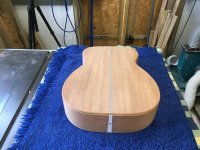
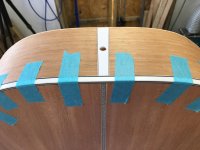
The back of the guitar is now bound and purfled.

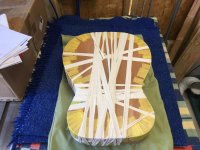
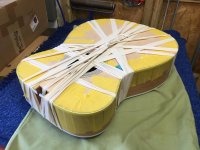
The yellow low tack tape holds it in place as I go round with the glue and feed them in to their rebates. The twill tape, nowhere near enough, clamps it, especially where the bends of the waist are.

IMG_4095.JPG

I'll try and show you the join tomorrow, if I dare! :oops:
 
I was thinking when making my 3 wood rods that I could do with some bungee cord/rope for pressure wrapping. Looks like you could have used some too.

Hope the tape comes off easy. I found masking tape that has spent time being under clamping force sticks like...
 
Robert":3rmsiwat said:
I was thinking when making my 3 wood rods that I could do with some bungee cord/rope for pressure wrapping. Looks like you could have used some too.

I wonder if you could use strips of bicycle innertubes to clamp that up? I happen to have a few in the bike shed that have holes in, if you would like some posted to you, just ask.
 
Robert":1ozn9pnd said:
I was thinking when making my 3 wood rods that I could do with some bungee cord/rope for pressure wrapping. Looks like you could have used some too.

Hope the tape comes off easy. I found masking tape that has spent time being under clamping force sticks like...


Twill tape is the traditional material for this job, I believe, because bungee cord could well crush unbound edges and can maybe exert too much force and crash the guitar. Something solid, like your boards might benefit from bungee cord.

The tape is 'low tack' so that it shouldn't lift any of the unsealed wood fibres, but I use a hair dryer to soften the adhesive first and then pull off at 45 degrees to reduce that risk.

The masking tape I've tried is a little too aggressive and pulls the fibres, but also 'gives' which isn't helpful when I'm trying to hold something in place.
 
DaveL":2w68bfev said:
Robert":2w68bfev said:
I was thinking when making my 3 wood rods that I could do with some bungee cord/rope for pressure wrapping. Looks like you could have used some too.

I wonder if you could use strips of bicycle innertubes to clamp that up? I happen to have a few in the bike shed that have holes in, if you would like some posted to you, just ask.

Thanks, Dave. I think I'll stay with the tape for the time being. I think I was lucky in that most of the rebates were just about the right size, which made it easier to chase the three strips round to fit, and the tightest bends were the waist where I started with the twill tape.

I think I suggested to Mike G when he was doing something curved on his stairs that inner tube could be employed to clamp the curve.
 
Taken the tapes off.

IMG_4099.JPG
I'm a messy pup with glue.....


IMG_4100.JPG
...but I can be a demon with a cabinet scraper.

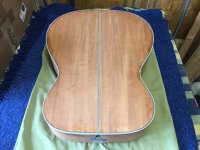
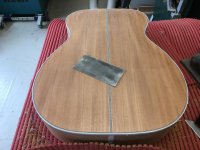
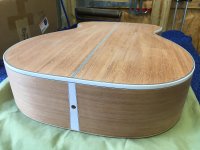
That's the back scraped, can you see the repair?

I'm 95% happy with that. I can see some issues caused by me not cleaning enough of one of the purpling strips of it's rough edges.

Time to scrape the sides.
 
Back and sides bound and purfled.
IMG_4101.JPG

I can see the errors and blemishes in it, but as that's the first time I've ever purfled, I'm quite pleased.
 
Back
Top