• Hi all and welcome to TheWoodHaven2 brought into the 21st Century, kicking and screaming! We all have Alasdair to thank for the vast bulk of the heavy lifting to get us here, no more so than me because he's taken away a huge burden of responsibility from my shoulders and brought us to this new shiny home, with all your previous content (hopefully) still intact! Please peruse and feed back. There is still plenty to do, like changing the colour scheme, adding the banner graphic, tweaking the odd setting here and there so I have added a new thread in the 'Technical Issues, Bugs and Feature Requests' forum for you to add any issues you find, any missing settings or just anything you'd like to see added/removed from the feature set that Xenforo offers. We will get to everything over the coming weeks so please be patient, but add anything at all to the thread I mention above and we promise to get to them over the next few days/weeks/months. In the meantime, please enjoy!

Matt's garage workshop - MFT bench construction

MattS

Nordic Pine
Joined
Jul 4, 2016
Messages
989
Reaction score
110
Location
In the Weald of Kent
Thought I'd start a thread for my new workshop. We moved house in September and so from sharing a single garage with a car I now have the opportunity to have a workshop. We have decided for various reasons, to go with a concrete prefab garage to replace the existing one but increased size to allow for a workshop. I am finalising the layout, and need to decide on door location. I'd always had in my head the side door would go into the workshop, then through door into the storage / metal / garage area. However I am now having second thoughts as to whether I should move the door. I have deliberately not thought too much about layout because this size is basically fixed so I didn't want to plan before having it in place. The garage is tight to next door so is concrete, less than 2.5m and less than 30m2 to avoid any regs / approvals.

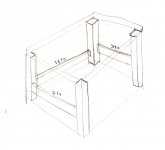
Here is a plan and then a couple of elevations for the door position. My thought with moving the door is that I could then have a workbench under the window for light and also feels like this could give better space utilisation? What do you guys think? I have very little in the way of tools, have always bought stuff used it and sold it! But I do have a pillar drill on a wheeled base and plan to have a MFT style table for use with TS55.

2CEB4917-5879-4CAB-B15B-E92D049851DE.jpg
 
hi Matt,

For my threeha'peth, I would say consider how long and wide any material might be that you would want to work with, whatever tools and machines you have at the moment.

For example, to save costs, if you were to buy sheet material in 8x4 (2440x1220) how would you get it in, manoeuvre it and get it out? That will help determine your door location or locations, and size or sizes. Even with a TS5 and the material static, it will still have to come in and move round to the working position.

That's what I've had to consider with mine.

In due course you may be using machines to deal with lengths of timber. To go through a machine you need the material length on both sides of the machine, so you might need a door, or window, in the material path, if the 'shop itself is not long enough.

Hope this helps a bit.
 
Pre-fab is probably the least favourite construction method for a workshop but I'm sure you have your reasons.

A few thoughts.

Make sure you get a damp proof membrane in the floor somewhere and tuck that up into the walls.

Organise some sort of flexible sealant between the pre-fab panels.

Give serious consideration to saturating the inside surface of the sections with damp proofing bitumen emulsion such as Sythna-prufe or its clones. This is a brown water miscible liquid that turns to impervious black bitumen as the water evaporates. Then it can only be removed from hands etc with whitespirit. Dont even think about cleaning brushes - you will use far more white spirit than the brush is worth.
When you take a break, submerge tools under water.
Its a filthy job but it will keep the damp out. Apply with cheap wide brushes or even a soft/medium broom and throw away after use. You can use it on the floor too (do the walls first. Pour it onto the floor in puddles and push around with a broom. You can apply it to a damp surface - no problem. When dry brush sand over to stop it sticking to your shoes when you lay the final floor surface

If you use polystyrene slab insulation. Then a polythene interface layer will stop the bitumen attacking the polystyrene over time.

All this might sound a bit off-putting but it is fantastic stuff for keeping the damp out and worth the hassle in my book.

Try and avoid the corrugated sheet roofing that normally comes with that sort of building and go for a roof type with some inherent insulating properties to prevent condensation.

Good Luck

Bob
 
Welcome Matt.

Is the base in already for this workshop,, or are you doing a new one from scratch?
 
Thanks all, Malcolm good point about materials and helps make mind up about door location.

Bob / Mike I know concrete is not ideal but ultimately it comes down to cost and wanting to use the location where the garage is currently. Current garage is 250mm from next doors house. The base will be extended to back and side, reinforced and I think it is 3inches over surface.

Intend to waterproof / clad inside. Roof is metal with a costing of some sort but very easily I can insulate with Kingspan type, air gap above and osb underneath so feel
I can get it to an acceptable level of dampness!

The way I look at it any workshop will be better than none ;)
 
MattS":3mvd1wog said:
Roof is metal with a costing of some sort but very easily I can insulate with Kingspan type, air gap above and osb underneath so feel
I can get it to an acceptable level of dampness!

My metal roof is a right PITA ! .. when it's frosty, it gets frosty on the under side.
Then when the temp warms up, it all melts and it has to go somewhere ! :evil:

The only solution I can think of is a vapour/water barrier on the outside of the insulation .. which isn't the best way to do things.
 
One way to deal with metal or other sheet roofing is to spray the underside with closed cell expanding foam designed for the job. This puts a water proof insulating layer in intimate contact with the cold surface of the sheet and no condensation is formed.
I think there are DIY packs of the two part chemicals needed to apply the foam but I don't think it is cheap. I would imagine it needs to be built up in layers to prevent great globs of semi wet foam dripping everywhere. Plenty of scope for making a real mess methinks.

Bob
 
9fingers":2u3wgcyj said:
One way to deal with metal or other sheet roofing is to spray the underside with closed cell expanding foam designed for the job. This puts a water proof insulating layer in intimate contact with the cold surface of the sheet and no condensation is formed.
I think there are DIY packs of the two part chemicals needed to apply the foam but I don't think it is cheap. I would imagine it needs to be built up in layers to prevent great globs of semi wet foam dripping everywhere. Plenty of scope for making a real mess methinks.

Bob
yeah .. had my narrowboat sprayfoamed .. very very messy ! .. wouldn't want to try it in a working shop !
Something to consider at the build stage :)

still .. if it comes to it !
 
Tusses":2jbt6n96 said:
9fingers":2jbt6n96 said:
One way to deal with metal or other sheet roofing is to spray the underside with closed cell expanding foam designed for the job. This puts a water proof insulating layer in intimate contact with the cold surface of the sheet and no condensation is formed.
I think there are DIY packs of the two part chemicals needed to apply the foam but I don't think it is cheap. I would imagine it needs to be built up in layers to prevent great globs of semi wet foam dripping everywhere. Plenty of scope for making a real mess methinks.

Bob
yeah .. had my narrowboat sprayfoamed .. very very messy ! .. wouldn't want to try it in a working shop !
Something to consider at the build stage :)

still .. if it comes to it !

Ah Rich if you are thinking about this at the build stage, then you can buy a laminated shallow corrugated sheet which is a sandwich of metal/foam/metal. Quite light to handle and no condensation problems. I had a couple of buildings put up at work like this and it works well. You can get skylights that integrate into the profile too so you can keep solid wallspace for hanging storage on and still get good natural lighting.

Bob
 
9fingers":18gazge0 said:
Ah Rich if you are thinking about this at the build stage, then you can buy a laminated shallow corrugated sheet which is a sandwich of metal/foam/metal. Quite light to handle and no condensation problems. I had a couple of buildings put up at work like this and it works well. You can get skylights that integrate into the profile too so you can keep solid wallspace for hanging storage on and still get good natural lighting.

Bob

Mines up, and I've had the steel for my next build for a few years now .
Good to know about the tin sarnie though :-) for future projects.

I was thinking more of the OP .. if he can work it into the design to sprayfoam/have it sprayed
I think the boat was a about £1500 .. . 57ft long x 6'high,6'wide .. roof and walls done so 57'x18' ish
 
Tusses":fn1c6lca said:
I was thinking more of the OP .. if he can work it into the design to sprayfoam/have it sprayed
I think the boat was a about £1500 .. . 57ft long x 6'high,6'wide .. roof and walls done so 57'x18' ish

Yes I'm at the build stage, wtched a couple of videos. Not sure I'd want to attempt that myself on a new roof :shock:

I know metal is the worst for condensation, if there was an air gap, then a good layer of insulating panel and OSB below so keeping warm and cold apart not keep condensation down to a minimum?
 
MattS":2x9mqsw8 said:
I know metal is the worst for condensation, if there was an air gap, then a good layer of insulating panel and OSB below so keeping warm and cold apart not keep condensation down to a minimum?

It's the air gap that's the problem.
Air gets in and condenses on the underside
The air doesn't have to be warm to condense
Ever had to scrape your car windscreen in the morning ?
But that's on the outside you think :eusa-think: ..
well, it gets like that on the underside too, if outside air can get in.

Frost is the worst, because when the sun hits it, it all melts at once,
then it's a shower, not a drip. :o
 
So the garage is up :eusa-dance:

I've bought Wickes liquid damp membrane, because it was half the price of Synthaprufe! I'm struggling to find an answer to whether I need to take care covering the mastic/sealant used between the panels. The Synthaprufe data sheets and Google have not helped. No mention of anything I can't over paint with it. Any ideas?
 
MattS":1rx3ew5k said:
So the garage is up :eusa-dance:

I've bought Wickes liquid damp membrane, because it was half the price of Synthaprufe! I'm struggling to find an answer to whether I need to take care covering the mastic/sealant used between the panels. The Synthaprufe data sheets and Google have not helped. No mention of anything I can't over paint with it. Any ideas?

I'm sure if you can tell them what the mastic is made from, then Synthaprufe technical people will be able to advise you. Just don't tell them you have the Wickes equivalent.
You could also ask the sealant manufacturer if it can be over painted with bitumen emulsion.

Thinking back I think I used the Wickes one too on the grounds of price.
I'm pretty certain that it will attack expanded polystyrene which is why I used polythene sheet between the bitumen and the polystyrene insulation.

HTH

Bob
 
I thought it was about time I did an update on this, it’s been nearly 3 years! Picking up where I left off, I’d forgotten that I planned to damp proof the inside. In the end I decided against this because it immediately felt dry inside. Although the walls sit on the slab, the slab does have a DPM and now 3 years later with just the concrete walls and metal roof I still have almost no damp issues. It’s cold but the ventilation seems to be keeping it damp free.

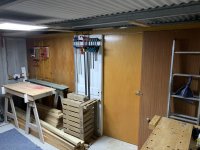
Initially I moved what tools I had in, set it up as if it was two rooms and that’s how it stayed. I don’t have photos but I used part of an old piece of furniture as a long surface in the location the wall would be to check the space worked. I’ve used it to work on a number of little projects all small things or DIY related as I’ve done a lot on the house over the last 3 years with what spare time I had. Fast forward to October last year and I had a week off work. First job was to knock the wall down between kitchen and dining room and after all the associated plumbing and electrical work to get the room functioning I moved to the garage. One of the jobs I’ve done over the years is replace all our internal doors. Previous owners had replaced all bar one of the original 60s veneered doors with awful pine doors, poor quality and badly fitted. Not one fitted or closed well and so I’ve reinstated period doors, not everyone’s taste but we like it. As a result I’ve ended up with a lot of doors! Particularly as I bought 4 on eBay but school boy error collecting in the dark what was sold as veneer was printed! I’ve put these to use cladding a simple stud wall to form the divide between wood shop and garage.

DC845ADC-9FFC-42C1-B397-F42B61EE8950.jpeg

I’ve used 2 pine doors so that I can fix to them. Door to the right of the white one is the actual door to enter other half of the garage. I still need to seal one side from the other to prevent dust getting to the car. Current thoughts are insulation between joists or corex type material fitted to top go wall and first joist.

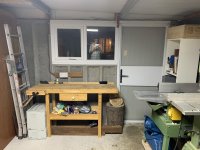
Here’s a few photos of the space, the wall of doors which has a knock down bench in front of it will be the next project, replaced with a MFT style table, 1800X900mm. Base from some really old pine we recovered when knocking out some stud walling in the house.

A329BCF8-8FD5-4BC8-A765-957783DAD982.jpeg
Next my basic workbench, have wood and plans to replace but this does for now as most projects coming up are house based from sheet goods and not hand tool based.

C93EB402-1BA7-4E32-B763-15138DAD3029.jpeg
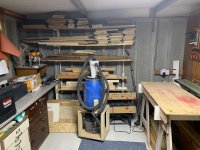
Other side wall has storage and machines, P/T wheels out and bandsaw and pillar drill can be used in situ. The worktop is a bit of a mess, but does the job for now.

1C0BBE34-3B57-411F-8742-8C899B57026A.jpeg
Then wall storage for timber, all reclaimed shelving from a friend and my DIY extractor.

I have projects planned this year hence the drive to get it uses able. I’ll be laying a floor in the lounge / kitchen / diner and then have some built in units to tackle for an alcove.

It’s a basic space but hope this is of interest, I always enjoy others workshop threads.
 
I really would have insulated before filling the space.
 
RogerS":8r5m9dc6 said:
Harrumph....that floor is far too clean ;)

I hoovered for the photo... covered in wood shavings before as I’m trying to set the P/T up so it doesn’t snipe on planing!

Mike G":8r5m9dc6 said:
I really would have insulated before filling the space.

True, and I know you’re the expert but my experience from my last concrete garage which admittedly was 30 years old was that I prefer to be able to see it rather than hiding any damp issues. It’s cold but I use it even now and just wrap up warm. No heating is used.
 
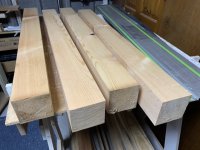
Started on the MFT type bench this afternoon, not a lot to show. I’ve got the Parf guide system for making the top and as mentioned previously have a few lengths of old pine, 2 at 95x95mm and 2 at 95x47mm each is about 2m long and they were stuffed in a studded section of wall lose obviously instead of being thrown away! Bench design is around how much wood I have to hand, I only plan to buy a sheet of MDF for the top and will get a frame to keep the top flat out of this as well. I’d consider a shelf or opening for storing machines underneath but actually don’t have enough for stretchers all round so this is what I’m going with, size 1800x900mm. Hope to put P/T on a base without legs so I can tuck away.

B28E3E67-09BE-4BD3-8082-590AABA28664.jpeg

I’ve been setting up my P/T which needed the table adjusting and new blades when I bought it. What a pain that’s been, I haven’t completely eliminated snipe when running test pieces but seems to be behaving today. No suitable extractor for chips - they make a lot of shavings don’t they?! Ended afternoon with 4 legs planed all round but not cut to final length.

0B66E631-0C43-431B-9CD3-E28A3D3FE7B0.jpeg
 
I've reverted to buying a cheap melamine faced chipboard length and glued sandpaper down the centre of it, then placing the workpiece onto of the sandpaper. The whole lot goes through together and it's eliminated the snipe that I'd previously got on the workpiece.
 
9fingers":1idetma9 said:
MattS":1idetma9 said:
Thanks Malcolm, it’s actually planing that I was having issues with. Thicknessing seems spot on

Sounds like the outfeed table maybe a touch too low Matt.

Bob

I think you’re right - it’s a fiddle to adjust, I don’t really like setting machines up much. My process was;

- wind infeed right up - doesn’t seem to be any adjustment on it.
- level outfeed table to the infeed
- set blades using drag method on a piece of wood with movement at about 4mm

I’d watched a video by Peter Parfitt suggesting 5mm and did this first but reducing blade height improved things a little. I wonder if I’ll ever get it perfect.
 
Neither of my machines have had adjustable outfield tables. So I have had to adjust the blades to the outfeed table. In fact my manual says move the indeed table out of the way.

It also says the movement should be 2 to 3 mm and they recommend an aluminium length rather than wood. This suggests to me that some wood will be too light and too easy to lift and move.

It is a faff and took me over two hours to get both blades to where I thought they should be, and that was on a brand new machine.
 
Back
Top