-
Hi all and welcome to TheWoodHaven2 brought into the 21st Century, kicking and screaming! We all have Alasdair to thank for the vast bulk of the heavy lifting to get us here, no more so than me because he's taken away a huge burden of responsibility from my shoulders and brought us to this new shiny home, with all your previous content (hopefully) still intact! Please peruse and feed back. There is still plenty to do, like changing the colour scheme, adding the banner graphic, tweaking the odd setting here and there so I have added a new thread in the 'Technical Issues, Bugs and Feature Requests' forum for you to add any issues you find, any missing settings or just anything you'd like to see added/removed from the feature set that Xenforo offers. We will get to everything over the coming weeks so please be patient, but add anything at all to the thread I mention above and we promise to get to them over the next few days/weeks/months. In the meantime, please enjoy!
You are using an out of date browser. It may not display this or other websites correctly.
You should upgrade or use an alternative browser.
You should upgrade or use an alternative browser.
Record SS...DUN
- Thread starter Woodbloke
- Start date


All I know is to take note of what keen collectors have studied, deduced and shared, eg here:
Rosewood suggests it's before WW2 and Stayset that it's after 1931. You'll need to work through details not shown in your photo - which was plenty clear enough to show it's a happy day in Salisbury!
Rosewood suggests it's before WW2 and Stayset that it's after 1931. You'll need to work through details not shown in your photo - which was plenty clear enough to show it's a happy day in Salisbury!
Woodbloke
Sequoia
Thanks Andy. Looking briefly through the linkie you kindly sent it's got a Lateral Lever No.4 pattern (1952>57) and a Frog pattern which ended in 1956, so if I were to plump for half way between those dates, around 1954 seems to be a reasonable guestimation? I'll do a bit more sleuthing tonight using the info you've given me. Thanks again - Rob...happy days indeed in Salisbury!All I know is to take note of what keen collectors have studied, deduced and shared, eg here:
Rosewood suggests it's before WW2 and Stayset that it's after 1931. You'll need to work through details not shown in your photo - which was plenty clear enough to show it's a happy day in Salisbury!
There's always the problem that owners can swap or upgrade features, particularly those parts where people have strong preferences, such as the handles and the Stayset option. I don't know any more details myself and only have a few Record planes of my own.
Woodbloke
Sequoia
I thought that the handle/tote were Rosewood, but having taken off the handle and sanded the underside it's Beech, so definitely post WW2. Cutter is the original pattern as well, dating up to the mid 50's when it was altered - Rob...who may make some new ones out of proper, pukka RosewoodThere's always the problem that owners can swap or upgrade features, particularly those parts where people have strong preferences, such as the handles and the Stayset option. I don't know any more details myself and only have a few Record planes of my own.
Last edited:
That should confuse the next owner!I thought that the handle/tote were Rosewood, but having taken off the handle and sanded the underside it's Beech, so definitely post WW2. Cutter is the original pattern as well, dating up to the mid 50's when it was altered - Rob...who may make some new ones out of proper, pukka Rosewood

Woodbloke
Sequoia
HopefullyThat should confuse the next owner!


I think the handle/tote aren't original as they didn't fit properly and I suspect they were changed sometime in the past. The rear handle nut is also too small for the hole and when it's fully tightened the nut surface isn't coplanar with the top...there's a wee 'step' on one side which makes me think that it's not the original handle - Rob
Last edited:
Woodbloke
Sequoia
Not a full restoration in any way, shape or form, but simply a really good spruce up and attempting to ensure a closer mating fit of the frog to the body:

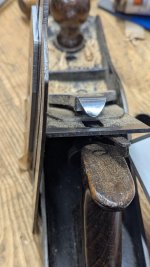
The front underside of the frog (arrowed) wasn't really flat, so the burr that had taken all the pressure (hence shiny) over the decades was made flat using a few strokes of a 6" smoothing file. The frog seating on the main body was cleaned up using a dowel in the pillar drill coated with coarse valve grinding paste, so burrs and high spots have been removed. Once all the screw threads had been oiled (3 in 1):

...the frog was reassembled onto the plane body. Next job is to sort out some Rosewood for the front knob and handle - Rob
The front underside of the frog (arrowed) wasn't really flat, so the burr that had taken all the pressure (hence shiny) over the decades was made flat using a few strokes of a 6" smoothing file. The frog seating on the main body was cleaned up using a dowel in the pillar drill coated with coarse valve grinding paste, so burrs and high spots have been removed. Once all the screw threads had been oiled (3 in 1):
...the frog was reassembled onto the plane body. Next job is to sort out some Rosewood for the front knob and handle - Rob

Pete Maddex
Old Oak
I have had records with a rosewood knob and beech tote, i guess they using up what they had left over.
Pete
Pete

Sheffield Tony
Nordic Pine
Or the original rosewood handle broke at some point as they often do? But I think you are right that the transition was a gradual one.
Woodbloke
Sequoia


Woodbloke
Sequoia
I hate making handles for planes...probably one of the hardest things to do when it comes to fitting the angled rod, but by COP:

...yesterday I'd got this far. The amount off faffing around it takes is unbelievable; mating frog surfaces cleaned up with a dowel dunked in valve grinding paste spinning in the pillar drill - Rob
...yesterday I'd got this far. The amount off faffing around it takes is unbelievable; mating frog surfaces cleaned up with a dowel dunked in valve grinding paste spinning in the pillar drill - Rob
Pete Maddex
Old Oak
I have a long series 6mm drill bit reground as a lip and spur bit that goes right the way through, but not enough travel on the quill so I have to stop and wind the table up. Clamping the rack to the pillar keeps it in alignment.
I drill the counter bore in the top and bottom first before the through hole it really helps to reduce tear out round the hole.
Pete
I drill the counter bore in the top and bottom first before the through hole it really helps to reduce tear out round the hole.
Pete
Woodbloke
Sequoia
The plane was a gift Andy and the handle/knob were horrid, worm eaten, covered in thick gloopy, badly applied stain so they had to go, but an hour's worth of bandsawing, rasp work together with a bit of powered sanding resulted in:I was wondering why you are putting yourself through all this if you don't enjoy it - but presumably it's a favour for someone else?
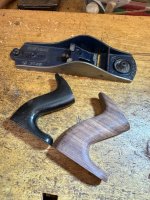
...this; slightly fatter than the original, which was too skinny anyway. Needs a whole load of hand sanding now, but it's essentially done - Rob
Woodbloke
Sequoia
It's now changed from a decent 'user' with grotty handles to something that's a little better:

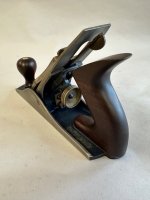
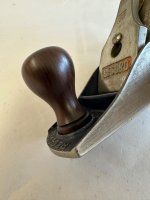
...and the front knob with 'V' cut detailing:
As mentioned above, it's not a full restoration project or anything like, but a general clean up, thead oiling (never been done) as well as a new front knob and handle in Indian Rosewood, so now it's a much more pleasant 'user' than it was a couple of days ago. Although there's absolutely nothing wrong with the original Record cutter, I've decided to treat it to a new Japanese blade from Workshop Heaven as I recollect that some while ago @Eric the Viking mentioned how good they were, having purchased one or two from Ax aeons ago. You won't be surprised (or maybe you will) to learn that Classic Hand Tools sell something similar for over twice the price, which is more than a bit steep!! - Rob
Edit - Indian Rosewood finished with two coats of Odie's Oil and a slathering of smelly Alfie Shine
...and the front knob with 'V' cut detailing:
As mentioned above, it's not a full restoration project or anything like, but a general clean up, thead oiling (never been done) as well as a new front knob and handle in Indian Rosewood, so now it's a much more pleasant 'user' than it was a couple of days ago. Although there's absolutely nothing wrong with the original Record cutter, I've decided to treat it to a new Japanese blade from Workshop Heaven as I recollect that some while ago @Eric the Viking mentioned how good they were, having purchased one or two from Ax aeons ago. You won't be surprised (or maybe you will) to learn that Classic Hand Tools sell something similar for over twice the price, which is more than a bit steep!! - Rob
Edit - Indian Rosewood finished with two coats of Odie's Oil and a slathering of smelly Alfie Shine
Last edited:

TomTrees
Sapling
- Joined
- Aug 19, 2014
- Messages
- 389
- Reaction score
- 104
That's painfully clever Pete!, and yet so simple at the same time...sounds waaay more straight forward than my Heath Robinson arrangement,I have a long series 6mm drill bit reground as a lip and spur bit that goes right the way through, but not enough travel on the quill so I have to stop and wind the table up. Clamping the rack to the pillar keeps it in alignment.
Pete
and ponderings regarding a big square/flat & plumb stud, for the table apron..
or even thoughts regarding a thicker walled column with a slot, for a spring pin to engage with.
Slightly miffed, an understatment, why the heck wasn't this wasn't suggested to my thick skull before?,
as I posted on having this exact problem previously.
Care to add a little more details/provide some links if possible?
I'd like to see what clamping arrangements were neseccairy, and Perhaps some other for bits of info.
Wouldn't ya think the manufactures could elaborate on this idea, as it sounds like this extremely useful function could be done very cheaply...
I'd be out experimenting on this, though a fools errand for me now, due to already having this function, combined with the dodgy quill, arbour, bearings, and chuck.. Lol.
Would love to see someone demonstrate this indexed drilling tip with a machine in trustworthy condition.
Cheers
Tom
Last edited:
Woodbloke
Sequoia
As mentioned above, the new Japanese blade from WH was fitted the other day. The original blurb on the webpage mentioned a thickness of 2.6mm and this was changed after my 'phone call where in conversation with the charming lady in the office (MP off swanning around the Continent apparently...disgraceful) I said it actually measured:
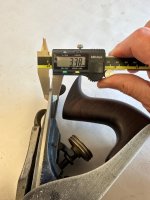
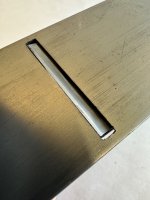
...nearly 3.4mm and would not drop in, as advertised online, straight into a No.4 without 'adjustments'. In this particular instance, the mouth was very carefully filed out from an original, scant 5mm to a just a smidge over 6mm:
Worth noting as well, that as it's a Japanese 'Blue Paper' steel blade, it should IMO be honed with a single 30 deg bevel as you would a chisel. This preserves the much softer backing steel that supports the very, very hard 'Blue Paper' steel honed edge. Matt is off on his hols at the moment, but early next month I'll give him a ring on the dog n'bone and have a natter with him - Rob
) I said it actually measured:...nearly 3.4mm and would not drop in, as advertised online, straight into a No.4 without 'adjustments'. In this particular instance, the mouth was very carefully filed out from an original, scant 5mm to a just a smidge over 6mm:
Worth noting as well, that as it's a Japanese 'Blue Paper' steel blade, it should IMO be honed with a single 30 deg bevel as you would a chisel. This preserves the much softer backing steel that supports the very, very hard 'Blue Paper' steel honed edge. Matt is off on his hols at the moment, but early next month I'll give him a ring on the dog n'bone and have a natter with him - Rob
Sheffield Tony
Nordic Pine
Watch out that for the SS cap iron and a thick cutting iron, the lever cap screw can be close to full stretch with not that many turns of thread engaged. Would not want to strip the thread out of the frog.
That sounds like a useful warning.Watch out that for the SS cap iron and a thick cutting iron, the lever cap screw can be close to full stretch with not that many turns of thread engaged. Would not want to strip the thread out of the frog.
Rob, if you need one made, I could turn you a longer replacement.
Woodbloke
Sequoia
Thanks Andy, that would be very handy. I'll check after tea and get back to you via a PM if that's OK?That sounds like a useful warning.
Rob, if you need one made, I could turn you a longer replacement.

Accipiter
Nordic Pine
- Joined
- Oct 16, 2025
- Messages
- 830
- Reaction score
- 619
- Location
- Frome, Somerset
- Name
- Frank
- LOCATION
- Somerset
Question Rob, if I may... re the filing out. Would that be making the opening bigger by filing at the back,front or trying to make it even both front and back? I've never been in such a position for having to do this so my mind is inquisitive about this 
Pete Maddex
Old Oak
If you file the back of the mouth you can go back to a thin iron.
Pete
Pete
Woodbloke
Sequoia
It's the front of the mouth that's filed....carefully!Question Rob, if I may... re the filing out. Would that be making the opening bigger by filing at the back,front or trying to make it even both front and back? I've never been in such a position for having to do this so my mind is inquisitive about this
You still can this way Pete, all you need to do is to advance the frog to close up the gap, but in all honesty, this blade is pretty darn good and I wouldn't want to return to anything thinner - RobIf you file the back of the mouth you can go back to a thin iron.
Pete
Planeiron
New Shoots
That's a great result on filing the mouth. I was in a similar position when I needed a new blade for a no.6. I must've purchased the same brand (also from WSH) along with a new cap iron. There was no way this was going to fit as it's a hefty piece of metal. I chickened out and bought a Hock which turned out to be the Goldilocks of the 3 and just about fitted without any filing.
New blade at the top, old at the bottom
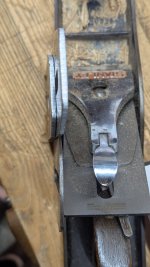
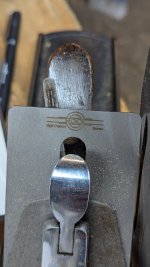
New blade at the top, old at the bottom