• Hi all and welcome to TheWoodHaven2 brought into the 21st Century, kicking and screaming! We all have Alasdair to thank for the vast bulk of the heavy lifting to get us here, no more so than me because he's taken away a huge burden of responsibility from my shoulders and brought us to this new shiny home, with all your previous content (hopefully) still intact! Please peruse and feed back. There is still plenty to do, like changing the colour scheme, adding the banner graphic, tweaking the odd setting here and there so I have added a new thread in the 'Technical Issues, Bugs and Feature Requests' forum for you to add any issues you find, any missing settings or just anything you'd like to see added/removed from the feature set that Xenforo offers. We will get to everything over the coming weeks so please be patient, but add anything at all to the thread I mention above and we promise to get to them over the next few days/weeks/months. In the meantime, please enjoy!

Return of the shed thread (a little more progress)

Wizard9999

Old Oak
Joined
Aug 8, 2014
Messages
1,409
Reaction score
0
Location
Eversley, Hampshire
Well, as some may know my shed thread is currently residing in the nether regions of cyberspace. Hopefully it ill return, at which point it an be merged with this thread.

Having built the frames it took a while to get around to erecting them on the plinth walls. I have to say it was not without a fair degree of trepidation that I approached this task, as having made the frames they were a lot heavier than I had expected and I was rather concerned my block laying skills would be proved insufficient and the walls would crumble when the frames were put into place.

Rob (also no on TWH) had kindly said he would again come around and give me a hand, as well as another friend Ian (particularly generous as he has no interest in woodworking or workshops, he'll learn one day). Rob arrived first and we decided on the order to put the frames up in. The key factors I this were access, the weight of the frames and a particular concern about the strength of one of the walls. So the first wall was the side nearest the trees.

I was planning to put the frame on a bed of mortar as Mike advocates. My understanding (possibly wrong) is that this is for two reasons, to makes levelling easier and helps seal the building reducing the air that can get between frame and plinth. This seemed like it would add an extra element of complexity to the whole process, so we first lifted the first frame up to see the extent of levelling needed. Well, by luck rather than judgement I am sure, when the frame sat on the wall it was almost completely level and certainly better than any tolerance I was looking for, at worst it was about by about 5mm over the c.4.2m length. So after a short conflab Rob and I decided that it would be a lot easier to drop the frames straight onto the wall without any mortar - I'm sure it ends up as a major issue with heat loss I can find a way of sealing the gap.

So we cut a strip of DPC to length took the frame off, put the DPC down and lifted the frame into place. The frame was just as level as the first time. Throughout this build the two large oak trees have caused no end of problems, at last there was plus for building so close to them, one of them was the perfect rock solid point to attach a brace onto. So one up, three to go.


The second frame we decided to put in place was the back frame. Not much to say here, it went up pretty much as per the first, except if anything it was even closer to perfect level. This is very useful, as the roof joists will sit on the front and back frames. as the front frame s a little taller this creates a slight slope on the roof. The resulting triangular gap will then be in-filled. So having the sides level is not key, far more important is front and back.


My friend Ian's timing was perfect as he arrived just as the post frame 2 tea was finished. This was a good job as the next frame to go up was by far the heaviest, the front. Clearly the doubled up 200mm x 50mm timber I have used above the door opening was heavy, but I had expected it the large open section to compensate somewhat. Well this frame was way to heavy for two of us to do anything more than lift it a few inches off the ground, but with a third person we managed to man handle it all the way around the house. It took a huge effort but we managed to put it up onto the plinth and again it was level. You'll see that, like Mike I left the sole plate whole across the bottom for cutting later, the weight is all at the top and if I hadn't I'm pretty sure it would have twisted itself to pieces when we were moving it.


We left the other side frame to last as there were real questions in my mind as to whether this wall could take the weight. My thinking was that if the frame could go up and we could fix it to the two frames adjacent to it then it would be partly supported if the worst happened with the wall. Well I need not have worried, the wall was fine and dandy. Not easy to get an angle for a picture of this wall as it is up against the house.


Now I know whilst Mike tends to have pictures that are in a Haynes manual style (very helpful in providing info on how to do things), mine are a bit more tourists holiday snaps a bit superficial and content free. But the next one probably shows a few things worth pointing out.
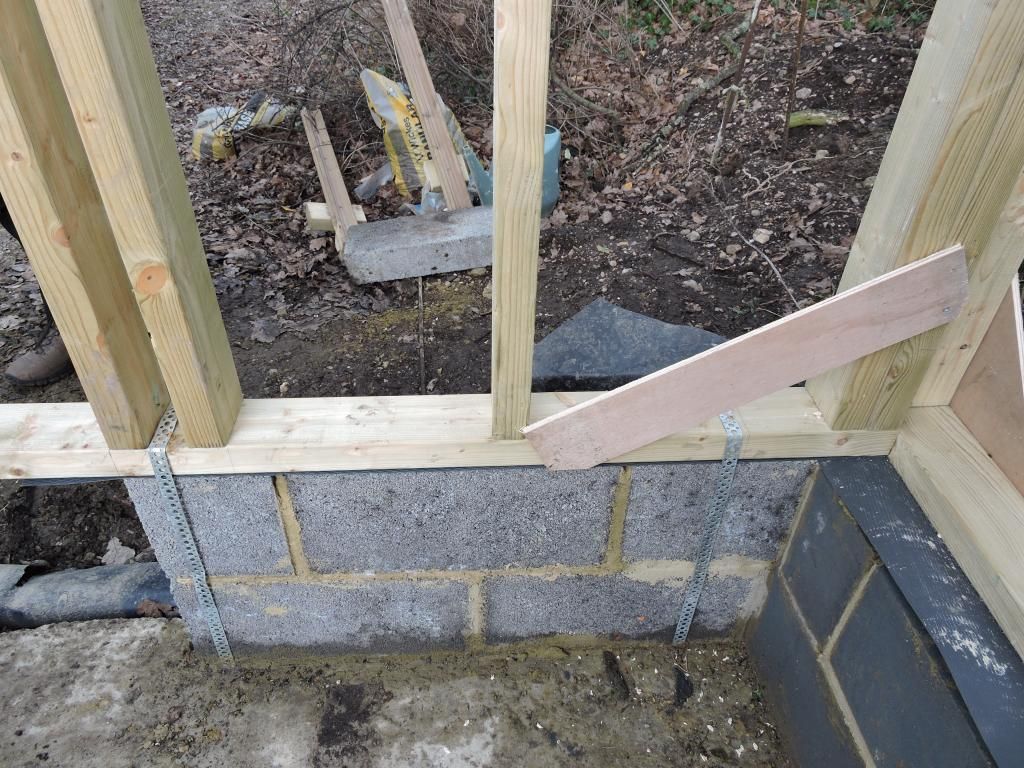

First the strap on the left hand side. Here you can see why I had to make one of the uprights removable, so the strap could be fixed and the upright put back into place. You can also see that on the two walls that have a double skin (back and tree side) the frame is sitting on the outside, this will allow me to use the inside wall as a narrow shelf.

Anyway, I'm about out of steam now and my typing fingers are sore. Tomorrow I'm hoping to have a look at getting the roof joists up, they're heavy, but I think it is easy enough to get them in place if I take my time and lift one end at a time.

I did have one question for you though. Once the joists are up I need to start getting the OSB up on the inside of the walls and the underside of the roof. Chances are it will be up one weekend and the outer skin for both roof and walls will not be up the same weekend. But what I don't know is how durable OSB is and how long it could reasonably be up before I get the outer skin covering it. Any advice would be much appreciated.

Terry.
 
Excellent Terry. Good work. I'll see what the horizon is like at the weekend and see if I cant give you a hand with those rafters even if its for a couple of hours. It's going to be cold tomorrow isn't it?
 
Excellent stuff Terry.

Don't worry about your OSB. It is so full of glue that it will last months exposed to the weather. It just thickens up slightly. Remember to leave a small gap between sheets........I use a nail as a spacer.
 
Interesting. What's the gap for, Mike?

Good work, Terry...When lifting heavy objects vertically I'm a great fan of hiring a Genie lift.
 
RogerS":9pwr45mb said:
Interesting. What's the gap for, Mike?

Good work, Terry...When lifting heavy objects vertically I'm a great fan of hiring a Genie lift.

I think Mike means he spaces the OSB with a nail to allow for the expansion from soaking up water from being outside Roger. Thus they end up butting once they've grown and would otherwise bow. At least that's the way I read it??
 
Great stuff Terry well done. Can't be easy having to work in such restricted space. The gap between the back of the garage, the fence and those trees must mean there is very little room for manoeuvring.
 
Well I feel really bad now. I've just basically had to leave Terry in the lurch as I was told in no uncertain terms by SWMBO I needed to be on hand at home for the onslaught of several noisy children descending for the afternoon. (4 boys)

He's now man handling very long 8x2's on his own erecting the roof. It's ideally a 2 man job but I suspect Mike's super human efforts have set the bar pretty high for us mere mortals!

Though cold, the weather was sunny and no wind so progress is happening and I reckon he'll have the bulk of it done by the end of the day.
 
Once the framing starts to go up it does feel like the build advances leaps and bounds, certainly what it felt like for me in my last place. You're doing great Terry.

What has happened to all the ground workings from this thread?

Mark
 
Rob":sxv12xz4 said:
Well I feel really bad now. I've just basically had to leave Terry in the lurch as I was told in no uncertain terms by SWMBO I needed to be on hand at home for the onslaught of several noisy children descending for the afternoon. (4 boys)

He's now man handling very long 8x2's on his own erecting the roof. It's ideally a 2 man job but I suspect Mike's super human efforts have set the bar pretty high for us mere mortals!

Though cold, the weather was sunny and no wind so progress is happening and I reckon he'll have the bulk of it done by the end of the day.

Thanks to Rob's help I did indeed get all but one of the joists up before I threw in the towel due to bad light. To be honest I would have had that up as well if I had cut it right (being on the side it has to have an angle cut to run along the wall for a way - got one side spot on with a bit of basic maths, but for some reason the second one didn't go so well).

More detail AND PICTURES tomorrow at which point I hope I will also have a fair bit of OSB up as well (now I know it can cope with January weather, thanks for that Mike.

Terry.
 
OK, second try to post this, part way through typing this out Photobucket crashed and as I had not saved a draft...

First, yesterday.

My roof joists are on a very shall angle (I later worked out about 1 in 25). But I decided trying to notch my joists with such a shallow angle in the joists would be beyond my tolerances to achieve, so I went for the simpler approach of a square notch that would sit over the front and back frames. My first solo effort was poor in both concept and execution. I cut the two sides of the notch and then drilled a hole in the corner of the notch and inserted the reciprocating saw to cut out the notch - the logic was that as the reciprocating saw blade was cutting along the notch it would give a smoother base to the notch.


But the reciprocating blade flexed so I ended up with a hideous slope across the width, I eventually levelled this off but it took some considerable time.

At this point Rob arrived. Now Rob has three things in his favour over me, more experience, more intellect and sharper chisels. He suggested we cut many slots with his circular saw and then chop out the waste with a chisel. Worked a treat.


As the joists as delivered were very even in length and I want a consistent overhang we then just lined up all the joists and cut all the front notches in one batch.


Whilst the frame of the workshop is pretty square it's not perfect, without allowing a fairly substantial amount of 'play' in the second notch it was not going to work to cut these in a batch. Instead we offered up each joist and marked where the notch needed to be, being very careful to number the frame and joist for later alignment. We then lined the joists up for the lines for cutting the notches and again batch cut.

If I recall correctly this is the point Rob had to leave. This left me to get the joists up, not a piece of cake but possible in an improvised style. Lots of lift one end at a time and moving steps backwards and forwards, and some precarious balancing if needs be. I actually got pretty good at walking up the steps and catching the joist on my shoulder without breaking my stride.


Having got all the 'inside' joists up I turned my attention to the ones on the side of the frame. These needed to be cut with a slope from the end of the notch until the slope of the joist cleared the top of the frame. I measured the length the slope ran over and the amount of the fall, it worked out a 1 in 25, so knowing how deep the notch was I could calculate what the slope needed to be. I cut the slope and the joist fitted first time, perfectly. Chuffed or what.


Well you know what they say, "pride comes before a fall". It was getting dark now, so I went straight to the second side joist. To cut a long story short, after three attempts at getting this in place the slope I cut still wasn't right, so I had to give up. I still don't know if it was an error of intellect or if there is an inconsistency in my build that is waiting to be discovered that caused the problem, only time will tell.

Today did not start well. In the early hours of the morning I was woken by a migraine, never a good thing when the pain is enough to wake me up. It meant I was in no fit state to do anything on the workshop until early afternoon, and even then the sound of cutting and hammering was actually quite painful to endure. Still, I only have weekends to do this workshop in and with other commitments at best I get 1 1/2 days a week, so losing two thirds of a day was pretty disastrous and I was not willing to surrender the little daylight there was by this stage.

On the second attempt I finally got the last joist in place and decided I would start on cladding the walls with OSB. Well, this meant getting my as yet unused Makita SP600 track saw out. Oh what a joy, I'm in love. It is very solidly built, the track works beautifully and the results are excellent. My only critiques are that there don't seem to be any instructions on how to join the two tracks and whilst it may seem to be easy I was not sure what the second piece of the joining kit is for. Second point may be related in that once joined it did seem quite possible that the leverage could result in the joining strip (which is pretty short) bending. I may well look into a longer track, not sure Makita do one, but believe the Makita saw fits the Festool track and I have seen longer Festool tracks.

Anyway, I started with the back wall, easier as the ceiling is level across the length. I took note of Mike's advice and used a couple of screws to space the boards out to allow for expansion due to the elements.


I then moved on to start the sides and had to deal with the slope again. Rather than test my maths again, I cut a dummy noggin that I could push between the joists directly above the stud the piece would attach to. By aligning this noggin to the joists I could then measure to the noggin to get the precise height required and cut the slope.


I then manage to fit two boards on the side. I worked beyond dark under the outside light at the back and a temporary site light, but at the point debris started to freeze to the track saw tracks I decided it was time to throw the towel in. Also way too dark for a final photo.

In the end, not a bad weekend's work.

One last point. Having been advised by Bob to maximise height at the neighbour's side of the shed even if that meant it going above the fence line, that is what I did. Having swung joists and panels of OSB around in the space now all I can say is, good call Bob!

Terry.
 
Andyp":45p3eke6 said:
Can't be easy having to work in such restricted space. The gap between the back of the garage, the fence and those trees must mean there is very little room for manoeuvring.

Spot on there Andy. For example, when putting the joists on a couple of times I lifted the wrong end first, only finding on the last part of the lift that there was not enough 'travel' between workshop and fence to get the joist up, which meant all they way down to the ground and start again!

When I do my summer house in wide open space it will be a joy in comparison.

Terry.
 
Excellent report Terry, and nice photos. Good to see such solid progress. Hope you actually nailed those roof joists in place. I hope your head feels better!
 
Looking good. I feel your pain on the migraine front. I get them too and understand how disabling they are.

For your end joists, I would have left the joist set off your end panel and put sprockets in for your facia.

Nothing wrong with how you've done it though. Good effort indeed.
 
Good progress Terry, plenty of effort gone in there!

Finding time for all these things is the thing I find hardest what with 2 kids and they various activities, my own cycling, and work, there ain't much left for playing!

Cheers
Mark
 
TrimTheKing":2rfeeov7 said:
Good progress Terry, plenty of effort gone in there!

Finding time for all these things is the thing I find hardest what with 2 kids and they various activities, my own cycling, and work, there ain't much left for playing!

Cheers
Mark

Ain't that that truth! I'm worried that I'll finish this and end up with no time to work in it. Roll on early retirement.

Terry.
 
Terry ,

Makita do a 3m rail for those saws. The joining bar you're talking about should be 2 bars sandwiched together the when you tighten the Allen grub screws it separates the bars. If you do this with it in the rail it then locks the rails . You need to put a straight edge against the rails as you do it.

I've not got the Makita but have used one a few times.

I have the far superior festool lol ;)
 
chippy1970":22jk5icf said:
Terry ,

Makita do a 3m rail for those saws. The joining bar you're talking about should be 2 bars sandwiched together the when you tighten the Allen grub screws it separates the bars. If you do this with it in the rail it then locks the rails . You need to put a straight edge against the rails as you do it.

I've not got the Makita but have used one a few times.

I have the far superior festool lol ;)

Thanks for that, I had just put the bar with the grub screws in and tightened up to the rail itself and then wondered what the second bar was for :eusa-doh: . I did think about the over priced Festool ;) but the deal on the Makita at the D&M tool show was too good to pass up.

Terry.
 
chippy1970":36ihc6ws said:
To be honest the Makita saws are good for the money.

It was a good deal, just under £300 for saw, blade, sustainer, 2 x 1400mm rails, rail bag and 2x clamps. Which is why having just looked at D&M I baulk at paying £150 for one 3000mm rail.

Terry.
 
I'd forgotten about your track saw Terry....that would have come in pretty handy chopping out those notch/mortices in the rafters...accurate depth setting and lining up the track with the mark out for the cut and its battery wouldn't have died half way through :-)

Note to self: make an inventory of Terry's hidden tool stash ;)
 
Well, I have to say, I am very pleased with progress in the last week.

I left it last week with one and a bit sides of the interior clad with OSB. Rob came round to help again and before much more cladding could go up we decided getting the windows in would be useful. We offered up the first window and determined the sizes for the additional framing required to support the window. With this framing in we were able to offer up the window again and, having checked levels, could fit the frame above and to the sides of the window. This first window fitted perfectly in the space left in the frame with the additional framing.


I already knew the second gap had been made a little too small. So having put top, bottom and one side in around the window we were able to measure up the remaining gap and Rob made a quick trip home to 'trim' the final piece of the frame on his bandsaw. He came back with the reduced width section (and very usefully the offcut, more of that below). We slotted in the second window and could then continue with the cladding.


As I am sure somebody will spot it I may as well confess, yes the windows are at different heights. On the first window when I measured I forgot the bottom of the window frame. When fitting the second window we wanted to try and get it at the same height the table saw will be at, so in extremis I could put wood being cross cut through the window. So we had to make the necessary correction to the height. Working to the mantra of "this is just a shed" we concluded there was no point taking out the first window to lower it. It actually has a benefit as the first window has a nice view and it is better being a little bit higher to allow for the view.


Cladding of the inside walls went on well, well beyond dark!


The next job was getting the under side of the roof clad and for this one I was on my own. Well even if I say so myself I had a rather good idea. The offcut from the side of the window frame was had a nice degree of flex in it, was remaining pretty strong. So I attached an offcut of OSB to it too act as a spacer.


I was then able to clamp it to the joists and use it as an extra hand to support one end of the boards as the went up. As I was on my own I did also rip down the sheets of OSB lengthways, so I was only dealing with half sheets which added to the time it took but made it possible.


The width of the workshop means I need two sheets on the ceiling to make the width, when doing the second side I simply turned my 'third hand' over as the spacer was no longer required and clamped it to the piece I had just put up.


I had to add a noggin or two along the edges as the last joists are actually over the walls.


As got to the far end of the workshop these needed to be notched slightly to keep the ceiling broadly level. Well, start 'em young I say, so here is my son hard at work (yes Rob, that is one of your chisels).


And, when not woodworking my son picked up the camera so you can have a bit of insight into my technique!


I worked my way right up to the last piece, where there would be nowhere to clamp my, third hand. I was just thinking of an alternative way of doing it when SWMBO came to the rescue and leant me her hands.

Now, I don't know about you, but this is starting to look like a workshop to me!


A couple of other things to note. First, Rob made a very natty little work table with two saw horses and an offcut of OSB. I am now referring to it as the MFT-OSB. If you like it I'm sure Rob can knock u another one for no more than £500. What better use could it be put to than this!


Finally, if you don't have anyone to hold the end of a board you are cutting, how do you stop it crashing to the ground potentially destroying the corners?


Magical levitation?

No, with 'Terry's magic fingers'. Just two more offcuts of OSB sitting under the board on both sides of where the cut will be. By accurately adjusting the depth of the plunge on the track saw you can cut the board and leave the 'fingers' holding up the offcut.


Well, that's more than enough from me for now.

Terry.
 
Excellent Terry....that made me chuckle.

A veritable home from home now :eusa-clap:
 
Great progress Terry, well done.

Good to see your boy getting involved too. Can't wait until my kids are old enough to properly help with this kind of stuff. :)

Cheers
Mark
 
I like your 'fingers'. Usually, I'll support the near edge with my thigh and hold the far edge with my lefthand but that only works for smallish boards.
 
A long time back I did all my board cutting on a couple of sheets of this stuff.
181-rigid-insulation-03.jpg


With the circular saw depth set just enough to cut through the insulation lasts a long time.
 
Looking very cosy!

It is going to get cold and wet over the next couple of weeks however - I would recommend covering that OSB with at least a tarp to prevent water delaminating the edges of the OSB. Although it has a high glue content, it is not immune to the ravages of water ingress. Better yet is to prioritise finishing the roof if possible!

Steve
 
StevieB":2frxv9j3 said:
Looking very cosy!

It is going to get cold and wet over the next couple of weeks however - I would recommend covering that OSB with at least a tarp to prevent water delaminating the edges of the OSB. Although it has a high glue content, it is not immune to the ravages of water ingress. Better yet is to prioritise finishing the roof if possible!

Steve

Uh oh, Mike said it could be exposed for some time no worries :o .

That said, as long as I get the insulation and EPDM order this evening I plan to try and get the out roof covering on this weekend, eather permitting.

Terry.
 
Excellent progress, Terry. I like all your little ideas for working alone, too. I have to think like that all day every day, as there is never anyone to hold the other end or pass something up to you. One handed clamps were a genius invention from that perspective!

Are your two windows different? It's just that they don't appear to have the same cill height.
 
Mike G":2md6sxj2 said:
Are your two windows different? It's just that they don't appear to have the same cill height.

Tut, tut Mike...

Wizard9999":2md6sxj2 said:
As I am sure somebody will spot it I may as well confess, yes the windows are at different heights. On the first window when I measured I forgot the bottom of the window frame. When fitting the second window we wanted to try and get it at the same height the table saw will be at, so in extremis I could put wood being cross cut through the window. So we had to make the necessary correction to the height. Working to the mantra of "this is just a shed" we concluded there was no point taking out the first window to lower it. It actually has a benefit as the first window has a nice view and it is better being a little bit higher to allow for the view.

Guess you were tired from a day on your build :lol: ;)

Terry.
 
Coming on Terry and some great comical banter. Keep up the good work.

I remember once seeing a documentary once about the Americans building a station at south pole. To cut a long story short they didn't finish the build in time for winter so left a shell covered in osb board. They returned a year later expecting to find it all wrecked but it wasn't.
 
I'm almost afraid to post now. Not only do we have 'Master Builder Mike' but now we are blessed with 'Artisan Alex', and here I am with antics rather more akin to the character of Terry from Viz - hopefully most of you will know his full name, I won't repeat it here!

Well, if OSB can survive an Antarctic winter...

Saturday was a bit of a write-off. We had people coming over for dinner and I was on cooking duties so only the morning was available. When I went outside the shed was covered in a film of semi-thawed icy snow and where it wasn't frozen it was soaking wet. And when inside the gaps I left for expansion meant I had to stand directly under a board to avoid a cold shower! It was not going to happen! Well I put the time to good use in the kitchen instead and prepared for :obscene-drinkingcheers: :obscene-drinkingbuddies:

Sunday morning started with a tiny little bit of a headache, but I decided a bit of chilly fresh air could do nothing but good. I found the insulation a bit difficult to handle! Each roll is about twice as long as my workshop and I made a real hash of unwinding it (it expanded to about five times the size it is in the pack it when I took the plastic off). It is also pre-perforated for 400mm and 600mm sections. What this actually meant in the roll I used was that in some places there was no perforation and in others it was not joined at all. You've probably got the idea I ended up with insulation everywhere, but at least it made me forget my headache.

Anyway, I finally got some up onto the roof and between the joists, which are neither exactly 400mm or 600mm apart :eusa-doh:. Now I'm about the worlds worst at working at heights, so crawling along the joists as I unrolled the insulation was far from my favourite job on this build so far.


In the picture above you will also see my 'safety fingers' at the far end of the roof. As there was no way I was able / willing to try and carry boards up a ladder the best way to get the boards up was to get one end over the edge of the roof and give an almighty shove upwards and forwards - basically throwing them into the roof. Before I started it occurred to me that if the angle was wrong a board could just slide done the roof and end up in the neighbour's garden. So I screwed scraps of OSB to the ends of the joists to at least slow the boards down if this happened.

Anyway, there were no run away boards and I got to screwing them down. I wanted to try and minimise the scope for water to get into the insulation before I get the EPDM on, so these boards run with the joists with just one join on the length.


And under the boards a decent 'corridor' for ventilation over the insulation.


As my confidence increased on the roof I picked up a bit of speed and two thirds of the roof is now done.

My 'safety fingers' did cause one amusing moment. I was on the roof and saw Mrs Neighbour come out into her garden to feed the birds, I didn't know the etiquette for sitting on a shed roof peering into the neighbours' garden so I decided that I would only speak if she spoke first. Nothing, so I just got on with what I was doing. Roll forward no more than ten minutes and there was Mr Neighbour dragging his son outside to play baseball in the garden. He very quickly struck up a conversation and took very little time in asking just how much higher is "that shed" going to get. This is the top said I, patting my newly laid OSB board, "so what are those bits?". I explained that my 'safety fingers' were there only out of consideration to them and about thirty seconds later they were heading in with about one contact between ball and bat. I rather think Mrs Neighbour had sent him out to find out more after her trip to the bird feeder!

I rather hope to carve out time to get the last third of boards on soon so the EPDM can go down to make the roof waterproof. I fully appreciate it would be better to put the EPDM down in warmer weather, but I don't want to leave it unprotected for any longer than necessary.

Terry F*&%W1?.
 
That must make me Buster Gonad!!

Blimey mate...sorry I couldn't be there for that...what a struggle to get those boards on top...great job though and I love the rodent nesting area...er I mean....air flow bit :-)
 
Back
Top