Way back over a century ago in 1924, one Edward Oakley had a bright idea. Corrugated iron sheeting was a popular material for all sorts of roofing requirements, but it was difficult to cut. As far as I can tell, the standard tool was a cold chisel with a long curved edge, like this: (picture from a 1925 Melhuish catalogue)
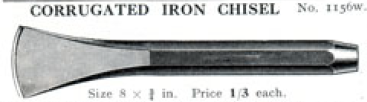
but it must have taken ages. The portable angle grinder was still decades away in the future, and you couldn't even use a hacksaw, as the thin blade had to be held taut in a frame, and the frame got in the way if you were trying to cut something more than a few inches across.
But Edward must have been a clever chap as he developed his idea and took out patent GB 236448A, issued in 1925. Here are the drawings from it:
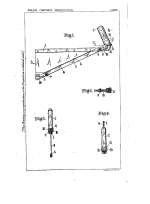
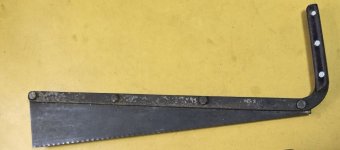
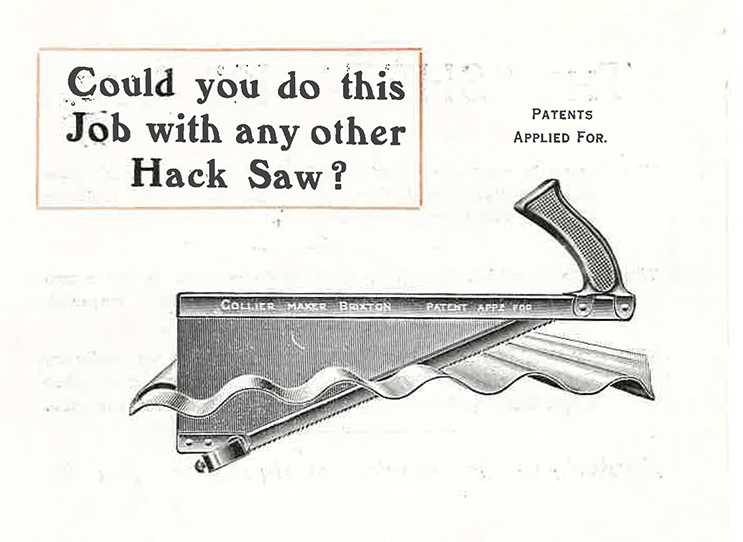
You can see that a normal hacksaw blade is held against a thin sheet of metal - rather like an ordinary backsaw - and tensioned by a threaded anchor. If you make your cut in the direction of the arrow marked in Fig.1 as 3-> there's a clear run at the blade, for as long as you want, like this:
Now, when I was at school, some of the time allocated to our brief lessons in woodwork and metalwork was given over to technical drawing and theory. (Presumably all 32 of us fighting over the sharp tools was too much even for our very patient teachers.) And some of the theory was copying out pictures and notes of tools, one of which was an odd-looking "Shetack Saw". Did this plant a seed that only germinated many years later? Maybe, but the name and the image lay dormant in my brain ever since.
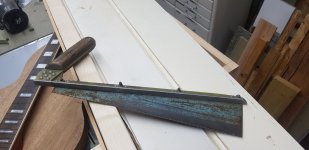
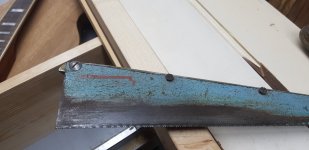
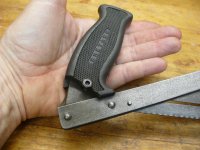
So it was with great pleasure a little while back, when my good friend Andy B generously gave me this attractive and - to me - valuable! specimen from his collection...
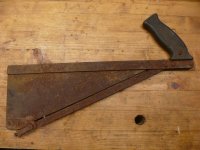
You can see that the unusual surface treatment extended across most of the functional details, but it was indeed, a "Shetack" saw and matched my distant memories!

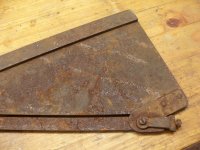
Before I embarked on putting it back into working order, I had a bit of a look into its history. These saws were made by Monument Tools.
Monument Tools is an unusual company. It was started, as Colliers of Brixton, back in 1880 and continued through five generations as a family firm. It still makes a wide range of very good tools, mostly for the plumbing trade, and manufactures them in Hackbridge, in the south-west London borough of Sutton.
They are rightly proud of their heritage and in the "Our History" section of their website, there's a clear statement: "In 1924, Arthur Collier Snr. buys the patent to the Shetack Saw from the inventor."
(There's also a longer history of them in the TATHS Journal number 7 here:
https://www.taths.org.uk/component/...ths-journals&id=154:journal-7-1992&Itemid=101
and a series of videos on their YouTube channel.)
The design has gone through several versions, which is easily seen by doing an image search or looking on auction sites. There's a good clear picture of the one that Arthur Collier donated to the Science Museum here
And so to the rust!
Following the recent discussions about electrolysis, and a substack linked to by @SteveMP , I thought I'd try that method. I'd done some before, but couldn't remember much about it. The article Steve referred to recommended using some proper steel for anodes, so I took the time to cut bits off a long steel bar that I bought donkey's years ago from a scrapyard. (I even used an electric angle grinder to cut it, which was a bit unusual for me, but I know it's somewhat harder than ordinary mild steel. The cutting disc made an impressive display of orange sparks, which I think is a good sign.)
I couldn't get a very good picture of the setup because of reflections from the bright sunshine, but here's one from part way through when I was changing the scummy water. The plastic bits are just to stop the saw from flopping over.

Also, I had a bit of an interruption to the process. It kicked off nicely with plenty of bubbling (next to an open window in a good draught) but then stopped. I could still hear a buzz from the transformer but when I checked the voltage it had gone down to less than half a volt. Fortunately, the fault was at the level of electronics I feel comfortable with - a soldered connection to the rectifier had parted company:

but was easily fixed.
The electrolysis did seem to have shifted the rust but had left a thick layer of soft blackness over the saw.
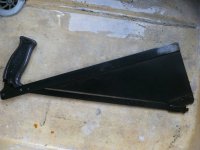
I gave it a few hours more and decided it was time to rinse everything off and start cleaning up by hand.
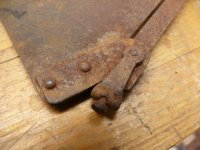
The good thing was that the rusted-up threads were now freed, revealing the tensioning bracket (which was at the other end in the original patent drawing).
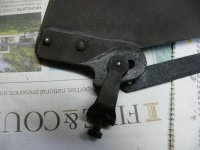
I didn't take pictures of all of this stage, but you can probably imagine a wire brush or two, which did most of the work, plus a couple of abrasive blocks. I finished off with some fine wire wool and some microcrystalline wax, which should prevent any future rusting.

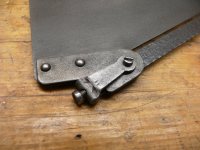

I found some text that had been hidden. On the hacksaw blade, the memorable old brand name, Ding-Dong, established 1899:


(Ad image from Grace's Guide)
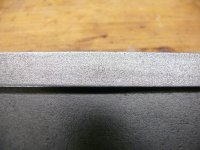
I could also see that this saw was presumably an early example, not yet marked with the patent number, just the usual PATENT APPLIED FOR
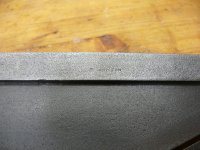
but also this much rarer wording. Looking at it when it first showed up, I thought it said MADE IN BRIXTON but here on a big screen it looks more like MAKER on one line with BRIXTON below. Frustratingly, the first line is lost to time, but I expect it would have said COLLIER.
So there you have it, a little bit of British manufacturing history, a bit of an old geezer's reminiscing, and an example of how to get rid of lots of rust.
Thanks again to Andy @toolsntat for making it possible!
but it must have taken ages. The portable angle grinder was still decades away in the future, and you couldn't even use a hacksaw, as the thin blade had to be held taut in a frame, and the frame got in the way if you were trying to cut something more than a few inches across.
But Edward must have been a clever chap as he developed his idea and took out patent GB 236448A, issued in 1925. Here are the drawings from it:
You can see that a normal hacksaw blade is held against a thin sheet of metal - rather like an ordinary backsaw - and tensioned by a threaded anchor. If you make your cut in the direction of the arrow marked in Fig.1 as 3-> there's a clear run at the blade, for as long as you want, like this:
Now, when I was at school, some of the time allocated to our brief lessons in woodwork and metalwork was given over to technical drawing and theory. (Presumably all 32 of us fighting over the sharp tools was too much even for our very patient teachers.) And some of the theory was copying out pictures and notes of tools, one of which was an odd-looking "Shetack Saw". Did this plant a seed that only germinated many years later? Maybe, but the name and the image lay dormant in my brain ever since.
So it was with great pleasure a little while back, when my good friend Andy B generously gave me this attractive and - to me - valuable! specimen from his collection...
You can see that the unusual surface treatment extended across most of the functional details, but it was indeed, a "Shetack" saw and matched my distant memories!
Before I embarked on putting it back into working order, I had a bit of a look into its history. These saws were made by Monument Tools.
Monument Tools is an unusual company. It was started, as Colliers of Brixton, back in 1880 and continued through five generations as a family firm. It still makes a wide range of very good tools, mostly for the plumbing trade, and manufactures them in Hackbridge, in the south-west London borough of Sutton.
They are rightly proud of their heritage and in the "Our History" section of their website, there's a clear statement: "In 1924, Arthur Collier Snr. buys the patent to the Shetack Saw from the inventor."
(There's also a longer history of them in the TATHS Journal number 7 here:
https://www.taths.org.uk/component/...ths-journals&id=154:journal-7-1992&Itemid=101
and a series of videos on their YouTube channel.)
The design has gone through several versions, which is easily seen by doing an image search or looking on auction sites. There's a good clear picture of the one that Arthur Collier donated to the Science Museum here
And so to the rust!
Following the recent discussions about electrolysis, and a substack linked to by @SteveMP , I thought I'd try that method. I'd done some before, but couldn't remember much about it. The article Steve referred to recommended using some proper steel for anodes, so I took the time to cut bits off a long steel bar that I bought donkey's years ago from a scrapyard. (I even used an electric angle grinder to cut it, which was a bit unusual for me, but I know it's somewhat harder than ordinary mild steel. The cutting disc made an impressive display of orange sparks, which I think is a good sign.)
I couldn't get a very good picture of the setup because of reflections from the bright sunshine, but here's one from part way through when I was changing the scummy water. The plastic bits are just to stop the saw from flopping over.
Also, I had a bit of an interruption to the process. It kicked off nicely with plenty of bubbling (next to an open window in a good draught) but then stopped. I could still hear a buzz from the transformer but when I checked the voltage it had gone down to less than half a volt. Fortunately, the fault was at the level of electronics I feel comfortable with - a soldered connection to the rectifier had parted company:
but was easily fixed.
The electrolysis did seem to have shifted the rust but had left a thick layer of soft blackness over the saw.
I gave it a few hours more and decided it was time to rinse everything off and start cleaning up by hand.
The good thing was that the rusted-up threads were now freed, revealing the tensioning bracket (which was at the other end in the original patent drawing).
I didn't take pictures of all of this stage, but you can probably imagine a wire brush or two, which did most of the work, plus a couple of abrasive blocks. I finished off with some fine wire wool and some microcrystalline wax, which should prevent any future rusting.
I found some text that had been hidden. On the hacksaw blade, the memorable old brand name, Ding-Dong, established 1899:
(Ad image from Grace's Guide)
I could also see that this saw was presumably an early example, not yet marked with the patent number, just the usual PATENT APPLIED FOR
but also this much rarer wording. Looking at it when it first showed up, I thought it said MADE IN BRIXTON but here on a big screen it looks more like MAKER on one line with BRIXTON below. Frustratingly, the first line is lost to time, but I expect it would have said COLLIER.
So there you have it, a little bit of British manufacturing history, a bit of an old geezer's reminiscing, and an example of how to get rid of lots of rust.
Thanks again to Andy @toolsntat for making it possible!