• Hi all and welcome to TheWoodHaven2 brought into the 21st Century, kicking and screaming! We all have Alasdair to thank for the vast bulk of the heavy lifting to get us here, no more so than me because he's taken away a huge burden of responsibility from my shoulders and brought us to this new shiny home, with all your previous content (hopefully) still intact! Please peruse and feed back. There is still plenty to do, like changing the colour scheme, adding the banner graphic, tweaking the odd setting here and there so I have added a new thread in the 'Technical Issues, Bugs and Feature Requests' forum for you to add any issues you find, any missing settings or just anything you'd like to see added/removed from the feature set that Xenforo offers. We will get to everything over the coming weeks so please be patient, but add anything at all to the thread I mention above and we promise to get to them over the next few days/weeks/months. In the meantime, please enjoy!

Time for a new bench (dog holes)

I know that people react in various ways to Chris Schwarz's opinions on things, but he has built a lot of benches and spent a lot of time researching and designing them.

You can download his Anarchist's Workbench Book foc at this link

https://lostartpress.com/products/the-a ... -workbench

He gives his preferred holdfast hole pattern on page 200.
 
Looks a good solid bench Mike :eusa-clap:

I found the easiest way to drill 3/4 holes perfectly perpendicular to the top was with the router, I drilled a 30mm hole in a scrap of thin wood, centred it over were I wanted the hole then clamped it in position & used a 3/4 cutter & 30mm guide bush in the router to cut the hole. If you don’t have a 3/4 cutter use a smaller one but make the guide bush hole bigger in the scrap of wood to compensate. Also even if the bit isn’t long enough to go all the way through the top it will give you a great reference hole to carry on with an auger & keep it perpendicular.
 
Doug":3d7pe7vl said:
Looks a good solid bench Mike :eusa-clap:

I found the easiest way to drill 3/4 holes perfectly perpendicular to the top was with the router, I drilled a 30mm hole in a scrap of thin wood, centred it over were I wanted the hole then clamped it in position & used a 3/4 cutter & 30mm guide bush in the router to cut the hole. If you don’t have a 3/4 cutter use a smaller one but make the guide bush hole bigger in the scrap of wood to compensate. Also even if the bit isn’t long enough to go all the way through the top it will give you a great reference hole to carry on with an auger & keep it perpendicular.
I did the same but then drilled the ones in the apron. What a mistake they are all slightly different and cause havoc with jigs. So use the router to create the holes n the apron as well. I intend to plug mine with dowel and recut them one day.
As for the front row, you are right to think about having them and/or placement. I put mine too close to the apron and curse that I cannot use a carvers screw as the apron prevents the over sized wing nut from tightening. I use the front row of holes more than any others.
 
Doug":2d1fd50l said:
Looks a good solid bench Mike :eusa-clap:

Thanks Doug.

I found the easiest way to drill 3/4 holes perfectly perpendicular to the top was with the router, I drilled a 30mm hole in a scrap of thin wood, centred it over were I wanted the hole then clamped it in position & used a 3/4 cutter & 30mm guide bush in the router to cut the hole. If you don’t have a 3/4 cutter use a smaller one but make the guide bush hole bigger in the scrap of wood to compensate. Also even if the bit isn’t long enough to go all the way through the top it will give you a great reference hole to carry on with an auger & keep it perpendicular.

You're dead right about the technique, but it's beyond my kit levels, I'm afraid. My biggest straight cutter is 9mm, and it can only cut about 25 or 30mm deep. Lose 8 or 10mm for the template and we're looking at 15 or 20mm deep holes. So, I'm going to be kneeling on the bench drilling with a brace and auger. I might make a guide to help.
 
PAC1":1423uga4 said:
.....I did the same but then drilled the ones in the apron. What a mistake they are all slightly different and cause havoc with jigs......

What jigs do you use on the apron?
 
AndyT":14ct6jir said:
I know that people react in various ways to Chris Schwarz's opinions on things, but he has built a lot of benches and spent a lot of time researching and designing them.

You can download his Anarchist's Workbench Book foc at this link

https://lostartpress.com/products/the-a ... -workbench

He gives his preferred holdfast hole pattern on page 200.

Thanks Andy. In one sentence he says he doesn't want the bench covered with so many holes that it looks like it's got giant woodworm, and in the next there's a drawing showing about 18 holes! I'm looking at 4 at the moment.
 
Mike G":20iw4jyp said:
PAC1":20iw4jyp said:
.....I did the same but then drilled the ones in the apron. What a mistake they are all slightly different and cause havoc with jigs......

What jigs do you use on the apron?
The back jaw of my vice is not flush with the apron :o It is proud. Therefore I have a a packer and support for planing long deep pieces which should be self supporting from a dowel. That does not work properly because it does not fit 100% parallel to the apron. I also planned to make a large version from 3x2 say 30” long so that I could clamp work to the apron vertical to work on it in such a way that the weight and stress is taken by the jig and any clamp simply stops the work from moving. That proved impossible.
The holes are fine for holdfasts and the like. It is any jig where you use a dowel to take the load where they really need to be 100% accurate. If you taper the dowel to compensate the jig falls out if it is not clamped in position.
 
PAC1":20gotpzd said:
....The back jaw of my vice is not flush with the apron :o It is proud. Therefore I have a packer and support for planing long deep pieces which should be self supporting from a dowel...

Ah, I see. Do you gain any advantage by not having the apron as the back jaw? If not, why not re-locate the vice rather than fill all the holes and re-drill?
 
Right, where we we before work interrupted?

Ah yes, I had just patched up an old board to use as a stop parallel to the front edge of the bench. I spent a while umming and ahhing about hole location and spacing, but it all became clear in the middle of a night. I marked everything up on the worktop, and transferred the markings to the stop. Clamping that in place involved a long piece of wood:

hEZYmgv.png

I squared up some offcuts to use as a guide, climbed on the bench top, and started drilling:

VP8QEyw.png

k3NU5ye.png

Using the now-drilled board as a guide ensured that the remainder of the holes were correctly spaced. Some years ago I had bought an old snooker table because I wanted the slate for my hearth. Along with it came a dozen or more snooker cues:

9AyQoNq.png

Because of the very gentle taper it was easy to push them in until they fitted, and cut off a section above and below this point to give me the diameter of pegs that I wanted. With an offcut off rubberwood (if that's what it is), I set about making some bench dogs:


oN0w1Ie.png

SHwvdRI.png

XxiGVzO.png

qtoTgtS.png

pV81MVI.png

lKcxgEB.png

I was a bit enthusiastic with the hammer on the first one:

JocJdT5.png

I had a grand tidying session, and thought I'd compare the old bench with the new:

vcBjVuZ.png

4njM0GE.png

When the glue had set I cleaned up to dogs:

yiRyIWH.png

They have to be this sort, rather than the type with a spring and just a round section with a flattened face, because with the big apron and doors it would be a complete pain to retrieve any pegs which got knocked in flush. In addition to work as dogs, they also locate the parallel stop in place. Note the differing distance to the front edge of the bench due to the line of holes being very off-centre:


V1s1iZY.png

fItyXQu.png

There are 3 locations for the stop:

rbu2Yir.png

rDigPjc.png

The latter will be useful if I ever use the belt sander at the bench, which is very seldom these days.

Right, on to doors. Here are the ones from my old bench:

R71l1ry.png

I was pleased to find they were dry fitted:

RQNO7Z1.png

I cut all the T&G to length, as well as a 2 ort 3 new pieces saved from the back and sides of the bench. I then planed all the varnish off ono the PT, and re-did the arrises/ grooves with a block plane. Next I found some suitable Douglas Fir to use as ledges. It was absolutely gorgeous close grained and quarter sawn stuff:


KeWzgVw.png

4N0Mrmp.png

There's the planing stops in use already. I've been lost without them for a couple of weeks. After marking and drilling them I used some modern screws as clamps:

nw1iWe1.png

This enabled me to take the doors to the saw horses and use a Yankee to drive in the slot headed screws which had held the old doors together:

4USwJwm.png

Rather than trying to hinge directly off the legs, I cut some smaller pieces for the task. Again, note the backstop:

ehwdMY3.png

The doors fitted very easily, which is always great. With double doors like this a little twist normally makes things awkward, but there was very little:


wTGfXlF.png

TCMe62V.png

I made a little thingamejig to hold the bench dogs:

XQnoiEo.png

NHmpnmx.png

So that, ladies and gents, is the bench done. It has been fun, but feels very self-indulgent and quite an unproductive time in that I have far more important things to be getting on with. With an hour or two left of the day, I thought I'd tackle this disaster area on the other side of the workshop:

ASdOlgU.png

I cleared everything away. Note the position of the right hand leg:

CNUfsYK.png

I moved the leg, and re-fitted the hinged router table in an altered location:

BOze0Q3.png

I rewired the remotely switched socket which turns the router on and off, and made a little shelf for my battery chargers:


WTbf4b7.png

UgqDoc5.png

The re-located leg left me a space for the set of shelves which house sanding belts, clamping block thingies, and a whole lot of floating tongues from the days when I used to use such things. The bigger bench had left it homeless:

woMluZc.png

It might take me a long while to get used to walking into the workshop and seeing a new overly-smart thing where my bench used to stand. In the short time I've been using it, though, I've discovered a couple of things. Firstly, the height is much better. I really enjoy not stooping all the time. Secondly, when you've twice as much space you get lazy and just leave tools lying around in your way. A small bench forces a discipline on you.
 
Good result. Nice. I think the ledges on those doors might just be adequate. :?

Stuff expands to fill the space. I made a 5.2 m long by 1.2m wide Island in our kitchen which I thought was ginormous at the time, but now I sometimes find it a bit cluttered :lol: No doubt your bench will be the same.
 
AJB Temple":57ug3uuu said:
... I made a 5.2 m long by 1.2m wide Island in our kitchen which I thought was ginormous at the time, but now I sometimes find it a bit cluttered :lol: No doubt your bench will be the same.

I know, I've seen it. It's HUGE.

I'm determined to keep my old disciplines and not just put tools down any-old-where.
 
Looks great.
And I was relieved to see the other end of the workshop in its natural state.

I'm sure you will find plenty of projects to enjoy it on, even when you finish the house.
 
Looks very nice indeed Mike, I noticed on the plans that this one is 925mm high what was your old one pls? I’m a little obsessed with heights at the mo. Particularly as you said what an improvement it is.
Ian
 
Congratulations Mike for making this brilliant work bench and many thanks for posting the detailed progress photos.
 
Thanks John, it was a pleasure.

Ian, the old one was 860 high. I did a survey here a year or two back and concluded on average that the starting point for bench height is a little more than half your standing height. I suggest making it a little taller than you think, and leave the front bottom rail high enough that you can always cut an inch or two off the legs.

Edit: here's that old thread:http://thewoodhaven2.co.uk/viewtopic.php?f=19&t=8499
 
Mike, that looks very smart indeed, excellent work. :eusa-clap:

Looks too good to be used.
(just around the corner is the old bench which will still be used :D )
 
Phil":1rt9dms9 said:
.....Looks too good to be used.
(just around the corner is the old bench which will still be used :D )

That's the danger I was trying desperately to avoid. You may never have heard of Waka, but he was a forum member who made the fanciest bench and tool cabinet you've ever seen. I couldn't think of anything I'd like less.
 
Mike G":11ws5hsf said:
Phil":11ws5hsf said:
.....Looks too good to be used.
(just around the corner is the old bench which will still be used :D )

That's the danger I was trying desperately to avoid. You may never have heard of Waka, but he was a forum member who made the fanciest bench and tool cabinet you've ever seen. I couldn't think of anything I'd like less.

I recall the name Waka.


When I made a new top for my work ‘cabinet’ when we moved to the smaller house, I protected it with an old towel and worked on the router table top.

About 4 years ago I decided it should get a coat of BLO, but first needed to find place for all the stuff on the top.

It now has some dents, scratches and getting some character. Still no BLO. :o
(It has been christened with beer and wine :lol: )

All my assembly work is either on the router table and/or the table saw which has a thick piece of hardboard protecting the top, which has lots of character. :D
 
I kind of agree with the sentiment about workbenches being too fancy. I have perfectionist tendencies and like to keep pristine things pristine. I do admire the really nice ones like the Cosman build or Derek Cohen's lovely job. My OCD aspect :o is why I continue to use ancient second hand workbenches that are beaten up and marked. I get paint and glue on them, drill marks in the top etc. Most of the time my bench is a sheet of 8 by 4 shuttering ply (on some support sheets) on three trestles. It's pretty much ruined by tracksaw marks. It doesn't matter much if I strip down a chainsaw or something on that.

I'm starting to get interested in clock and watch repairs, so that may require a nice bench.
 
Now Mike's finished and we're on to digressions, anyone recognise this well-used bench or its owner?

IMG_20190610_134218795.jpg

Note the simple construction, deep apron and Parkinson's Perfect vice.
 
Excellent work Mike, that will see you out and whoever inherits it. I do like that aside from the beech it is mostly made from reclaimed materials, you haven't made an effort to make it a "showy" bench as so many do and become to scared to actually use it for fear of damaging the top, but all the different materials and the pretty much totally handcrafted nature of it gives it a charismatic charm very few new benches seldom have, a proper WORKbench.

Mike G":1907n96c said:
Now, let me tell you about something that has been bothering me for days. I've been working in an ad hoc way on the top when it was just individual boards, and the planed surface has been ridiculously slippery. Bits of wood skid around all over the place, and I have pondered long and hard how to get over this. Would a finish help? Would toothing the surface with a toothing plane, or dragging a handsaw all over it, do the trick? Mentally, I was all set to do the latter.

You may have seen it before, but there were a bunch of mini-documentaries made in the late 1970s and 1980s in Ireland based on rural crafts called "Hands", one of the craftsmen showcased was John Surlis making a "Leitrim Chair" and he was also shown in the "Hurl-Making" episode. Where I'm going with this is at one point in the Hurl-Making documentary at about 9:45 he shows how he makes his "Cooper's Mare" more grippy by rubbing the teeth of a handsaw along the clamping faces.

You can see it here: https://www.youtube.com/watch?v=l38gpMWbzA8

AndyT":1907n96c said:
Now Mike's finished and we're on to digressions, anyone recognise this well-used bench or its owner?

Cmon Andy, that's easy! But I'll leave it to others to have a guess first. All I'll say is B.H.
 
Benches seem to reflect users and their individual varied outlooks and attitudes. The picture below is my late fathers , last one he built 23 years of use upto his passing in 2010. As a kid i used to go to work with him one week each summer in my school holidays from age of about 7 -14 ( when i started a paper round and evening jobs)so ‘72 on. My first job on leaving school was with the builder next door. In that time he had a small joinery shop with 3 bench joiners ( little Ron, Jeff and Lawrence fulltime and a couple of subbies that did the site work, he and his partner did the office side of things and most of the machining,( i expect i’ll be able to draw out the arrangement of that place and the machines in it to my last day)then had another workshop when he sold and went on his own again, then moved to wales and the bench in the pic.

The benches were all the same, very plain, chipboard tops , between 8 and 10 feet long and 3 wide. No stops or dogs, anything needed would be nailed or screwed in place as required, 12” overhang each end to allow for g clamps, the overhang having space for a coping saw, square, tenon saw and couple of g cramps to hang. The stretchers boarded to form a shelf.

They were mainly for setting out, easing and assembly/gluing up, fitting hardware and beads, very little heavy work. ( morticer, tenoner, planer thicknesser, spindle etc did most of that in machine shop) . When they did shopfronts the frames would span as many benches as needed and the boys worked on it together.

IMG_7874.jpeg
 
Trevanion":1jyjofn6 said:
Excellent work Mike, that will see you out and whoever inherits it. I do like that aside from the beech it is mostly made from reclaimed materials, you haven't made an effort to make it a "showy" bench as so many do and become to scared to actually use it for fear of damaging the tp, but all the different materials and the pretty much totally handcrafted nature of it gives it a charismatic charm very few new benches seldom have, a proper WORKbench.

Thank you so much. You've got the flavour of what I was intending exactly right. And yeah, I reckon it's got a far higher percentage of the original has than has Tally Ho! Could I claim it to be a re-build? ;) I think everything on the bench is second hand other than the front two boards of the top, and the apron.
You may have seen it before, but there were a bunch of mini-documentaries made in the late 1970s and 1980s in Ireland based on rural crafts called "Hands", one of the craftsmen showcased was John Surlis making a "Leitrim Chair" and he was also shown in the "Hurl-Making" episode. Where I'm going with this is at one point in the Hurl-Making documentary at about 9:45 he shows how he makes his "Cooper's Mare" more grippy by rubbing the teeth of a handsaw along the clamping faces.

You can see it here: https://www.youtube.com/watch?v=l38gpMWbzA8....

I shall definitely look them up, thanks.
 
Lovely bench which will no doubt help you make countless lovely things. (I'm feeling tired just thinking about the work you're going to churn out on it!)
 
Great looking bench Mike. Like others I admire its functionality and the rate you will use it.

MIne is more like your original one, ex school, jacked up on blocks. Top needs flattening a bit though.

I don't remember Wakas bench but I do remember his tool cupboard, a work of art in itself and the most expensive tools.

I'd just like an organised workshop with a home for everything, no matter what it looks like

Mark
 
Trevanion":2gku1u00 said:
Cmon Andy, that's easy! But I'll leave it to others to have a guess first. All I'll say is B.H.

That's the one. Glad someone has been paying attention!
 
Thanks Alasdair. A 1900 bench? Sounds like we should have a photo or two of that.
 
Thoroughly enjoyed this build series and the bench looks great. I like the mix of new and old, crisp joinery and screws. I do think you could have stretched to a new plain stop that looks a bit beat up on the new top. I know you’ll say it works so why change it :lol:
 
MattS":ysergu2v said:
I do think you could have stretched to a new plain stop that looks a bit beat up on the new top. :lol:

I think the new top might soon match the old stop Matt ;) :lol:
 
Lons":1ekj4xwj said:
MattS":1ekj4xwj said:
I do think you could have stretched to a new plain stop that looks a bit beat up on the new top. :lol:

I think the new top might soon match the old stop Matt ;) :lol:

I did think that!

Apologies also for my poor spelling…. Plane!
 
Mike G":2bjh9pw4 said:
Thanks Alasdair. A 1900 bench? Sounds like we should have a photo or two of that.

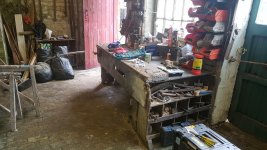
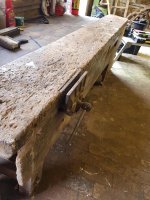
Pictures arent that great (I am working away at present on a restoration project for the National Trust for Scotland) so not in the workshop as much as I'd like to be.

I cannot seem to get the second picture to rotate to the correct alignment

Bench 1.jpeg

11.jpeg
 
Back
Top