• Hi all and welcome to TheWoodHaven2 brought into the 21st Century, kicking and screaming! We all have Alasdair to thank for the vast bulk of the heavy lifting to get us here, no more so than me because he's taken away a huge burden of responsibility from my shoulders and brought us to this new shiny home, with all your previous content (hopefully) still intact! Please peruse and feed back. There is still plenty to do, like changing the colour scheme, adding the banner graphic, tweaking the odd setting here and there so I have added a new thread in the 'Technical Issues, Bugs and Feature Requests' forum for you to add any issues you find, any missing settings or just anything you'd like to see added/removed from the feature set that Xenforo offers. We will get to everything over the coming weeks so please be patient, but add anything at all to the thread I mention above and we promise to get to them over the next few days/weeks/months. In the meantime, please enjoy!

V & A coffee table Finished!

AndyP

Moderator
Staff member
Joined
Jul 22, 2014
Messages
14,297
Reaction score
1,850
Location
14860 Normandy, France
Remember the ideas I had for a coffee table?
viewtopic.php?f=26&t=6814

I’ve started!

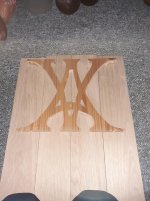
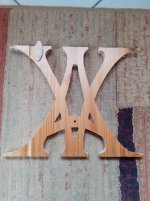
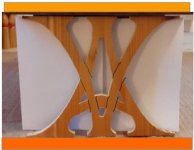
Stuck Malcolm's pattern on to two pieces of laminated pine boards and screwed together.
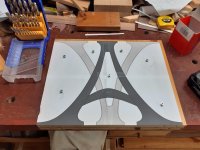
47E7EFC1-1EEE-44B3-9F53-C4B223999620.jpeg

Cut the biggest pieces out on the bandsaw.
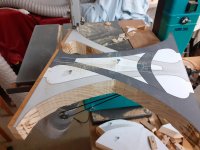
AE6EEEA2-02C4-4CC9-A4AB-06865538AA31.jpeg

The inside cutouts on the scroll saw
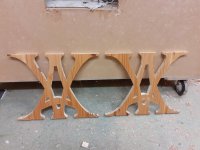
D5F1EE33-5F18-4117-8E5E-A6B314A6F077.jpeg

FA054071-3D3F-4B62-BCF4-3445158C20E7.jpeg

And offered up to an existing table to see how it would look
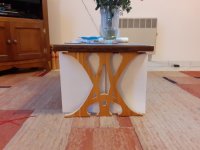
76E1BEF4-CEE7-4AAB-AD12-4F2D4B063E2B.jpeg

From this I can see that the feet need more meat and there is not a lot of room for the rails at the top. :eusa-think:

What about a stainless steel stretcher between the legs to hold them apart? Fixed in the middle of the A’s crosspiece .

Thoughts and opinions welcome.

I am now on the lookout for some 1” oak boards to make the real thing from.
 
Love the prototyping, Andy. Watching with interest.
 
Good work. :text-bravo: I would experiment with carving to differentiate the V &A. Agree the feet need to be a good deal thicker as that end grain is vulnerable.

Do you have a lathe? A turned bar between the legs (may need to be made in 2 or 3 pieces) might look good.

Will you let the legs into the top underside with a hidden or maybe wedged tenon? Would add rigidity and as a through wedged tenon, with contrast wedge, might show it off as hand made cabinet making.
 
Well it’s a start.
For the carving do you mean carving some grooves to highlight one of the letters eg the V like this

8AE4435E-3C85-47E1-9794-D0BF06BE6D89.jpeg


For attaching the top I am thinking about through cylindrical loose tenons, aka, dowels. Either wedged or not. I like the combination of oak and walnut which was used to great effect on the settle. A walnut stretcher as well perhaps.
 
Hi Andy, I acquired some cast iron table ends which in effect were pretty much what you’re doing with the V and A, this was a lot of years ago, I put a top on it but needed a stretcher, I imagine the original had been cast-iron so I used a piece of mahogany and planed facets on it and fitted staircase type nuts and bolts to the ends where it went through the cast-iron and tightened it all up, the end section of the mahogany where it touched the cast-iron was about an inch and a half square? The table never was hugely stable and if I was to do it again the stretcher would be redesigned so that it had a higher cross-section, certainly no less than 2 1/2 inches, but that was a 7ft dining table.
Rather than have such a large piece of wood going across at the bottom you may be able to add another two at the top which would give you more stability as well as something to fasten the top to, looking really good up to now. Ian
 
Andyp":3nswba91 said:
Well it’s a start.
For the carving do you mean carving some grooves to highlight one of the letters...

This is going to be a good'n :D For the carving, I'd go the whole nine yards and break out the carving gouges to relief carve the whole lot (or part of it) to accentuate where the two letters cross - Rob
 
I'd beef up the delicate letter endings with two horizontals as in the crude diagram below. these would over hang a bit and be thicker than the VA section by say 10mm either side you could even M&T the letter ends into the horizontals.

VA2.jpg

Bob
 
OK. here is where I am this morning.
Ian correctly pointed out the advantages of upper rails which is something I had in mind before.

legendsA.jpeg

The red boxes represent the horizontal rails with dowels to hold in place. The dowels to attach the legs to the top are also in green. I could also add buttons to the rails to hold the top.

The weak end grain I only see as an issue for the feet and I would really like to keep the overall design unaltered so I propose just two, relatively thin, pieces of horizontally grained timber under each as shown in black. Maybe under the V as well.

That level of carving Rob goes against my KISS principles, sorry.

A simple turned wooden stretcher maybe in order. Lathe not big enough to do in one piece but could be made in pieces as Adrian suggests.
 
Maybe rout a small radius roundover on all the cut edges and mimic the profile by carving where you have indicated on your photo?
If you are putting the feet on the ends of the A's I think I'd leave the end of the V off the floor as it will be both strong enough and to avoid more problems getting 6 feet in the same plane to stop rocking.

Bob
 
Andyp":3m62s3nh said:
That level of carving Rob goes against my KISS principles, sorry.
All in favour of the KISS principle Andy, but I'd be tempted to go the extra mile on this one. The relief carving doesn't have to enormous, rather where one letter is a few mm higher than t'other, 'specially at the areas where they intersect. I reckon if you tried it out on some scrap pine and did a very rough 'lash up' you'd see what I was on about...it would give a sort of a 3D dimension to the ends and would look rather 8-) 8-) - Rob

Edit: I'd suggest that the 'A' could be made a tad lower than the 'V'
 
If I'd have got my doigt out last year and got the component parts of my CNC router machine then, it could be ready by now and I might have been able to carve the V & A ends with it. After all, I still have the original file.

But, now…..it could be years before I finish this wiring. :)
 
Great start Andy! Looks very good.

I totally agree with Roberto - a wee bit of relief carving is definitely the way to go matey! 8-) :D

In fact, with the size of your legs, you could quite comfortably do the work with a block plane, maybe a spokeshave and then some paring work with chisels - a bit like the plaque in you rather lovely settle. :eusa-whistle:

143a.jpg

I know the above plaque was one-sided and is slightly different to your legs, but you could easily implement for both sides. Time consuming, but so worth the effort.

:obscene-drinkingcheers:

:text-bravo:
 
Malc2098":1sbd7d2q said:
If I'd have got my doigt out last year and got the component parts of my CNC router machine then, it could be ready by now and I might have been able to carve the V & A ends with it. After all, I still have the original file.

But, now…..it could be years before I finish this wiring. :)

Do you really think I will have this finished any sooner :)
 
Andyp":3oehbztq said:
Malc2098":3oehbztq said:
If I'd have got my doigt out last year and got the component parts of my CNC router machine then, it could be ready by now and I might have been able to carve the V & A ends with it. After all, I still have the original file.

But, now…..it could be years before I finish this wiring. :)

Do you really think I will have this finished any sooner :)

:lol:
 
Pinch":31pg45wu said:
Great start Andy! Looks very good.

I totally agree with Roberto - a wee bit of relief carving is definitely the way to go matey! 8-) :D

In fact, with the size of your legs, you could quite comfortably do the work with a block plane, maybe a spokeshave and then some paring work with chisels - a bit like the plaque in you rather lovely settle. :eusa-whistle:


I know the above plaque was one-sided and is slightly different to your legs, but you could easily implement for both sides. Time consuming, but so worth the effort.

:obscene-drinkingcheers:
Pinch, that is VERY beautiful, superb workmanship. Ian
:text-bravo:
 
Although posting stuff on here gives me an added incentive to get things done, by wishing to adapt a design executed so well by Pinch has set me up for an undoubted fail. It will never look that good.

I will however succumb to the collective pressure on here and have a go at “carving” that pine. Just don’t hold your breath it could take some time.
 
Andyp":mpcldlci said:
Although posting stuff on here gives me an added incentive to get things done, by wishing to adapt a design executed so well by Pinch has set me up for an undoubted fail. It will never look that good.

I will however succumb to the collective pressure on here and have a go at “carving” that pine. Just don’t hold your breath it could take some time.
Excellent Andy. I think you'll find it easier than you imagine and it doesn't matter with the 'lash up' if the fit n'finish isn't perfick, it's the overall impression that your after - Rob
 
Andy, have you by any chance got one of those old Bosch power chisels ? If so then get yourself some Flexcut chisels.

Or if you can wait then you can borrow mine. I hadn't used it for over seven years until the staircase and can't envisage using it in anger in the foreseeable future. Mind you, God alone knows what hoops we'll have to go through now thanks to Brexit - the 'gift that keeps on giving'.
 
RogerS":2homg6v5 said:
Andy, have you by any chance got one of those old Bosch power chisels ? If so then get yourself some Flexcut chisels.

Or if you can wait then you can borrow mine. I hadn't used it for over seven years until the staircase and can't envisage using it in anger in the foreseeable future. Mind you, God alone knows what hoops we'll have to go through now thanks to Brexit - the 'gift that keeps on giving'.

Hi Roger, no, I do not have a power chisel and while I really do appreciate the offer it seems like a sledgehammer to crack a nut. A nut that I am not overly excited to crack in the first place.

I do have some carving chisels (actually belonging to the missus) so will give it a go on that pine. Although I am sure oak may well be easier to shape.

I am going to take a leaf out of Pinch’s book and buy the oak PAR from British Hardwoods who supplied the timber for the settle.
 
Andyp":2xwmxd9z said:
I do have some carving chisels (actually belonging to the missus) so will give it a go on that pine. Although I am sure oak may well be easier to shape.

Easy enough on pine (and oak) provided you make sure your gouges etc are über sharp. I use the leather wheels on my Tormek (+ honing paste of some denomination) but a leather strop (for the outside bevel) and a oddment of folded leather for the inside will work just as well - Rob
 
If you do decide to go with the overlap grooves instead of carving, you’d get a weave effect if you changed half of the lines you drew in the previous photo. As you drew it, you had one letter above the other, but it’s no more work to have them weave by alternating the grooves at each junction.
 
Windows":91yxojgq said:
If you do decide to go with the overlap grooves instead of carving, you’d get a weave effect if you changed half of the lines you drew in the previous photo. As you drew it, you had one letter above the other, but it’s no more work to have them weave by alternating the grooves at each junction.

:eusa-think: I haven't yet placed gouge on wood on those prototypes, I could do one of each. I am looking forward to this about as much as a turkey looks forward to Christmas. But I will have a go.
 
I brought home the timber from British Hardwoods last weekend.This is the first time I have bought PAR timber like this, other than softwood from the sheds. I am impressed. The finish is impeccable. The sides true and square. It was well wrapped with all edges and corners well protected.

Laid out my prototype legs just to see where any joins would be. I think 4” wide was a good choice and it easy to see where, if any, the dowels will go.

05439B47-C547-4D54-81BE-9F898278865A.jpeg

A9BC1838-8767-4D9D-83D6-FD5B8760FE03.jpeg
 
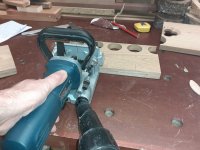
A very nice man has leant me a biscuit jointer. Which I will use to aid the glue up of the table top but for the legs I can see a small problem.

03A81E76-BE5D-423C-AA11-C405DBAB2014.jpeg

Dowels the only option to add strength on those joints, I think.

I wonder why there is not a horizontal dowel boring machine along the lines of the biscuit and domino machines.
 
I see, like this.

E8D54A89-702C-40E0-B306-32B03FDB011A.jpeg

I’ve not had chance yet to have a good look at the machine and cutter. How much bigger, lengthwise, is the hole than the biscuit? Position and precision are clearly going to be important.

As a slight aside I wonder when tools like that stopped being supplied in metal boxes.
 
Andyp":3h9xx1ed said:
I see, like this.


I’ve not had chance yet to have a good look at the machine and cutter. How much bigger, lengthwise, is the hole than the biscuit? Position and precision are clearly going to be important.

As a slight aside I wonder when tools like that stopped being supplied in metal boxes.

The blade is 100mm diameter I think, so you can work out the length of the chord for a given depth.
Depth must be a bit deeper than 1/2 a biscuit width to allow the joint to close.
Whilst there are preset depths for 0,10 and 20 biscuits, there are also other depth stops on the turret you can adjust to do what you want.
Deffo do test pieces befor you commit to the oak!

Bob
 
I've only had time to read the manual and watch a few vids. I hope that I can find some suitable, same thickness as the oak, scrap to practice on soon.
 
A couple of hours in the workshop to do some test carving and biscuit cutting.

V&A Carving test.jpg

Comments welcome. needs more cleaning up methinks. I am going to get a detail sander to aid with the sanding. Doing the real thing in oak is gonna be nerve wracking.

I then thought I should have a dummy run with the biscuit jointer. Found some scrap oak of the right thickness
First up was to make an adapter for the dust extraction.
BiscuitDust Adapt.jpg

Biscuits cut.jpg
I found that the no 20 biscuits were a tight fit. needed a hammer to tap them home even without glue. The 0 biscuits were a loose fit.

Because they were I tight fit I decided to put glue in the slots
bisucuits glued.jpg

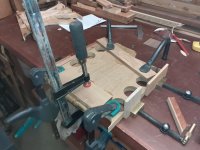
Clamped up.
Biscuit test Clamped.jpg

I found the jointer much easier to use than I expected. You cant quite see but the the wood was pushed up against a couple of bench stops. Would you folks recommend clamping the board down as well?
 
9fingers":12qviblb said:
Deffo do test pieces befor you commit to the oak!

Bob

:text-+1:

Wot Bob said. A dummy run on some gash pine or otherwise always, but always pays dividends - Rob

(Currently making a prototype tantalus and the whole thing is a total full size lash up in whatever gash pine I've found loafing around the 'shop. No working drawings though, so designing on the 'oof)
 
@Andyp Clamp your biscuits in a vise before using them, they swell up with the moisture in the air, do each end then you have something to hold on to.

Pete
 
OK Pete, thanks will do. They are stored in sealed plastic jars but I’ll give the next ones a quick squeeze before use.
 
Andy my biscuits should all be bone dry. The size 20 in the herb container are known quality make but the three small containers are from aldi and could easily suffer from poor size control. I’ve used very few of those favouring no 20s but I realise you need smaller ones.
Maybe a bit of sanding to fit.

I’ve never tried compressing them as Pete suggests. Might help dunno

Bob
 
Just to reassure Bob, all the biscuits had remained in the tubs in the tool box until my test on Wednesday. It was the size 20 that needed a tap to seat them in the slot.

When it comes to do the actual table glue up should I joint the first two boards on their own or joint all the boards in one go?
 
Back
Top