• Hi all and welcome to TheWoodHaven2 brought into the 21st Century, kicking and screaming! We all have Alasdair to thank for the vast bulk of the heavy lifting to get us here, no more so than me because he's taken away a huge burden of responsibility from my shoulders and brought us to this new shiny home, with all your previous content (hopefully) still intact! Please peruse and feed back. There is still plenty to do, like changing the colour scheme, adding the banner graphic, tweaking the odd setting here and there so I have added a new thread in the 'Technical Issues, Bugs and Feature Requests' forum for you to add any issues you find, any missing settings or just anything you'd like to see added/removed from the feature set that Xenforo offers. We will get to everything over the coming weeks so please be patient, but add anything at all to the thread I mention above and we promise to get to them over the next few days/weeks/months. In the meantime, please enjoy!

V & A coffee table Finished!

Sunday morning and I found an hour in the workshop.

I do not use the sliding carriage on my Kity very often but after a couple of cuts my rectangular table top is nearly square. Only 0.5mm, or a smidgen, out on the diagonals. That’ll do me

DDB14B67-0456-46C5-88D2-AD3D144F8732.jpeg

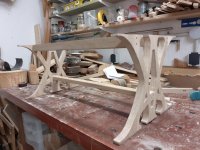
And managed to cut to size the rails and stretcher and with the help of the pine legs had a view of how it will look upside down.

EB5C3255-1971-4B08-8D9D-F9FCAC5CEFBB.jpeg

Next up will be to cut the leg ends on the Hegner.
 
Nice!

I wish I had my CNC fully operational. We could shape the ends from the drawing.
 
Phil":1zdu32pd said:
Andyp":1zdu32pd said:
Next up will be to cut the leg ends on the Hegner.

Can you do a vid? What number blade will you use?
Interested in seeing how it handles the Oak.


Phil, I'll see what I can do. Vid might be difficult. As for the blade I dunno yet. Trial and error to start with.
 
Malc2098":2mv5529n said:
Nice!

I wish I had my CNC fully operational. We could shape the ends from the drawing.

Malc, there's time :) Would be great to see those shapes appear on a CNC machine but alas the postage of all that wood to and fro would be prohibitive.
I do wonder if a scaled down version of that pattern would make a nice trivet :eusa-think:
 
Andyp":2cn5yzrn said:
Phil":2cn5yzrn said:
Andyp":2cn5yzrn said:
Next up will be to cut the leg ends on the Hegner.

Can you do a vid? What number blade will you use?
Interested in seeing how it handles the Oak.


Phil, I'll see what I can do. Vid might be difficult. As for the blade I dunno yet. Trial and error to start with.


I tried to cut some extremely hard and heavy (unknown) wood the other day using a #12 on the slow speed.
These was lots of smoke, burning smell and then the blade jammed and broke. :cry:
 
Andyp":rh7o62gq said:
Malc2098":rh7o62gq said:
Nice!

I wish I had my CNC fully operational. We could shape the ends from the drawing.

Malc, there's time :) Would be great to see those shapes appear on a CNC machine but alas the postage of all that wood to and fro would be prohibitive.
I do wonder if a scaled down version of that pattern would make a nice trivet :eusa-think:


When I can get round to making it work, I might give that a try and put a couple in the post.
 
Malc, I am sure you have higher priorities for getting your CNC up and running. I was thinking that I could, in theory, make them on the scroll saw.
Not that I can help but what is holding up progress on the CnC?
 
Andyp":2eiydcyv said:
Malc, I am sure you have higher priorities for getting your CNC up and running. I was thinking that I could, in theory, make them on the scroll saw.
Not that I can help but what is holding up progress on the CnC?


I'm just about to solder the last plug and socket for the control box wiring. I've done 32 pairs of joints so far.

I shall nor be winning any prizes for my soldering!
 
Phil, I’ve no idea what number my blades are. There are the type where the teeth in the lower inch are reversed to lessen tear out. I'm sorry my usual filing system has let me down and I cannot even find out where I bought them, nor how long ago. At least 15+ years. The only reference I’ve got is on the packet shown.

13ED7E18-FFD5-4462-BEB3-04B92174BA97.jpeg

Not enough hands for a video either.
Here is a close up of the first cut out. No burning.

29D4CF2F-F999-42AE-894F-6C3FB9215A73.jpeg

The first completed leg

28B8C404-FF05-4160-93ED-E84BE31BED51.jpeg

And I couldn’t resist resting the top on top of both oak legs.
A45CF01E-7D0A-478D-A23C-A794193C4462.jpeg

The burning in that last image is from the band saw not the Hegner.
 
:obscene-drinkingbuddies: :obscene-drinkingcheers:

I think that calls for a decent bottle of vino. :D
 
My plan calls for through dowels (walnut) to join the rails and the stretcher to the legs. Visible walnut dowels were used to great effect by Paul (Pinch) when he made the settle and I hope to replicate the same detail. Stupidly expensive to obtain here so I had some delivered to the UK prior to our aborted trip there over easter.

My brother will have to cut a few to length for me and post in a letter thereby, I hope, avoiding and duties etc.
 
Andyp":1459hoqi said:
Phil, I’ve no idea what number my blades are. There are the type where the teeth in the lower inch are reversed to lessen tear out. I'm sorry my usual filing system has let me down and I cannot even find out where I bought them, nor how long ago. At least 15+ years. The only reference I’ve got is on the packet shown.
View attachment 3


Andy, that is looking really good

The blade looks like a reverse tooth.
For hardwood up to 25mm a number 7, I generally use a #12

What also makes a difference is the table insert, zero clearance.

Impressive cutting with no burn marks. How long did it take?

I ordered a whole lot of blades from Ax, which are somewhere between UK and SA, which included reverse tooth and modified geometry.
 
Thanks Phil,
How long? The two big outside cuts were done on the bandsaw. The rest probably took about 30 mins each leg. I broke 2 blades BTW. The 2nd one is much cleaner than the first. I really should have done some practice cuts on some offcuts before the real thing. I do scroll work so rarely these days it takes a while to get the feel back.
 
Looking good.

I continue to wonder how you will stop the ends of the feet and similar ends of the top support, from breaking off through the weak end grain. Surely these areas are very vulnerable?
 
AJB Temple":lx7h9ayt said:
Looking good.

I continue to wonder how you will stop the ends of the feet and similar ends of the top support, from breaking off through the weak end grain. Surely these areas are very vulnerable?

They've got walnut feet haven't they, with the grain running perpendicular?
 
Indeed Mark, the feet have strips of walnut. I could do the same at the top of the V but as this will be hidden under the table top I am less concerned.

I am not all convinced that this will come out looking as good as I intended but the great thing about this hobby of ours is the secondary use that all project failures have ………kindling. :)
 
I might be getting ahead of my self here but my thoughts have turned to how to attach the top to the rails.
Buttons are the obvious answer and being as I have one, for a few more weeks at least, I was thinking I could make the grooves in the rails with the biscuit jointer. Far more controller in my hands than a router.

Good idea or not?
 
Andyp":2fsjtk4d said:
I could make the grooves in the rails with the biscuit jointer. Far more controller in my hands than a router.

Good idea or not?

Sounds like a good idea to me. This is my first visit to this thread after a long layoff, and this project is looking great Andy.
 
Thanks Roger,
I have just about finished sanding the leg ends. Rails and stretcher cut to size. I had a go at carving some relief into the letters but it looked awful so I have scrapped that idea.
 
Dry loose fit of the legs, stretcher and rails. 5mm dowels used in 6mm holes just to see what it looks like. Coming together more or less as planned. Probably not as neat and tidy as I would have hoped. Perhaps from a distance it wont look so bad.

7534F6A1-CC0C-4EBE-85CE-45075B0AB066.jpeg

Question,
If I stain this to match an existing small table I will use a medium oak spirit stain. Should I stain before gluing or after?
 
I think if I were staining something as complex as this, with all those nooks and crannies, I'd do it beforehand, but also apply a coat of finish. That way, your glue will wipe off cleanly without leaving a trace.
 
Mike G":3k07qpmn said:
I think if I were staining something as complex as this, with all those nooks and crannies, I'd do it beforehand, but also apply a coat of finish. That way, your glue will wipe off cleanly without leaving a trace.


:text-goodpost:

Excellent advice (been there, T-shirt, Red Face)
 
Applying the stain to all surfaces is straight forward enough. The joints are butt with through dowels. Keeping the varnish off the end grain of the rails and stretcher is easy enough. How to keep it off the face grain of the legs is taxing me somewhat. Or does it matter? There is obviously is very little strength in an end grain to face grain butt joint, the strength comes from the dowels, so having varnish in the way probably wont have much effect.

Finish will be polyurethane varnish. First few coats thinned.
 
Put masking tape over the area of face grain, poke holes in it where the dowels need to go, then dry-assemble the joint with the tape in between. Now you can trim off any exposed tape, disassemble the joint, and apply finish.
 
I have done some dummy runs on some offcuts and the dowels are a very tight fit. I really do not think that they would come apart if I knocked them fully home.
 
Andyp":1ssosmp5 said:
I have done some dummy runs on some offcuts and the dowels are a very tight fit. I really do not think that they would come apart if I knocked them fully home.
Is there room for any glue on the dowels or are you relying on friction?
 
When I did this before I scratched the dowel across the teeth of a saw to scuff them up a bit and give the glue something to cling to.
 
Dowels need at least one longitudinal groove, to let glue get past them as they are knocked home.
If there's no escape route for the glue, a dowel can work like a hydraulic ram and make it burst through the surface of the wood. Or just stop you getting the joint together.
 
Andyp":2h32wrc6 said:
I have done some dummy runs on some offcuts and the dowels are a very tight fit. I really do not think that they would come apart if I knocked them fully home.

That's happened to me so I usually do a dummy run with looser or old dowels to make sure everything goes together and can be knocked apart again

AndyT":2h32wrc6 said:
Dowels need at least one longitudinal groove, to let glue get past them as they are knocked home.
If there's no escape route for the glue, a dowel can work like a hydraulic ram and make it burst through the surface of the wood. Or just stop you getting the joint together.
On a plain dowel the groove is usually done with by putting a tenon saw in the vice and running the dowel along the the teeth, but yep, you must provide an exit for unwanted glue or you're liable to get 'hydraulic lock'. Bad news - Rob
 
Woodbloke":emkdt8hg said:
On a plain dowel the groove is usually done with by putting a tenon saw in the vice and running the dowel along the the teeth, but yep, you must provide an exit for unwanted glue or you're liable to get 'hydraulic lock'. Bad news - Rob

Which was what I was trying to explain earlier, not very well.

Andyp":emkdt8hg said:
When I did this before I scratched the dowel across the teeth of a saw to scuff them up a bit and give the glue something to cling to.
 
The other way it was done was with a piece of scrap wood with a hole the same size as the dowel drilled through it, then knock a panel pin in so that it protrudes into the hole, then push the length of downing through.
Hydraulic lock is a strange thing to witness as the glue emerges/bleeds from the surface or more likely through the pores on the end of the piece of wood. Ian
 
Thank you John, I am still not convinced that I can pull it off to my satisfaction but will soldier on.

Buttons made this morning.

4AA17200-3500-4000-90FA-37AD78C9CEB8.jpeg

Should I also fix the ends to the top with buttons? Can’t make the slots with the biscuit jointer as there is not room. Would have to use a router I guess.
 
Back
Top