• Hi all and welcome to TheWoodHaven2 brought into the 21st Century, kicking and screaming! We all have Alasdair to thank for the vast bulk of the heavy lifting to get us here, no more so than me because he's taken away a huge burden of responsibility from my shoulders and brought us to this new shiny home, with all your previous content (hopefully) still intact! Please peruse and feed back. There is still plenty to do, like changing the colour scheme, adding the banner graphic, tweaking the odd setting here and there so I have added a new thread in the 'Technical Issues, Bugs and Feature Requests' forum for you to add any issues you find, any missing settings or just anything you'd like to see added/removed from the feature set that Xenforo offers. We will get to everything over the coming weeks so please be patient, but add anything at all to the thread I mention above and we promise to get to them over the next few days/weeks/months. In the meantime, please enjoy!

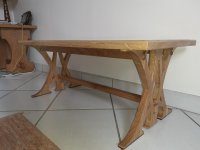
V & A coffee table Finished!

All the buttons that you can see have already had their slots cut with the BJ.

4CB501A9-F89C-4884-98C2-4E10B623393A.jpeg

The two red arrows indicate where I will need to rout slots for two extra buttons, one at each end.
 
If the boards for your top are running lengthways, then you could also just put a single unglued dowel in the centre of each end piece to positively locate the top in the horizontal plane, with the buttons then being to prevent it lifting or tipping. With all the grain running end to end, there'll be no expansion to worry about in that direction and the dowels wouldn't need any movement room.
 
Andyp":6o2woroi said:
All the buttons that you can see have already had their slots cut with the BJ.


The two red arrows indicate where I will need to rout slots for two extra buttons, one at each end.
No you are missing my point. Just cut slots in the end of the rail before glue up

ALL buttons fit in the rails none in the ends
Bob
 
spb":6lboia57 said:
If the boards for your top are running lengthways, then you could also just put a single unglued dowel in the centre of each end piece to positively locate the top in the horizontal plane, with the buttons then being to prevent it lifting or tipping. With all the grain running end to end, there'll be no expansion to worry about in that direction and the dowels wouldn't need any movement room.

Yep, I'd do that as well. Provided it's a righty-tighty fit, a single dowel at either end will prevent side-to-side top 'slippage' and the buttons, as mentioned above, will keep it from lifting or tipping - Rob
 
Blimey, Andy, that's a lot of buttons. Are you expecting a fierce wrestling match between the legs and the top?
 
Mike G":1ql46x1c said:
Blimey, Andy, that's a lot of buttons. Are you expecting a fierce wrestling match between the legs and the top?

Oh is it? Having never done this before I went for the over engineered approach :) . Perhaps I got carried away with my new favourite tool, the biscuit jointer on loan from Bob 9F. I made the buttons en masse as well.

Just to show how far my woodworking skills have progressed. Here is the table, partially seen earlier in this thread, that I made at least 35 years ago. Legs attached to rails using T bolts (bed bolts) . Plastic corners used to attached the top. :oops:

04DBB606-E3F7-4A2A-9C18-C08F377230CB.jpeg

In some ways woodworking was so much easier back then. I just had an idea and ran with it. Nowadays I spend longer perusing the web related to the project then I do actually making anything. And I still get it wrong. :o .
 
Me and the router don’t get along too well. Too much can go too wrong very fast so I was mightily relieved when I managed to round over the table top edges without incident. Just a light sanding required now and I can stain.

93283906-5FA6-4796-9039-DF6683ECF197.jpeg
 
Andyp":uu9e51cv said:
Me and the router don’t get along too well. Too much can go too wrong very fast so I was mightily relieved when I managed to round over the table top edges without incident. Just a light sanding required now and I can stain.
I can understand your worries with the router, but setting the machine up is the important bit and doing plenty of test runs to check that the set-up is spot on. A 'round over' on an edge is relatively easy, other stuff like making thru' mortices in thin rails (needed for the next project) are a lot more tricksier and require some very careful thought before taking the machine to the wood - Rob
 
Indeed Rob, took me longer to re-familiarise myself with the tool, set it up and run tests cuts on both soft and hard wood than to do the actual job. Would have taken me even longer to fettle the #405 for this job though.
 
Disaster, damn and blast and every expletive you can think of. Glue up, knocking it together, the top part of one of the Vs came adrift. Too disgusted with myself to take pictures. A clean break so have glued it back , but pulling everything else apart has left a right mess of the dowels.
Really not sure if it is recoverable.
Time for a drink.
 
Andyp":1l07bfhp said:
Disaster, damn and blast and every expletive you can think of. Glue up, knocking it together, the top part of one of the Vs came adrift. Too disgusted with myself to take pictures. A clean break so have glued it back , but pulling everything else apart has left a right mess of the dowels.
Really not sure if it is recoverable.
Time for a drink.

Leave it without looking at it for 24 hours. Somewhere in the background another bit of your brain will come up with a way of recovering it sensibly.
 
AndyT":3ns44l6d said:
Andyp":3ns44l6d said:
Disaster, damn and blast and every expletive you can think of. Glue up, knocking it together, the top part of one of the Vs came adrift. Too disgusted with myself to take pictures. A clean break so have glued it back , but pulling everything else apart has left a right mess of the dowels.
Really not sure if it is recoverable.
Time for a drink.

Leave it without looking at it for 24 hours. Somewhere in the background another bit of your brain will come up with a way of recovering it sensibly.

:text-+1:
 
Malc2098":1wzz709j said:
AndyT":1wzz709j said:
Andyp":1wzz709j said:
Disaster, damn and blast and every expletive you can think of. Glue up, knocking it together, the top part of one of the Vs came adrift. Too disgusted with myself to take pictures. A clean break so have glued it back , but pulling everything else apart has left a right mess of the dowels.
Really not sure if it is recoverable.
Time for a drink.

Leave it without looking at it for 24 hours. Somewhere in the background another bit of your brain will come up with a way of recovering it sensibly.

:text-+1:

:text-+1: ...and here also. Leave it alone for a goodly time and return to it in the cold light of day. It will be recoverable; you've just got work out how. It's far too good a project to consign to the bandsaw (from one who knows about these things :eusa-whistle: ) - Rob
 
Woke up at various times last night thinking about it.
I did glue the busted bit back on, held together with sticky tape, impossible to clamp. Out all morning and really not looking forward to going into the workshop this afternoon. I did check the one piece of oak I have spare and I might be able to make a while new leg end but the effort involved……..

Ho humm

You only fail when you stop trying.
Anyone who has never made a mistake never made anything.

Trying to stay positive.
 
Andyp":3fvfnpcm said:
Woke up at various times last night thinking about it.
I did glue the busted bit back on, held together with sticky tape, impossible to clamp.

Here's an idea to try Andy, for things that really difficult to clamp. Go to your local bike shop and beg, borrow or steal an old cycle inner tube and then slice it up into long lengths around 12-15mm wide. Use it to wrap around said tricky clamping project, gradually increasing the tension as you pull and stretch the rubber around the job, wrapping in various directions according to where the pressure needs to be applied.

The pressure that can be obtained in staggering and I've used this method severial times in tricky situations; even better it's free :D (unless you can't obtain cycle inner toobs in 'la belle France') :D - Rob

Edit- sticky or masking tape probably won't give you enough pressure to make an effective fix; inner toob will!
 
Woodbloke":3x4al6n5 said:
Andyp":3x4al6n5 said:
Woke up at various times last night thinking about it.
I did glue the busted bit back on, held together with sticky tape, impossible to clamp.

Here's an idea to try Andy, for things that really difficult to clamp. Go to your local bike shop and beg, borrow or steal an old cycle inner tube and then slice it up into long lengths around 12-15mm wide. Use it to wrap around said tricky clamping project, gradually increasing the tension as you pull and stretch the rubber around the job, wrapping in various directions according to where the pressure needs to be applied.

The pressure that can be obtained in staggering and I've used this method severial times in tricky situations; even better it's free :D (unless you can't obtain cycle inner toobs in 'la belle France') :D - Rob

Edit- sticky or masking tape probably won't give you enough pressure to make an effective fix; inner toob will!


The rubber strip hack is what luthiers, and us amateurs, use to 'clamp' the binding around the body age of an instrument. It works.
 
I needed cheering up after yesterday's disaster. For my twins it's baccalaureate results day here.. (A level equivalent)..
Its all in the jeans of course ;) :)
Even if dad can't spell :)

One happy Papa.
 
Andyp":352rje7d said:
I needed cheering up after yesterday's disaster. For my twins it's baccalaureate results day here.. (A level equivalent)..
Its all in the jeans of course ;) :)
Even if dad can't spell :)

One happy Papa.


Congrats to them. :eusa-dance:
 
Andyp":9hro9elm said:
I needed cheering up after yesterday's disaster. For my twins it's baccalaureate results day here.. (A level equivalent)..
Its all in the jeans of course ;) :)
Even if dad can't spell :)

One happy Papa.
Nice one! :text-bravo: :obscene-drinkingcheers: - Rob
 
Thanks for the positive encouragements.

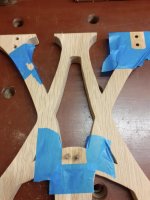
Here was how I left things last night. The break is under the tape on the left.

FB8DDAD2-79A5-463D-B5B3-B03335C416F0.jpeg

After a bit of sanding I am left with this. Face grain looks not too bad end grain will need filling somehow.

2FAD6099-FAEF-41B6-B41F-F3C438EF0643.jpeg

53D387BE-0490-438D-A7F2-6744C35B266F.jpeg

I was thinking about running a walnut dowel through the break for added strength.
Another idea to add strength was to add some 3mm veneer to the V, stopping where it meets the A. What do you think?
 
It's only just occurred to me and probably too late in the build process, but to strengthen instrument necks, some are laminated; i.e. cut lengthways down the middle and one half turned over so the grain is mirrored and then an odd number of thin laminates inserted in the middle. The whole lot is then glued and clamped.

Because of the weakness at the top half of the V as the grain is diagonal, perhaps the way to construct would be to make two thin halves and add a third V/A shape with the grain 90 degrees to the other two and then glue up.

I'm sure I could do that with the CNC when it's finally set up.
 
Finishing…

Glue up, 2nd attempt, was way to stressful for photos. The top has had two coats of Patina now and is looking good. In order to mimic the design of an existing table I made 35+ yr ago I decided to cover the exposed dowels with oak buttons. The buttons are recessed, not just glued surface glued. This also hides the awful mess I was left with after the CUF visited on the first glue up. A little more sanding required on the framework but constructionally it is finished.

I don’t think I have ever made anything without thinking I could do it better, or differently. This table is no different. In retrospect probably bitten off more than I could chew. The imperfections are a reflection of the maker :) .

0219DB7F-A47C-4760-A805-F72451DA87CB.jpeg
 
Cabinetman":j7oylvk3 said:
?

The Patina finish does give the oak a darker tint as can be seen but definitely not painted :)

I do not think anyone else here has used it, Patina, and there has been some confusion in the past as to exactly what it is. This guy sums it up well as a polyurethane jelly.

https://traditionalpainter.com/langlow- ... ays-on-tin
 
Alas not quite finished :oops:
I just have the legs to varnish. As well as other stuff getting in the way the space allocated for its final resting place in the living room has been taken up by various bits of furniture from eldest daughter's flat who has moved back in with us after a failed attempt to find schooling further away from home.
Oh yes the table has gone down very well by all the people who have seen it in it's current state.

I'm working to a Christmas delivery date now. :)
 
Finally approaching the end of this project.

3M finish used. First time I have done this. Very surprised that French white spirit appears to have very little odour. I've been using UK sourced stuff that I bought more than 15 years ago up to now.
Also surprised at how little is required. I measured out about 30ml of each ingredient, bushed it on and used a less than a third.

I am pleased with the colour change, brings out the grain well.

before
20230108_134206_resized.jpg

After first coat
20230108_144251_resized.jpg

I've missed so many deadline with this, wedding aniv., christmas, birthday but I am confident of having this done my her ladyships name's day on the 28th April. :)
 
Andyp":346ldbnm said:
Finally approaching the end of this project.


I've missed so many deadline with this, wedding aniv., christmas, birthday but I am confident of having this done my her ladyships name's day on the 28th April. :)

You could always put on a final spurt and aim for valentines day? :lol:

Bob
 
Well I am declaring this finished, sealed and delivered. Horrified to discover that I applied the first coat of Patina on the top in July!! What on earth has taken me so long.
I will never forget the help received from the folks around here in the early stages of this project. The help in designing the legs and construction were in valuable. A special thanks to Malc who did the final drawings of those legs for me.
Many things I would do differently next time. I am less than happy with the double dowels I used to join the legs to the rails and stretcher. A single dowel would have been sufficient. The little oak buttons I used to cover the ends of the dowels, which I used on a piece I made decades ago, are fine but two that close together are just not right.
I only used 6 buttons in the end to attach the top. I think they will be sufficient.
8A037C88-2845-4E0D-8265-7DC52F3AB3EC.jpeg
Very pleased with the 3M finish. Thanks Mike for bringing this to our attention even if your modesty prevents you from taking credit I would never have heard of it otherwise. The join where the top piece of a leg broke off is more visible since I applied the finish although it is hardly noticeable in situ.
D86C6283-0F11-410F-8BD5-497E1CA13377.jpeg
Mrs P, the V in those legs, is very pleased with it and so is everyone else who has seen this in real life and in it’s various stages of production.
3BC815F3-1421-4520-BC9B-6D1779A21304.jpeg

Note that there are no bread board ends. I hope this does not come back to haunt me. It is the fourth table I have made without breadboard ends, 2 other coffee table size, 1 dining, so far so good.

I do think that the design would look cool scaled up in box section steel for a dining table, one day…
 
Nothing to come back and haunt you with those table ends, they’re good. I was a bit sceptical of the shortgrain on the legs but seeing it finished it will be absolutely fine I’m sure – looks really really good.
 
Cabinetman":1y7zqfls said:
Nothing to come back and haunt you with those table ends, they’re good. I was a bit sceptical of the shortgrain on the legs but seeing it finished it will be absolutely fine I’m sure – looks really really good.

Thank you Ian, once the design and subsequent cutting of the legs was done the construction was very basic and probably, as I’ve said, could be tidier.
 
Back
Top