• Hi all and welcome to TheWoodHaven2 brought into the 21st Century, kicking and screaming! We all have Alasdair to thank for the vast bulk of the heavy lifting to get us here, no more so than me because he's taken away a huge burden of responsibility from my shoulders and brought us to this new shiny home, with all your previous content (hopefully) still intact! Please peruse and feed back. There is still plenty to do, like changing the colour scheme, adding the banner graphic, tweaking the odd setting here and there so I have added a new thread in the 'Technical Issues, Bugs and Feature Requests' forum for you to add any issues you find, any missing settings or just anything you'd like to see added/removed from the feature set that Xenforo offers. We will get to everything over the coming weeks so please be patient, but add anything at all to the thread I mention above and we promise to get to them over the next few days/weeks/months. In the meantime, please enjoy!

Malcolm's Workbench (Fitting the vice)

Malc2098":3r382i69 said:
RogerS":3r382i69 said:
Malc2098":3r382i69 said:
I have jumped up and down on the stretchers and I jumped on the top today and nothing creaked.....well not on the bench, anyway.

It's not the up and down movement that's the issue but the sideways racking when you're sawing or chiselling etc.

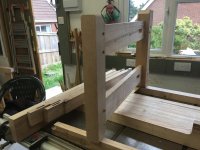
There will be a plywood sheet screwed to the two back legs to prevent the sideways wracking.
...

That'll help :eusa-dance:

But still think they are too thin. It can still rotate, as it were.
 
Thanks, Roger, I'm optimistic.

For some of you, this might be second nature, but for me this is the first time I've taken on a project like this. Having Milled the various components of the bench top, I've now got to fit them all together.

I have noted your advice, Rob, about the apron and will reduce its height by half.

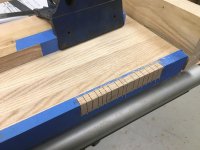
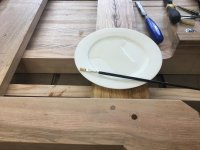
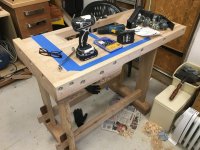
First I've got to fit the components of the vice. Don't yer just love blue masking tape. I got this tip off YT. Cover the area in tape and use your sharp marking tools to indent the work as usual, but also tear off the tape where the waste will be. With my eyesight, I needed that.
IMG_2727.JPG

I cheated with the spacer. I cut that lot out with the router in the table.
On to the cutout in the table.

That magnetic dovetail guide came in handy.
IMG_2729.JPG

Finally with a trusty Marples, I chopped out the cutout, having learned tips from YT, e.g. like standing in line with the chisel when cutting to the mark so you can see that you are perfectly upright. I never learnt that at school.
IMG_2731.JPG

It fits....a treat! I've never had something fit that well before. Feeling quite chuffed.IMG_2730.JPG
 
Nice fit on the vice body Malc. When you fit the closing cheek to the other half of the vice, plane it so it grips dead parallel from side to side, but that it also closes at the top slightly before the bottom ie, the closing cheek is very slightly wedge shaped in section, with the thicker bit at bench top height
Edit - check the grip by holding a piece of printer paper, there should be equal grippage each side - Rob
 
Thanks, Gents.

That's helpful, Rob. I found some fitting instructions online for the 52E and they said something similar.

Well, with this amount of bolts and screws, I don't think it will work loose!

IMG_2733.JPG
 
Looking very good Malc :eusa-clap: 8-)

I found it such a ballache handling the top with vice fitted on my own. Awkward and heavy.
 
I aim to put a Veritas inset tail vice on the right hand end.

I've tried ordering for collection on Saturday, but it seems to have disappeared from my basket/account.
 
For the smutty ones among you, and Rob, I have loads, and for Phil, I found it only made my head ache! :D
 
I like presents. I got myself an inset vice today, and I have a long egg in bubble wrap due to arrive soon.

Oh, and a Fisch 3/8" wood drill!
 
The lovely 19 fingered Easter Bunny known as TrimTheKingBob9Fingers have supplied me with this lovely stuff to draw bore the tenons in the bench frame. :eusa-clap:

Lovely Jubbly! (Does anybody remember Jubblys? Or Calypsos? Or was it Jubly?)

IMG_2753.JPG

Now I've got to spend the rest of the afternoon popping the bubble wrap!
 
Excellent, glad it's all with you now. Should look good. That ABW goes a lovely dark brown, with many different shades within it ranging from a fairly light brown, through dark, to some purplish shades. Lovely stuff.
 
Well here goes, a giant step for Malckind! My first attempt at draw boring.

IMG_2755.JPG
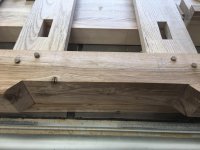
All the holes drilled for one side frame assembly. A while ago, I bought a cheap tapered reamer to ease the string pin holes on my guitars. It helped easing the holes in the tenons to facilitate the dowels going through.

IMG_2756.JPG
A whizz with a drill on some sandpaper and the ends of the dowels are chamfered.

IMG_2757.JPG
The first dowels are tapped through. Some were less resistant than others. I put that down to some differences in the density of the tenons.


IMG_2758.JPG
All the dowels are tapped through.


IMG_2759.JPG
Dowels cut flush with a flush cutting saw.


IMG_2760.JPG

I read somewhere that somebody uses a hypodermic to drop water on to the dowels to swell them. I only had a paintbrush. But doesn't that ABW come up lovely when it's dampened!

IMG_2761.JPG

One end complete!

Chuffed, again.
 
Excellent mate. It’s a really great timber for your use case because as you say it comes up lovely and dark under a finish and the contrast against the light timber of the bench will look bang on.
 
Been away on family stuff installing sink and renovating a beech worktop for my godson.

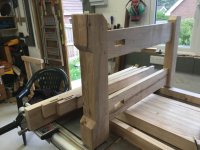
Both frames have now been drawbored and the the apron and end rail bolted to the neck top.

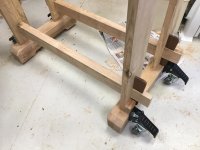
And it's getting heavy, so I shall fit the bench casters next.
IMG_2770.JPG
 
Looks like it's all coming together very nicely Malc...whatcha going to use for a bit of vice grippage? - Rob
 
Woodbloke":22koa5z1 said:
Looks like it's all coming together very nicely Malc...whatcha going to use for a bit of vice grippage? - Rob

The lower pair of bolts are holding the apron/vice jaw to a Record 52E, the other half of which is waiting for the outer jaws to be made to size.
 
Nothing like a nice bit of hardware to move the bench round the 'shop.

IMG_2771.JPG
 
Today I offered the top to the frame for the first time. Blimey, that was heavy! But it came out nice.

IMG_2778.JPG
So I decided too rack on with the outer vice cheek. Last week I invested in a set of CMT forstener bits. I used the 35mm to rout out the shape of the vice jaw, using the blue tape cut line method. It worked a treat.

IMG_2779.JPG
The cheek fitted the jaw with no fettling!!!
So I checked the angles of the cheeks. Will that do, Rob?
If it's OK, I have to say it's more by luck than judgement. :)

IMG_2780.JPG
 
In a small workshop having the bench on wheels is a great idea. I have to lift mine up and slot some castors underneath to move it and have done so only twice in 10 years when laaning longth lengths across the workshop and out through the door.

I have some mortices to cut in 4m lengths soon so might have to move it again, although it might be easier to take the mortiser down to the garage.
 
Malc2098":1ey0ldvu said:
View attachment 1
The cheek fitted the jaw with no fettling!!!
So I checked the angles of the cheeks. Will that do, Rob?
If it's OK, I have to say it's more by luck than judgement. :)
I've done mine slightly differently in that the closing cheek (the one attached to the vice) is slightly tapered and the bench side is square. It looks to me from the pic as though there may be too much of a taper (it's literally the thickness of a bit of printer paper or very thin card) so I guess the only way to see if it works is to stuff something into the vice and see if it grips - Rob
 
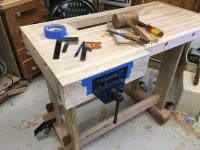
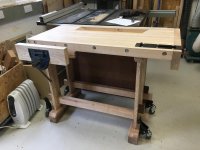
Slowly getting there.

I've fitted the front vice and done the paper test and it seems to work.

I've fitted a trial tool tray which seems to work, so I'll make a permanent one out of ash.

I've fitted the tail vice and need to bore some dog holes and buy/make some dogs.

I've fitted the locating buttons in holes in the underside of the top and top side of the frame but it was so bloomin' heavy getting one on top of the other marking it out upside down and then fitting it right way up, I haven't got any photos, but a couple of achy shoulders instead!

And I've bolted the oak faced ply to the back to stop the frame wracking/racking or however you spell it.

Now, I've got to try and fit the shop vac underneath and see if I can make and fit some drawers in whatever space is left.

IMG_2784.JPG
 
Looks lovely that Malc.

Out of interest, is there no lateral movement at the front at all? Appreciate the back is braced with a board but those legs are very thin in one direction so I’m surprised there’s no flex if you were planing a tough board along the front apron.
 
Gents, thanks for your kind comments.

Rutlands are sending some bench dogs as I type. I aim to bore holes in line with the tail vice and then some pairs in line with the front vice, like on Rory's bench.

Mark, I gave it a try yesterday and and it stayed un-flexed, but lifted the right end foot off the floor.

Either I back off the plane blade or I need more weight low down! :D
 
DaveL":22ovxd4b said:
I made a cupboard with drawers for tools that sits on the stretchers on my bench, it does help.


Thanks, Dave. I was planning something like that, but I'd like to get the shop vac fitted in first and see how much room I have left.
 
Looks really good Malc. As a suggestion, I'd knock off those sharp corners on the closing cheek of the vice; maybe a 4mm chamfer. If you're planing a longish board edge in the vice and you're left hand/knuckles comes into close contact with that vice corner, you'll say slightly more than 'oh botheration!' :D - Rob
 
Thanks, Rob. Yes, it's on my to do list to knock off the arrises. But I wouldn't say anything near as strong as botheration. It'd be more like, blow, or dash. Honest! :oops:

Years ago, I bought a veritas cornering tool kit. I've sharpened it up with the supplied silicon carbide paper and tried it out on some scrap ash, and I think I'll use that to lose the arrises.
 
Malc2098":2jyrhuja said:
Gents, thanks for your kind comments.

Rutlands are sending some bench dogs as I type. I aim to bore holes in line with the tail vice and then some pairs in line with the front vice, like on Rory's bench.

Mark, I gave it a try yesterday and and it stayed un-flexed, but lifted the right end foot off the floor.

Either I back off the plane blade or I need more weight low down! :D

I’ve got a cast iron surface plate for ballast under one bench but a bag of sand would probably do the trick.
 
Back
Top