• Hi all and welcome to TheWoodHaven2 brought into the 21st Century, kicking and screaming! We all have Alasdair to thank for the vast bulk of the heavy lifting to get us here, no more so than me because he's taken away a huge burden of responsibility from my shoulders and brought us to this new shiny home, with all your previous content (hopefully) still intact! Please peruse and feed back. There is still plenty to do, like changing the colour scheme, adding the banner graphic, tweaking the odd setting here and there so I have added a new thread in the 'Technical Issues, Bugs and Feature Requests' forum for you to add any issues you find, any missing settings or just anything you'd like to see added/removed from the feature set that Xenforo offers. We will get to everything over the coming weeks so please be patient, but add anything at all to the thread I mention above and we promise to get to them over the next few days/weeks/months. In the meantime, please enjoy!

Martin Guitar Kit (It's First Public Outing!)

9fingers":csn8ogwl said:
Prior to seeing your last line, I'd have thought clamps ideal one at each end of the stiffners would have done the trick but nothing like so intriguing as your method.
Is there a practical/musical reason for the curved back? or is it simply style/tradition
As with my artistic genes, musical ones were never fitted at birth either so I know nothing whatsoever about guitars. I do recall a friend who made a bass electric guitar and both rigidity and mass were key features as well as a steel rod inside the neck to take the reaction of the string tension.

Bob

Bob, I don't know the reason the back is arched and braced. Possibly it's because one piece of wood that wide and thin would have to be really good not to break under the pressure and more than one piece, mine has three, can not rely just on a glued butt joint. Different companies have slightly different designs and this is Martin's.

I am aware that some classical guitars have flat backs and some have curved, rather than carved arched backs. The history of the modern acoustic guitar comes from them trying to project more volume in a band or orchestral environment and companies like Martin developed the cross bracing, and slight curvature, to the soundboard which helps to create attack, volume and sustain, I think.

Rest assured, I won't let you down and when I start on the neck, one of the first jobs will be to fit an adjustable truss rod. (Something my back could do with these days! :) )
 
Very interesting project and read.

So totally different to the cutting dove tails, mortises and tenons.

The one thing I enjoy about TWH2 is the variety of projects end the 'learnings' from them.

Also all the travel sites/places where the members visit/link. 8-)
 
There are some cracking luthiers in the UK. Here's just one.

[youtube]0PwCnfBi4jw[/youtube]
 
Having glued the lateral braces to the back, I then had to glue the longitudinal braces.

IMG_3831.JPG

These are to support the join and so are cross grained which makes them quite delicate. I rounded the delicate edges (end grain) and sanded their tops, cut them to length and fitted them between the lateral braces.

The go-bars were used again to provide the clamping force.

IMG_3832.JPG

I clamped a temporary fence along the length of the back with notches cut to go over the braces, but which provided a straight edge to align the long braces. I also used some offcuts of wooden venetian blind to protect them from the ends of the bars.

Et voila.

IMG_3833.JPG
 
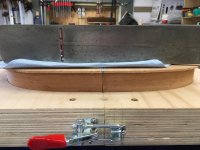
After a bit of fettling to notch the kerfed linings for the back and adjusting the lengths of the lateral braces slightly, the back fitted to the rim. Yay!

The braces curved the back laterally and the 2 degree sanding thingy round the post created a contour on the rim. So now, the back is domed.

IMG_3850.JPG

IMG_3851.JPG

IMG_3852.JPG

Time to start on the soundboard.
 
"Nice" work Malcolm although I would be writing to the makers detailing the issues you have overcome and the "service" provided by their agent.
 
I am disappointed that those planes were all that was needed to glue the back. I was hoping to see a clamping jig as shown in that video you posted.
 
Andyp":374y3rxq said:
I am disappointed that those planes were all that was needed to glue the back. I was hoping to see a clamping jig as shown in that video you posted.


:D You will! The planes were only for fitting. I won't be gluing until I've made the soundboard and fitted it.
 
9fingers":kax5yz2p said:
I love the use of the planes on this project. Just the way mine get an ocasional airing. Weights and door props.
Bob


:lol: Philistine!!
 
MY63":1mjci0gz said:
"Nice" work Malcolm although I would be writing to the makers detailing the issues you have overcome and the "service" provided by their agent.


Thanks, Michael. I am considering that.
 
Malcolm if I was the maker of these fine and expensive products and one of my agents was giving such poor service and sub standard materials. I would really want to know.
You are doing a great job.
Michael
 
Andyp":4z5bq6hs said:
Malc2098":4z5bq6hs said:
Blimey, that was tricky!


Sorry Malc, but what are we looking at and why was it tricky

Sorry, Andy. This is the tailpiece of the body. It covers the join at the back where the two sides meet.

You're provided with three pieces of plastic. The main white piece in the middle is about 1.5mm thick and is tapered. The two thin pieces are about 1.5 x 0.5mm with black on one of the wide sides, so that looking at it edge on, as in the install, that black is just a hair line.

The taper makes it easy inasmuch as you don't have to have the width of the taper spot on, because as you push the tapered plastic in, it fills the tapered gap. I had to create that tapered gap with my little Makita router and a 6mm end mill cutter. I created a fence each side and used double sided tape to hold the fences down, but the left one moved just as I got to the bottom.

Having cleaned the bottom and edges, I used UHU Hart adhesive to stick them, and my fingers!! A quick bead down each side and I pushed the thin pieces in there, one each side, then I covered the bottom of the channel with glue, placed the tapered piece down on it, not quite all the way, then slid it further upon the taper so it squeezed the thin pieces into the side of the channel.

At that point, I walked away, and I'll clean them all up tomorrow.

Oh, and I've got to drill a tapered hole in the middle of it for the end pin, to hang your strap on.
 
Andyp":3meuz3g9 said:
So you had to take it out of the mould to do that?


Yes. It's been in and out a few times. It doesn't slide straight back in, but it's not far off, just a little squeeze. :)
 
Andyp":2fwyf49e said:
The more of this build I see the more I want to see, and hear, the finished guitar being played.


Thank you, Andy. It might be a while yet, and I'll see if i can find someone! :D
 
Put it another way, can you imagine getting to the end of the tally ho vids only to find out he wont set sail.
 
Andyp":3tyncj4i said:
Put it another way, can you imagine getting to the end of the tally ho vids only to find out he wont set sail.

:lol:
 
Tailpiece and endpin socket done.

IMG_3857.JPG

fullsizeoutput_935.jpeg

IMG_3868.JPG

And this is what the back and rim look like together.

IMG_3869.JPG

Mods, that second one keeps turning. No idea why. I carry out the iPhone instructions to the letter.
 
So far that cover strip looks a bit out of place on a wooden instrument I presume there will be other decorative details that will tie in with the contrasting strip.

Bob

Ps I had to google uhu hart glue. I’ve known the uhu brand for years but presumably the hart bit comes from some sort of company merger along the line?
 
Bob, there will be binding and purfling in the same black and white stripey pattern. I'm not looking forward to that job.

They are not exclusively cosmetic or decorative. They do serve a practical purpose, but then their decoration can be enhanced as much as the luthier wants.
 
Now, here is where it starts getting interesting.

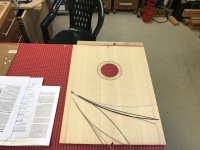
This is the supplied top, or soundboard, for the guitar. I think it's sitka spruce. It's book matched and glued together. It has the sound hole cut and the rosette channels routed. It's been sanded to thickness through a drum sander.

I've got to glue these purflings into the channels.

IMG_3883.JPG

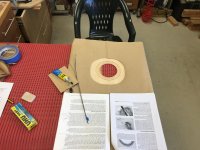
Let's have a dry run.....

IMG_3885.JPG

....and wrap the soundboard in paper so I don't spread glue all over it!!

IMG_3886.JPG
 
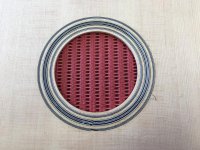
I've purfled the rosette! :eusa-dance:

IMG_3890.JPG

Then I scraped and sanded it, and slightly sanded a roundover of the soundhole.

fullsizeoutput_948.jpeg

I hope you can tell the difference in the images (apart from being from opposite directions :) )

The two outer joins will be covered by the fretboard. The inner join will be visible and I've tried to make it as good as possible and bang on the centre line.
 
DaveL":2l7eox25 said:
That looks very fiddly to do!


That was, Dave.

I don't know how many dry runs I did before I even tried to cut to length. The outer ring didn't need cutting. The inner ring did and I had to do that as well as I could because it will be visible. The centre ring comprised of about nine strands and cutting to length was tricky because what is a straight line across the channel is an inclined line as the strands come out and are straightened.

Once I applied glue to the channel, I had to go for it. I couldn't stop.

But after the cabinet scraping and sanding, I think they look quite good.
 
Brace yerselves!

Now we get to the really interesting bit. It's how the guitar works.

I've been back on to the supplier in the States because there was both an absence of blueprint in the kit nor was the soundboard marked with where all the different braces went.

He sent me a link to a downloadable blueprint of a similar model. Similar, but different dimensions, so that wasn't a great deal of help. So, I surfed and found blueprints of the correct model available for purchase. I managed to expand one of the thumbnails sufficiently to print and read dimensions off and started applying them to my soundboard.

Here's how it went.

IMG_3900.JPG


Everything is referenced off the centre line, so to keep perpendicular to it, I drew two parallel lines, one each side of the board, and marked the dimensions from the top along them and was able to square across to either the centre line or any other points like on the outline.

First was the top plate.

IMG_3901.JPG

Then came the top bar.

IMG_3902.JPG

These two keep the soundboard stiff close to the neck joint and under the top end of the fretboard. The top bar also provides a level of reinforcement to the top side off the sound hole.

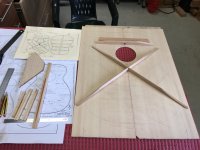
The X Brace comes next.

IMG_3903.JPG

The X brace keeps the soundboard stiffish and also curved to the large diameter arc. I say, 'ish' because it's how the soundboard vibrates that gives a guitar it's tone.

Next comes the bridge plate.

IMG_3904.JPG

The bridge plate supports the bridge and saddle on the front side of the soundboard. This is going to be a 12 string, six pairs of strings. The force they exert on to the soundboard is somewhere in the region of 250 lbs. They are trying to rip the bridge of the front off the board and so this plate, notched into the x braces and glued to the underside here resists that force, I hope!

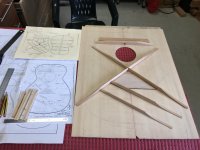
After this comes the tone bars.

IMG_3905.JPG

These affect the tone created by the vibrations of the stings. They can be 'tuned' by carefully removing some of their mass. In fact all the braces can be tuned to remove mass to improve the tine. The braces strength comes in their height, not their width. So some luthiers scallop the braces and bars and taper them to the top without reducing their height outside the scallops. Not something I'm going to experiment with. But all the bars a braces are scalloped on either end to where they meet another brace or the kerfed linings.

Next, the side braces, one side

IMG_3906.JPG

....and the other.

IMG_3907.JPG

Lastly, the sound hole reinforcement braces.

IMG_3908.JPG

They do exactly what they're called. The sound hole is a weak point. Part of the X Braces, part of top bar and these little braces provide reinforcement around the sound hole and under the rosette.

Well, it looks like the pictures, but I've no idea if it will be ok. But it can't be far off, so next job, I've got to glue them on. That's going to take a bit of planning. Back to youtube. :)
 
Oh, and what and why a 12 string, I hear you ask?

I had a 12 string years ago and loved some of the sounds it can make. For those of you who don't know, then remember back to the 60s and the Seekers song, 'I'll Never Find Another You'. Keith Potger played 12 string throughout, including that recognisable opening riff.

But you weren't looking at him, were you!! ;)
 
12 string, brings back memories of my teens, I had a Sharftsberry PBass copy and the mate who played guitar had a number of different 6 and 12 string instruments. We strung one 12 string with all octaves, very odd sound played by itself but with the bass it was good. Sounded a bit like My Sweet Lord, by George Harrison. It did confuse the chap in the music shop when I went to buy sets of strings.

Looking at all those parts you need for the acoustic makes me glad I am planning a solid body P bass, must sort out all the bits I have and get some wood for the body, sometime soon....
 
I’d no idea that there was so much going on, out of sight, in a guitar.

Malc2098":2hvtykiw said:
Oh, and what and why a 12 string, I hear you ask?

I had a 12 string years ago and loved some of the sounds it can make. For those of you who don't know, then remember back to the 60s and the Seekers song, 'I'll Never Find Another You'. Keith Potger played 12 string throughout, including that recognisable opening riff.

But you weren't looking at him, were you!! ;)

Oh I am looking forward to your version of that.
 
I'm saving myself a wet Sunday afternoon to watch this entire superb thread from start to finish.

My old woodwork master, George Love, turned his hand from making violins to guitars later in life.

george love.png
 
Do you think that the maker of these kits are doing a Frank Hornby and deliberately putting errors in the instructions?
 
Andyp":12vaga45 said:
Do you think that the maker of these kits are doing a Frank Hornby and deliberately putting errors in the instructions?

No. I think he had a enquiry from a Brit which was non-standard and when he and his supplier put the stuff together, their QA was not quite up to it. Then when 'challenged' by said Brit, he didn't want to pay all the shipping charges and just wanted to get me building. He's kept saying call me and we'll get it sorted. I told him I'm not paying transatlantic call charges.

The instructions, if all the kit parts were correct, are still a little succinct. Others have said on their WIPs elsewhere on the interweb.
 
My old woodwork master, Roger, was alleged to have been a gun runner in the Spanish Civil war!!! That's probably the closest he got to a guitar!! :D
 
Malc2098":3oez23un said:
Andyp":3oez23un said:
Do you think that the maker of these kits are doing a Frank Hornby and deliberately putting errors in the instructions?

No. I think he had a enquiry from a Brit which was non-standard and when he and his supplier put the stuff together, their QA was not quite up to it. Then when 'challenged' by said Brit, he didn't want to pay all the shipping charges and just wanted to get me building. He's kept saying call me and we'll get it sorted. I told him I'm not paying transatlantic call charges.

The instructions, if all the kit parts were correct, are still a little succinct. Others have said on their WIPs elsewhere on the interweb.

Whats app video or voice calls don't cost anything, nor facetime, zoom etc.
 
Andyp":1po4pi2d said:
Malc2098":1po4pi2d said:
Andyp":1po4pi2d said:
Do you think that the maker of these kits are doing a Frank Hornby and deliberately putting errors in the instructions?

No. I think he had a enquiry from a Brit which was non-standard and when he and his supplier put the stuff together, their QA was not quite up to it. Then when 'challenged' by said Brit, he didn't want to pay all the shipping charges and just wanted to get me building. He's kept saying call me and we'll get it sorted. I told him I'm not paying transatlantic call charges.

The instructions, if all the kit parts were correct, are still a little succinct. Others have said on their WIPs elsewhere on the interweb.

Whats app video or voice calls don't cost anything, nor facetime, zoom etc.

Steady on, Andy. Malc's only just discovered texting ;) :lol:
 
You know the old saying about 'measure twice cut once', well I've not really got measurements, although I try to extrapolate them from the thumbnail image and scale up, down and along.

The scale length of this guitar (the distance from the nut to the saddle - anything more than that, you can google it) is 24.9" and you add 0.1" to compensate for the the size of the thickest string going over the saddle (and then you have to make compensations on the saddle for the thinner strings!!).

Well, I wanted to check that the neck and fretboard provided were not only correct, but when fitted allowed the string holes to go though the bridge, soundboard and more importantly the bridge plate where I had drawn its position on the soundboard. I wanted to make sure there was enough space for 12 string holes to be accommodated (all in the absence of the blueprint!!)

So I laid everything out so I could see where holes would go when I drilled them from the outside once the construction had finished.

IMG_3910.JPG

Phew! Just about in the right place.

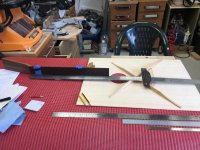
Next, when I drew all the brace positions yesterday, they were all loose and only held down by my fingers. So when I went to set up the X brace and bridge plate ready for gluing, I used little blocks of offcuts with DST on them to lock them all in place and so they will also stay in place as I glue them and start clamping with the go bars. The braces were a little off what I drew, or rather my drawing was a little off their locked-in positions.

IMG_3911.JPG
 
Back
Top