• Hi all and welcome to TheWoodHaven2 brought into the 21st Century, kicking and screaming! We all have Alasdair to thank for the vast bulk of the heavy lifting to get us here, no more so than me because he's taken away a huge burden of responsibility from my shoulders and brought us to this new shiny home, with all your previous content (hopefully) still intact! Please peruse and feed back. There is still plenty to do, like changing the colour scheme, adding the banner graphic, tweaking the odd setting here and there so I have added a new thread in the 'Technical Issues, Bugs and Feature Requests' forum for you to add any issues you find, any missing settings or just anything you'd like to see added/removed from the feature set that Xenforo offers. We will get to everything over the coming weeks so please be patient, but add anything at all to the thread I mention above and we promise to get to them over the next few days/weeks/months. In the meantime, please enjoy!

Two Concert Ukuleles (More or Less Finished)

According to my project plan, this is the last job on the CNC for this pair of concert ukuleles.

I used a 5mm stub drill for the string pin holes and and a 3mm end mill fort he saddle slot and outline profile.
(Playback speed x4 and audio 10% for those haunted by dentists' drills)

[youtubessl]PjiSTiym4ZE[/youtubessl]
https://youtu.be/PjiSTiym4ZE

Now I can stow the CNC in the rafters and use the table saw bed as the make up bench for the two instruments.
 
As a matter of interest Malc, do uke's use different neck profiles? I guess the neck is short and there are only 4 strings, so not wide either, so maybe makes little difference. With electric guitars I've always struggled with LP profiles, and my favourite "work" guitar, custom shop strat, has a very slim almost triangular profile that is very fast.

Second question, do ukes tend to have a different bridge cross section to acoustic guitars? Pretty much every acoustic I have ever owned (mostly Taylor, Martin, SC and Gibson, but a few others) has had a spread and tapered bridge (the ebony bit not the bone part or parts). Uke's seem to use a more straightforward block like design with less spread across the top soundboard?
 
AJB Temple":1l5q7ssb said:
As a matter of interest Malc, do uke's use different neck profiles? I guess the neck is short and there are only 4 strings, so not wide either, so maybe makes little difference. With electric guitars I've always struggled with LP profiles, and my favourite "work" guitar, custom shop strat, has a very slim almost triangular profile that is very fast.

Second question, do ukes tend to have a different bridge cross section to acoustic guitars? Pretty much every acoustic I have ever owned (mostly Taylor, Martin, SC and Gibson, but a few others) has had a spread and tapered bridge (the ebony bit not the bone part or parts). Uke's seem to use a more straightforward block like design with less spread across the top soundboard?

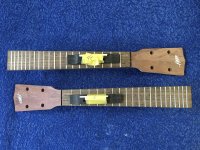
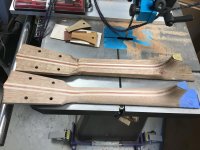
Adrian, as far as I know, ukuleles' neck profiles are proportionate to those of guitars. I've heard somewhere that ukuleles are taking over from the recorder as children's first instrument to try out at school, so if a child's hand can fit round a ukulele neck, then and adult's should, bearing in mind these two are concert size, the soprano is smaller and the tenor and baritone bigger. This image shows one of my necks carved and the other ready to be carved. The neck joins the body at the 14th fret, like many guitars, and the neck width of mine at the join is 43.5mm.C6A229EF-DB5C-4000-967E-F7C100A1D349.jpeg

My own observations of bridges is that many are similar in design to some classical guitars, as most instruments of this size employ nylon strings and use the 'above soundboard' method of attaching strings. I've chosen to use pin holes, even with nylon strings, by using beads on the string ends, secured with bridge pins. As the shape is a Dreadnought guitar shape, I see no style conflict by designing my bridges like this. I will rout a curved taper on the wings and round over the back edge, making them very similar to guitar bridges, but also in the process removing mass. It would not surprise me if the more classical style is employed on commercially made instruments to keep costs down.
 
Thank you, Nick.

I watched Julyan Wallis on The Repair Shop mending that oud last night.

I bet he doesn't make his own purfling.

And don't expect me to grow a man bun! :)
 
looks good! what is the fretboard taper on this? I ask because I want to make an electric one at some point in the future.
 
thetyreman":2ox415s8 said:
looks good! what is the fretboard taper on this? I ask because I want to make an electric one at some point in the future.

Thank you.

The taper is 36mm nut to 45mm end of fretboard, essentially 21st fret position.

Screenshot 2023-01-07 at 18.13.49.png
 
Malc2098":19nsrvog said:
thetyreman":19nsrvog said:
looks good! what is the fretboard taper on this? I ask because I want to make an electric one at some point in the future.

Thank you.

The taper is 36mm nut to 45mm end of fretboard, essentially 21st fret position.


appreciated! thankyou
 
thetyreman":1duyhyho said:
Malc2098":1duyhyho said:
thetyreman":1duyhyho said:
looks good! what is the fretboard taper on this? I ask because I want to make an electric one at some point in the future.

Thank you.

The taper is 36mm nut to 45mm end of fretboard, essentially 21st fret position.


appreciated! thankyou

Ben, I haven't mention in the WIP so far, but I might be putting an under saddle piezo pickup in one or maybe even both of these.
 
CNC machine stowed away in the rafters and it's all hand working from now on.

3ED1F170-28EE-4E48-B6F0-02FAC0BE5AFD.jpeg


I spent the afternoon fret dressing and shaping one bone nut a and one saddle.

6305573D-E423-498E-BEDC-A72F82AC6122.jpeg

It takes me about 6 or 7 minutes to dress one fret. You do the sums. People still ask why does a hand built instrument cost so much (and they also think that because a ukulele is smaller, it should be proportionately cheaper than a guitar).
 
This whole thread is fantastic :eusa-clap:

Many thanks, Malc, for all the quality work and showing us along the way. :obscene-drinkingcheers:
 
Thank you, Gents. You're too kind.

I know not all members are interested in instrument making, but I try to make my posts interesting.
 
What I find most interesting Malc is your approach to learning new skills and problem solving. No matter if I am interested in instrument making or not there is a lot to be learnt by watching the way you do things.

It may well be called purfling when it is used in guitar making to me it is just an alternative word for bandings or stringing when used on furniture. Or perhaps I have it wrong. Seeing what you have done does make me think about how I could use those techniques to decorate a turned bowl.

Keep the WIPs coming please.
 
Very good. The picture of the bodies on the bench gives a sense of scale.

True that people expect ukes to be cheaper than guitars. But twas ever thus. Collectors and good musicians will pay for high quality work like yours though. You can easily pay £12,000 for a hand made acoustic guitar from a top maker and you can equally well pay £60 for a full size acoustic for a machine made version. There is a huge difference in sound and aesthetics but probably not by a factor of 200.

I'd not heard that uke's are tending to replace recorders for school children. I suppose for a concert uke tuned AECG that gives you a good range of first position chords that are easy to finger and translate into popular music easily. And nylon strings are easy on small fingers. In the state schools around here music is barely taught at all. Neither is drama or dance. There are lots of private schools, which are entirely different and have proper music departments and all the gear. It's deplorable really that state eduction has done away with so many things that are important to life. Like learning how to make things out of wood for example....
 
Thank you, Andy. It's incredibly satisfying to hear a member think laterally on stuff that I'm doing. Go for it!


Thank you, Adrian. You make a very good point. I doubt very much that I would be making instruments now, if I didn't have the opportunity of 7 years of woodwork at school back in the 60s.

BTW, anyone thinking of using their drum sander to create veneer down to 1mm or less, I put my stock on an MDF sled that has 240 sandpaper glued to it so that the veneer is stable and on a flat base and doesn't slide. Mind you, I only take off a whisker at a time, probably 1/8th of a turn of the wheel, or even less, and the digital vernier gauge is in my other hand!
 
That's 40 frets dressed, and the nuts and saddles fitted to each of the necks, ready for fitting right at the end of the build.

AA229368-75C0-4101-8E51-3F8DBF34FFFD_1_201_a.jpeg


Now it's time to starts setting up the go-bar deck to provide caul pressure on various parts of the bodies starting off with the backs' joins' reinforcing strips.

04C680EB-C2D5-4356-8D5A-1427E0137757.jpeg
 
First job on the go-bar deck is to glue the reinforcing strip along the backs' joint. I'm using spruce cross grain. I read somewhere whenever you join wood with glue, the grain of each part should be a 90 degrees to each other. I don't know if that's true, but it's necessary here. Just testing the 'flexibility' of these backs, the cutaway back split at the join. I had to re-shoot and re-glue.

3B394E78-A04B-442A-A84D-DDA672D94DCA.jpeg

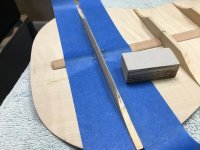
I decided to take another 0.5mm off each of these backs as they've got to proscribe a compound curve on to their rims. As they both had the strips glued, I made up a sled with a groove down the middle for the strip to sit in and ran them through the drum sander with 240 grit to about 1.55mm thickness.

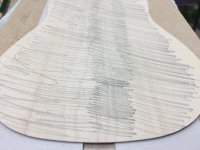
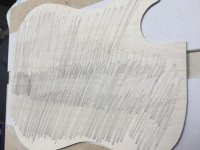
At this point, examining the outside faces I could see sanding marks on them from the drum sander, even at 240 grit and going less than an eighth of a turn at a time. This happened on my internship, I picked up the sanding marks the other interns had left, and was left with the job of sanding them out.

On this very light Sycamore, it's difficult to see the lines. So I had to show them up.

DCA85D2E-173F-4FC8-A604-0815BF5E5B34.jpeg

You might have to expand the photo to see them.

D9A6570D-BDEB-4D13-A14F-FCF68D393B90_1_201_a.jpeg

Sanding by hand, I try to remember how many strokes I make on one side and copy that number to the middle and then the other side, so I don't create a vari-thckness sheet.

FE4E2787-7CF1-4C75-8EC5-B0BB40572730.jpeg

Job done and reinforcing strips carved to shape.

C147E35B-6209-4376-A849-BEDC13FD9F33.jpeg

Remember that sanding dish I milled on the CNC a few months back? Now it's its turn to to earn its keep. (Anyone keeping up with apostrophes?) ;)

First I sand the back braces to the same radius as the heat of the sanding dish.

7AB4084B-F6FF-4B81-AEB2-A213C69B7DDB_1_201_a.jpeg

17089E88-A15A-4836-94D8-18B7F91B7959.jpeg

Then I have to cut the housings in the reinforcing strip to accept the braces.

F3F1AFA4-C382-4B00-B289-12FC45DE7BF4_1_201_a.jpeg

Dry fit flat.

BA1465DB-49B3-45CA-9CDC-84D36D53BEAD_1_201_a.jpeg

Now the sanding dish goes under the go-bar deck and the rods press it into the shape of the dish.

8BAAACAD-B58B-432C-AF27-F2740F581681.jpeg

Now the back is shaped under pressure, the braces can sit glued in their curves and the rods are only having to ensure a gluing mate; it was the previous three that maintain the shape.

539F5042-DE1C-4F64-B59C-8E155AD38E1A.jpeg

Tomorrow I'll have to rinse and repeat with the other instrument.
 
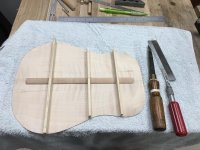
After gluing the braces to the back in the sanding dish, the back comes out curved.

B5DC0E74-867B-44D7-A8D0-CAEB2C79DA79.jpeg

The rim was sanded in the same dish, so this will fit onto the contours of the rim. Photos when that time comes.

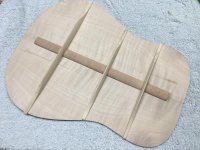
Time to start carving the braces. The carving is to remove mass while maintaining strength. So the outer edges of the braces are curved almost to nothing, because the back is glued to the rim here.

4C0B3158-0DD6-49B0-B752-2F4E51075996_1_201_a.jpeg

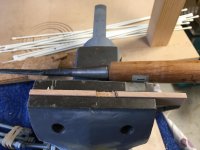
I use the chisel upside down to form the curve, and by having the ruler alongside the braces it means that when the chisel rides along the ruler, that will be as low as I can carve. So if I use the ruler at each brace end, then each one will be carved to the same depth.


Next, removal of more mass. I'm afraid I can't afford violin planes for this job.

AF77EF09-6E6C-41A4-A2BE-6499C27EBB1A.jpeg

Lastly, sanding smooth with smallest sanding block in the 'shop.

7B236406-00C1-4BD2-8289-A02732FD920F.jpeg

I reckon I've removed at least half of the mass of the original brace blanks by doing this.

34592646-67FD-4B2A-B6AB-1E87547C72F2_1_201_a.jpeg

A pair of non identical twins.

7565473A-46F3-472A-A672-136D0ABBE3D3_1_201_a.jpeg

Time to start on bracing the tops.

744F8DDA-DA92-4427-B6E7-0A50C51319D3_1_201_a.jpeg

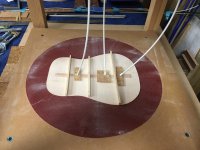
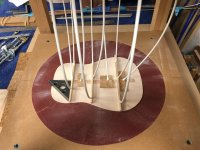
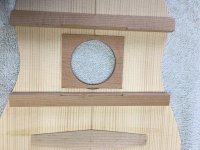
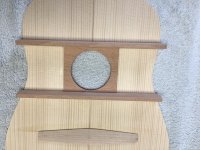
The go-bar deck is earning its keep again; the soundhole reinforcement and the bridge reinforcement.

A5EF6CA2-9543-4C87-AFA5-FA3B64552C84.jpeg

If you view that last image on a big screen, you could just make out a circular piece of acrylic that I had previously machined on the CNC router to the same size of the soundhole. So that's how I get the reinforcement exactly over the soundhole.

Oh, and BTW, I've turned the sanding board over to its flat side. The tops get braced flat on this ukulele design.
 
I've been rather quiet up to now, but I really must join add my voice to the chorus of appreciation. Even as a non-musician who will never attempt anything like this, I can see the huge amount of practical problem solving that goes into your builds. And the level of precision. And patience. Oh, and ingenuity as well.
Not to mention brilliantly clear photos and description. It's very impressive and much appreciated.

:eusa-clap: :eusa-clap: :eusa-clap:
 
AndyT":1lclc6d4 said:
I've been rather quiet up to now, but I really must join add my voice to the chorus of appreciation. Even as a non-musician who will never attempt anything like this, I can see the huge amount of practical problem solving that goes into your builds. And the level of precision. And patience. Oh, and ingenuity as well.
Not to mention brilliantly clear photos and description. It's very impressive and much appreciated.

:eusa-clap: :eusa-clap: :eusa-clap:
Thank you for those kind words, Andy. I, too, am a non musician. I play the guitar a bit. But realised a while ago that my guitar playing skills were not developing, whereas my woodworking skills could still develop.

So here I am, developing. ;)
 
Lovely neat work. You are so careful with those braces - and no one will ever see them again. That is what proper craftsmen do. :text-bravo:

As a design aside: a friend of mine still makes high end guitars (for sale but all made to order). He has been experimenting with hollow carbon fibre braces with (he says) very good results. The advantage is that they are super strong but have very low mass and allow better top sound waves. I think they are actually a printed polymer of some sort with CF reinforcing. The other advantage is that the design can easily be adapted as a carrier for a pick up / ambient mic.

Might be worth edging uke's in that direction? I have often wondered if one could adapt acoustic bracing with variable tension (thumbwheel or tension rod) so that tops can be somewhat tuned. You know how some tops can sound really dead and others very alive? Could help that.
 
AndyT has said all that I could say, but I would like to add a big thank you for letting me look in on how you build these things! fascinating.
 
Thank you, Adrian.

While no-one will ever see those braces, the sound waves are moving around in there, and I wouldn't want them to bash up against sharp edges. I want them to have a smooth route all the way to the soundhole.

I'm not sure I wan't to move towards CF bracing. I'm not a business and I can't pass the cost on. Even just buying CF rods for the necks would be expensive for me.

However, I haven't said before, but I might be fitting under saddle piezo transducers in these two. There are popular ukulele playing groups and ensembles everywhere these days and many play outside with mini-amps. So, if any of them just happened to want one of mine, they'd be amp ready.

Thank you, too, Paul.
 
Right, now those reinforcements are glued, it's time to make the braces for the tops.

This is a bit of a dark art, because how you carve the braces affects how the wood responds to the vibrating strings, and I haven't a clue how it's done to achieve a given tone/sound/colour/whatever. So I will follow the plans, and instinct, and see what I come up with.

First I had to make stopped housings 1mm x 1mm for the length of the soundhole reinforcement.

1AF30D29-7CEC-494B-84FE-376978E9273B_1_201_a.jpeg

Dry fit.

E336CACE-C9C3-4C2D-AF78-6C4951B98BDD_1_201_a.jpeg

The fan braces need to fit over the bridge reinforcement, so more micro housing joints.

D744BF7A-A03A-4543-8A16-79BA71E00F36.jpeg

Not the neatest.

All the braces with their housings.

58CE7D07-9A5B-41AE-9A4C-D3CB569D66E9_1_201_a.jpeg

And where they are intended to go.

32BB7B0B-88DF-4205-A9A0-1407ED9BF203_1_201_a.jpeg

I forgot to grab a photo, but the three fan braces needed their ends carved towards the second transverse brace. So I carved those ends in the vice before gluing. All the others I will carve after the glues cured.

That was tricky getting all those go-bars in place without skewing the braces.

67A8BB5F-1B2C-48C2-8BE5-DAC7C7F8FB33.jpeg

Rinse and repeat for the cutaway model.
 
Both tops' braces are now glued in position. Time to start carving them.

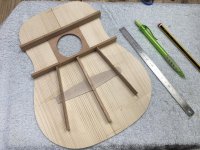
The transverse braces are kept long, because they will interlock with the rim. The fan braces and the bridge reinforcement are carved to nothing at their ends, and sharp arisses (is that the plural of aris?) are relieved.

0631313E-7202-47BB-9BE8-CA9DD74A3CBA_1_201_a.jpeg

And here's an image of how it will look inside when it's glued to the rim, and no-one will ever see that except me. ;)

24322A9B-A98D-4BB1-B5EF-911292B9DBAF_1_201_a.jpeg

Those spruce braces weren't 'alf 'ard. It fair knackered me. Just got the cutaway model top to finish carving tomorrow.
 
Andyp":9ii8mrdf said:
My favourite part of this process is that go bar clamping device. It looks so out of this worldly.

The underside of the deck roof I've covered with sandpaper, but they still pinged yesterday! Flew off in all directions.

Reminded me of those words on the Bayeux Tapestry, 'Stop messing about with them arrers, or you'll have someone's eye out!'
 
I've not had much to say on this thread but I'm enjoying following along the process.

Thanks Malc for the pictures and explanations. Fair amount of effort in presenting here never mind the making.
 
Robert":2l2iokz1 said:
I've not had much to say on this thread but I'm enjoying following along the process.

Thanks Malc for the pictures and explanations. Fair amount of effort in presenting here never mind the making.

Thank you, Robert. It kind of helps me establish the processes in my mind ready for the next time by articulating them on here.
 
Finished the carving.

663F4C88-3076-4EC8-A38D-3AC2C1C2526A_1_201_a.jpeg

207CAEA7-D41D-479D-BF4B-E4A85BCA4895_1_201_a.jpeg

Off out now for a birthday lunch somewhere in the wilds of Somerset. :)
 
Back
Top