• Hi all and welcome to TheWoodHaven2 brought into the 21st Century, kicking and screaming! We all have Alasdair to thank for the vast bulk of the heavy lifting to get us here, no more so than me because he's taken away a huge burden of responsibility from my shoulders and brought us to this new shiny home, with all your previous content (hopefully) still intact! Please peruse and feed back. There is still plenty to do, like changing the colour scheme, adding the banner graphic, tweaking the odd setting here and there so I have added a new thread in the 'Technical Issues, Bugs and Feature Requests' forum for you to add any issues you find, any missing settings or just anything you'd like to see added/removed from the feature set that Xenforo offers. We will get to everything over the coming weeks so please be patient, but add anything at all to the thread I mention above and we promise to get to them over the next few days/weeks/months. In the meantime, please enjoy!

WIP for the New Year (Dun)

Mike G":2llmzdkb said:
Just because I don't comment doesn't mean that I'm not following along. :) Door? What door? There's no door on your drawing, and I think we all assumed this was a set of open shelves.

Cabinetman":2llmzdkb said:
You had best look again Mike, it caught me out, I was thinking it was the sides of the cabinet and a strange double top and bottom.

Ian's correct Mike. If you scan the drawing again the door is shown (not clearly to be fair) with stiles and rails each 28mm wide - Rob
 
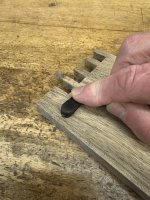
The first thing are the narrow housings for the 3mm wide ply slots used in the shelf jointing. The small de Walt router is set to a doc of 4mm using a brass gauge block; I never now use the thingie on the machine as this way is much simpler and more accurate:

IMG_2279.jpeg

I've got two matched lh and rh ply fences the router will run against:

IMG_2277.jpeg

...and with the job firmly secured to the assembly table, the first one was cut:

IMG_2280.jpeg

...so then it was simply a matter of joggling along the various cramps and fences until they were all done:

IMG_2281.jpeg

The next job was to machine the slot for the JK door catch. The big danger with machining a small bit of wood with a large router is the dreaded 'drop off' where there's insufficient support and it drops as the cut's finished; to be avoided at all costs. The way I get round it is to use a couple of gash bits of pine either side but also dead level with the end of the job, which enables the router fence to run true and not wander:

IMG_2282.jpeg

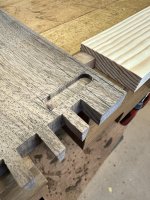
Once the doc on the big router has been set to 4mm, it's easy then to machine the 10mm wide recess:
IMG_2284.jpeg

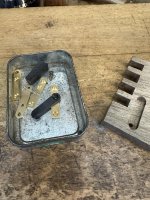
The Brusso hinges arrived from the postie this morning, so were unpacked and lobbed into the aforementioned 'baccy tin in the bench well. The supplied screws are always too long for my needs and are always replaced with proper slotted brass cs ones:

IMG_2296.jpeg

Eventually the tin will get chocca with all sorts of little odd n'sods and if they're kept in a 'baccy tin there's a better than even chance they won't go walkabout or even get lost on the floor with all the other accumulated detritus. My suggestion is that if you haven't got 'baccy tins (or similar) for this sort of application, then get some :lol:

The big Festool router was set to the thickness of a hinge:

IMG_2295.jpeg

It's absolutely critical that the hinge is set precisely to the right depth as the little 'washer' on the pivot pin determines the eventual shadow gap for the door and the thickness of the 'washer' is less than a mm :shock:
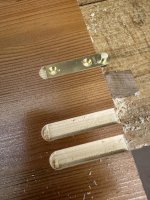
I always do a couple of trial runs to get the depth:
IMG_2297.jpeg

The first two were a fraction too deep, but the last one was spot on. Next was the machining of the two actual slots for the hinges, one on the top and one on the bottom. The set up is similar to the one shown above, but this time to stop the router 'drop off' I've used the other piece of wood, rather than something gash:

IMG_2298.jpeg

...and 'cos they're both in line, I'm able to do one cut, passing from the first bit, across the gap and then machining the second bit:
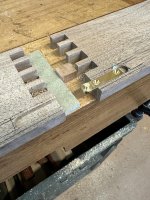
IMG_2300.jpeg

The last little bit to do is some chisel work to square out the round corners; this actually isn't too crucial as it can be adjusted 'in situ' when the door's fitted. At this point what I was aiming for was for the centre of the pin to be in line with the end of the walnut:
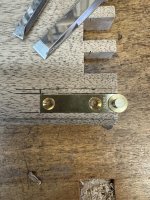
IMG_2301.jpeg

The other hinge is fitted similarly:

IMG_2302.jpeg

With all the machining done (slots, hole and housings) the next thing to do is to clean up the inside faces and polish:
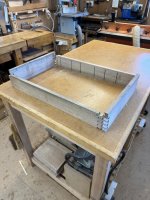
IMG_2303.jpeg

...and MikeG, if you've been following you'll now see where the door fits into the cabinet - Rob
 
Really enjoying watching this Rob. Thanks for taking the time to post it all.
 
AndyT":26xiutac said:
Really enjoying watching this Rob. Thanks for taking the time to post it all.

No problem at all Andy, but this will be the last WIP I do until the forum software is updated into the 21st century; uploading this quantity of pics by the archaic system we currently use is a planet sized pain in the ar$e. Mods please note! - Rob
 
Rob
Thanks for all your hard work in posting this WIP. Your methodical approach is fascinating, and very instructive!
Les
 
That’s all pretty damn good Rob, I think it’s about time you did one without the Routers, old school! :text-lol:

Still at least you didn’t use one for the Dovetails.
I understand about the software but that will be a real blow, I so much enjoy following your wips.
Ian
 
Routermonster":22ot0je3 said:
Rob
Thanks for all your hard work in posting this WIP. Your methodical approach is fascinating, and very instructive!
Les
Good to hear from you again Les, hope you and yours are well

Cabinetman":22ot0je3 said:
That’s all pretty damn good Rob, I think it’s about time you did one without the Routers, old school! :text-lol:

Still at least you didn’t use one for the Dovetails.
I understand about the software but that will be a real blow, I so much enjoy following your wips.
Ian

Like them or loathe them, routers are quick and (provided they're set up and used correctly) supremely accurate; please explain Ian how I could have done the 3mm wide housings accurately across the grain 'old skool' :lol: Furthermore, those little slots took no more than 15mins to cut - Rob
 
Wel it was tongue in cheek Rob, also I was a little surprised that you used ply tongues I assumed you were going to sink the shelves in full thickness, but you are definitely right that your way is by far the quickest.
Ian
 
Cabinetman":2gejc2of said:
Wel it was tongue in cheek Rob, also I was a little surprised that you used ply tongues I assumed you were going to sink the shelves in full thickness, but you are definitely right that your way is by far the quickest.
Ian
Appreciated Ian :lol: Although the ply tongues are only 3mm thick, I make them myself from 5 leaves of 0.6mm veneer so they're actually fairly strong and more than up to the job of securing the shelves and bearing the weight of the little netsukes. I use ply tongues quite a lot and they provide a useful alternative to biscuits, doms etc - Rob
 
Woodbloke":31dfh2sv said:
.......please explain Ian how I could have done the 3mm wide housings accurately across the grain 'old skool' :lol: .....

"Old school" would be housing in the whole board, not a bit of ply. Or you'd do a sliding dovetail. But if it had to be done, an accurate 3mm wide slot wouldn't be difficult at all: two knife walls, a mortice at the stopped end, 2 saw cuts, and a minute or two with a 3mm chisel. In walnut, you could probably cut the entire depth with a knife and leave out the initial mortice and the saw cuts.

This isn't to criticise your choice of method, because what you did is exactly what I would do if I needed a 3mm wide slot. It's just to answer your point and say that there is a hand tool alternative.
 
Woodbloke":2rzaxzj9 said:
........It's absolutely critical that the hinge is set precisely to the right depth as the little 'washer' on the pivot pin determines the eventual shadow gap for the door and the thickness of the 'washer' is less than a mm :shock:
I always do a couple of trial runs to get the depth:

View attachment 5

The first two were a fraction too deep, but the last one was spot on......

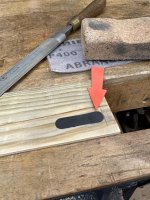
How do you allow for the amount you have to plane off your boards to remove the pen markings?
 
Mike G":5r9ux6qo said:
Woodbloke":5r9ux6qo said:
........It's absolutely critical that the hinge is set precisely to the right depth as the little 'washer' on the pivot pin determines the eventual shadow gap for the door and the thickness of the 'washer' is less than a mm :shock:
I always do a couple of trial runs to get the depth:

View attachment 5

The first two were a fraction too deep, but the last one was spot on......

How do you allow for the amount you have to plane off your boards to remove the pen markings?

A certain thought had been going through my mind as well.
 
Cabinetman":31oc83s3 said:
Mike G":31oc83s3 said:
Woodbloke":31oc83s3 said:
........It's absolutely critical that the hinge is set precisely to the right depth as the little 'washer' on the pivot pin determines the eventual shadow gap for the door and the thickness of the 'washer' is less than a mm :shock:
I always do a couple of trial runs to get the depth:

View attachment 5

The first two were a fraction too deep, but the last one was spot on......

How do you allow for the amount you have to plane off your boards to remove the pen markings?

A certain thought had been going through my mind as well.

Whispy thin shavings off a sharp card scraper; pics to follow - Rob
 
Sorry folks, all work on this project is on the 'back burner' as I've gone down with a really horrible chesty cough/cold, what I suspect is the 100 day cold. Loss of appetite, aches, shivers etc. Nasty - Rob
 
So very sorry to hear Rob, I really hope you don’t suffer too badly, we are big believers in a Vicks vaporiser in the bedroom when a cough is about, it stops it getting into your lungs.- pneumonia and you don’t want that!!
just coming out the other end of a similar thing, cough aches queezyness and a splitting non stop headache, just laid in a dark room, anything at all made it all worse.I hope you only have a few days of it, I’m on day 5 and a bit better but very weak. Tested and no not Covid which I had again at the beginning of Jan then 2 weeks later same symptoms but tested neg, I suppose it’s flu as it’s all pretty much the same bug anyway.
Ian
 
Get well soon Rob.

Another firm believer in the power of Vicks. It's been used on me as a neck and chest rub as well as for steam inhalation for 60 odd years. Missus is a convert too as an asthmatic she immediately felt the benefits when I introduced her to it.
 
We dont use the vaporisers Ian just a teaspoon of the vapour rub in a bowl of boiling water, breath it in with a towel over the head.
 
Andyp":1mpb49ls said:
Get well soon Rob.

Another firm believer in the power of Vicks. It's been used on me as a neck and chest rub as well as for steam inhalation for 60 odd years. Missus is a convert too as an asthmatic she immediately felt the benefits when I introduced her to it.

Guess what I found lurking in the bathroom cabinet:

IMG_2314.jpeg

A goodly finger full is going to be applied tonight prior to going 'up the wooden hill' - RoB
 
Woodbloke":c68sg01m said:
Sorry folks, all work on this project is on the 'back burner' as I've gone down with a really horrible chesty cough/cold, what I suspect is the 100 day cold. Loss of appetite, aches, shivers etc. Nasty - Rob

Wait for the sore throat, Rob. It's a beast. It's taken me 3 weeks to get rid of it. My sympathies.
 
Mike G":2gfiikto said:
Woodbloke":2gfiikto said:
Sorry folks, all work on this project is on the 'back burner' as I've gone down with a really horrible chesty cough/cold, what I suspect is the 100 day cold. Loss of appetite, aches, shivers etc. Nasty - Rob

Wait for the sore throat, Rob. It's a beast. It's taken me 3 weeks to get rid of it. My sympathies.


Got mine on Boxing Day. Everything's gone except the cough.
 
Routermonster":aa2o6qyp said:
Rob - Best wishes, and hope you get well soon.
Les

Blackswanwood":aa2o6qyp said:
Hope you are okay soon Rob.

Thanks both; feeling a bit better today. I think the worst of it was Thurs/Fri of last week but I'm not going back into the 'shop til I'm 100%: I even got an Ax package today and resisted the temptation to go outside to play :D - Rob
 
Woodbloke":1proyim4 said:
Routermonster":1proyim4 said:
Rob - Best wishes, and hope you get well soon.
Les

Blackswanwood":1proyim4 said:
Hope you are okay soon Rob.

Thanks both; feeling a bit better today. I think the worst of it was Thurs/Fri of last week but I'm not going back into the 'shop til I'm 100%: I even got an Ax package today and resisted the temptation to go outside to play :D - Rob

Ohh theres a novel thought, an axminster care package for when you are not well nearly beats the Commando magazines I used to get.

Take care with that cough it took me about 5 weeks to shift it.
 
Get well soon - hope you have it better than I did. My cough started mid November - I still have it now but have improved massively in January. November and December were bad coughed so much had chest pains to the point I couldn’t sleep. The most unwell I’ve felt, I’m asthmatic and had steroids which normally kick an illness didn’t touch it.
 
Alasdair":12j85whh said:
the Commando magazines I used to get.
I remember those as well; little paperback comics about A5 size if I recollect full of black and white sketches. Great reading for a little lad :lol: - Rob
 
They are still available (send the good lady out to find them :lol:).
I now have a real life Commando in the family as my son passed out as a Royal Marine Commando last year, I had the pleasure of getting him his Fairbairn Sykes dagger as they no longer issue them as part of the commando kit.
 
Glad you’re on the mend.
I lived on those and the Victor comic when I was a boy. Looking back my childhood was pretty idyllic, but kids would probably say it was boring now.
So what do our brave commando's use now? Lasers?
 
Alasdair":24um6bwt said:
..real life Commando in the family as my son passed out as a Royal Marine Commando last year..
My nephew passed the RM physical last year but declined to enter the service. He was and still is a serving member of the MoD plod and opted to train with firearms, so he now fairly constantly goes on exercise to play with them in real life situations (ie boarding a train taken over by terrorists etc) He's recently got his three stripes for sergeant and is now part of a select firearms group within the Mod plod who advices other agencies (eg the Met) on all aspects to do with lethal weaponry. His main bread and butter role is
as part of the the nuclear weapons convoys :o :shock: from Aldermaston to the Holy Loch in Scotland. His pay and prospects are currently far better (and he gets to play with guns). Had he joined the RM he would have taken a big pay cut; downside is he didn't get his green beret - Rob
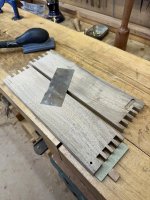
https://www.google.com/search?client=sa ... BHtpc,st:0
 
Woodbloke":3wet9ro7 said:
Alasdair":3wet9ro7 said:
..real life Commando in the family as my son passed out as a Royal Marine Commando last year..
My nephew passed the RM physical last year but declined to enter the service. He was and still is a serving member of the MoD plod and opted to train with firearms, so he now fairly constantly goes on exercise to play with them in real life situations (ie boarding a train taken over by terrorists etc) He's recently got his three stripes for sergeant and is now part of a select firearms group within the Mod plod who advices other agencies (eg the Met) on all aspects to do with lethal weaponry. His main bread and butter role is
as part of the the nuclear weapons convoys :o :shock: from Aldermaston to the Holy Loch in Scotland. His pay and prospects are currently far better (and he gets to play with guns). Had he joined the RM he would have taken a big pay cut; downside is he didn't get his green beret - Rob

https://www.google.com/search?client=sa ... BHtpc,st:0


You wouldn't want to know what was moved around escorted by chaps like me completely unarmed back a few decades. In fact my first ever job in 1971 was to safeguard a broken-down lorry with napalm bombs on board at a major crossroads, unarmed.
 
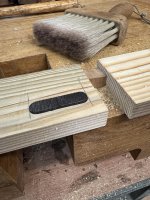
This step doesn't take very long at all and mostly involves a freshly sharpened cabinet scraper:

IMG_2306.jpeg

....and light (emphasis on light) sanding with part worn 240g Abranet. The walnut was skimmed by hand to determine face side/edge so doesn't really need too much attention, except to remove ink lines from the pen. I never plane internal surfaces with a plane, especially if there are dovetails; too much material is removed which will upset the fit of the joints. Several times years ago I used use a No.4 for cleaning up and wondered why the joint shoulder line was gappy! Using a card scraper, I clean up to the shoulder line and never beyond it, then lightly sand the whole surface, so to do all four pieces took around 10 minutes, not inc sharpening the scraper.

The only edges that do get planed:

IMG_2307.jpeg

...are those of the vertical sides. Two thin, full shavings only are removed and the internal edge is also lightly rounded over with a block plane and sanded - Rob
 
Cabinetman":1empoxb6 said:
Glad you’re on the mend.
I lived on those and the Victor comic when I was a boy. Looking back my childhood was pretty idyllic, but kids would probably say it was boring now.
So what do our brave commando's use now? Lasers?

It would appear that they may be using jet suits soon https://youtu.be/suHOLFhbwsM?si=YendW68iI0bBtotu, although my youngster has been delighted at jumping out of helicopters (google helocasting)
 
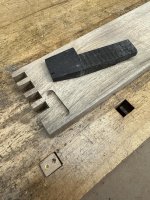
This bit would have been better done prior to cleaning up, but I forgot :eusa-doh: It's also far, far easier to do before gluing.

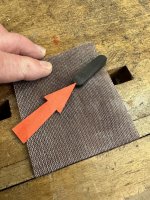
Like him or loathe him (and a lot did) one of the features of much of JK's work were his small accent details, usually hand carved, one of which was his signature, sprung loaded door catch. My version isn't quite the same as his, but it's just as good and surprisingly effective. I usually always use a heavy, dark timber for accent details and African Black Wood is ideal. It's relatively easy to work with, provided it's treated nicely and it also takes incredible detail:

IMG_2308.jpeg

I chopped off a bit and used the shooter/LN51 to bring it to size, after which the ends were rounded on the disc sander for a fit, bearing in mind that it needs to move and shouldn't be tight. There's around 2mm left upstanding:

IMG_2336.jpeg

Then a slot was machined in some pine to hold the ABW:

IMG_2337.jpeg

...so that I could used a cabinet rasp:

IMG_2339.jpeg

...a half round mw file and various grads of Abranet to make it flush and leave a small 'bump' at one end:

IMG_2340.jpeg

The round end of the 'bump' needed to be tapered to allow the door to slide over it as it's closed; easily done using grades of Abranet as above:

IMG_2341.jpeg

The next job was to find a 12mm brass cs screw; the catch was then drilled and countersunk at the opposite end to the 'bump':

IMG_2342.jpeg

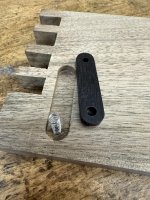
JK used biro springs and they're perfect for this sort of application. Apparently he was in the habit of strolling into stationers in Sweden and purchasing half a dozen biros (say BIC). They were then broken apart and the springs extracted, disappearing into one of his coat pockets. The remains of the biros were then lobbed into a convenient rubbish bin and all done in front of an astonished cashier behind the counter :lol:

The spring needs two holes, one in the walnut and the other in the ABW. I tapped a veneer pin into the a walnut (not a clever idea to try it in ABW :D ) and snipped off the end with some wire cutters:

IMG_2343.jpeg

The catch was then offered up to the pin, where it left a small indentation on the underside. Walnut and the ABW catch were then drilled out with a 4.2mm drill to allow clearance.

IMG_2344.jpeg

The hole in the ABW needs to be no more that a couple of mm...just enough to contain the spring. The depth of both the holes combined should be enough to contain the spring when fully compressed:

IMG_2346.jpeg

...as you can see by the pressure on my index finger:

The last thing to do is to lob the ABW catch, spring and screw into the 'baccy tin 'cos I don't want to loose them :lol:

IMG_2347.jpeg

The final pressure applied to the underside of the door is fine tuned by the screw setting - Rob
 
If I've followed along correctly it's not a positive catch so much as a pressure plate pushing gently on the underside of the door. Is that right?
 
Sorry, I know I am probably being dim here, but I couldn't see it earlier in the thread. Who is JK?
 
Back
Top