• Hi all and welcome to TheWoodHaven2 brought into the 21st Century, kicking and screaming! We all have Alasdair to thank for the vast bulk of the heavy lifting to get us here, no more so than me because he's taken away a huge burden of responsibility from my shoulders and brought us to this new shiny home, with all your previous content (hopefully) still intact! Please peruse and feed back. There is still plenty to do, like changing the colour scheme, adding the banner graphic, tweaking the odd setting here and there so I have added a new thread in the 'Technical Issues, Bugs and Feature Requests' forum for you to add any issues you find, any missing settings or just anything you'd like to see added/removed from the feature set that Xenforo offers. We will get to everything over the coming weeks so please be patient, but add anything at all to the thread I mention above and we promise to get to them over the next few days/weeks/months. In the meantime, please enjoy!

Two Concert Ukuleles (More or Less Finished)

I was just thinking why not screw it down on the scrap area too :)

Going by the variety of pieces you are knocking out now, I'd guess the design and program stages must be getting a bit easier now?
 
Phil, Thanks.

Robert, DaveL, I am still so new to this way of working with wood that I still worry about a wayward cutter meeting a screw in the stock area. This was the first issue I'd had with the CA glue and and masking tape method. I've since found out that the ply was slightly bowed, and the the medium CA glue didn't meet the tapes under that imperceptible bow. I had just finished a thick glue bottle and picked up the medium to use. So I went and found another bottle of thick CA glue which succeeded in meeting both tapes under the bow.

NickM, what are you waiting for?! :)
 
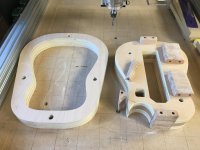
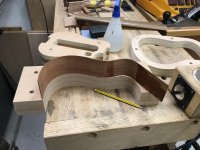
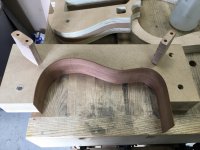
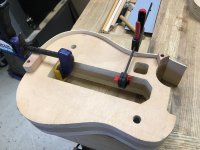
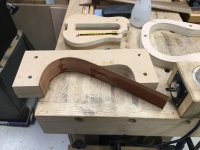
The outside form I finished yesterday is only about 36mm thick because you need to access both edges of the rims. It keeps the rim/sides stable with a turnbuckle spreader inside.

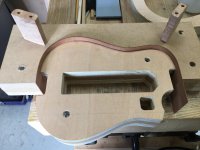
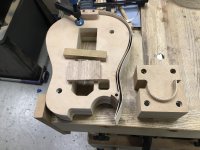
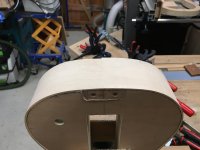
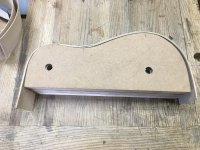
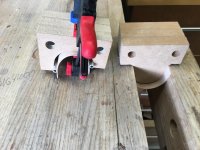
The inside form is roughly the depth of the deepest part of the rim/sides and is used to clamp the three separate parts of the rim together when gluing to the end, neck and horn blocks. The apertures facilitate clamping.

74FCB384-D4BB-4656-8DFF-0C91F1B8F1DC.jpeg

I can't help being gobsmacked by the accuracy of my Chinese imported CNC kit, when I I get stuff right, that is :D ! Those three ply/MDF/ply sheets that make up the inside form haven't been sanded and you can only feel the difference at the joins because they are different materials.
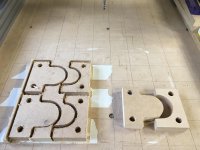
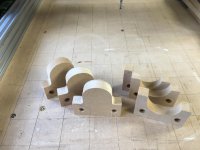
Eagle eye readers will notice I haven't yet cut off the horn from the form. That will be tomorrow's job along with making the little form to press the cutaway laminate. I've also got to make the laminate press forms for the sides before I begin to get the sycamore sides out of storage for bending.
 
Someone asked me how the cutaway was to be shaped.

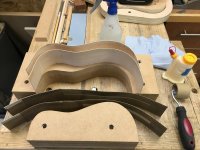
Instead of just two pieces comprising the rim/sides as in a conventional symmetrical instrument, the cutaway rim is made up of three parts; the large just over half part, the smaller just under half part and the cutaway part. The cutaway part needs its own mold to match against when bending and to be pressed when laminating.

Machined from MDF.

9BC9934B-ADB6-4753-8DDC-1A57CE712CAB.jpeg

Cleaned up.

C66AE018-38DC-42D9-8D4C-6DCE260B13CF.jpeg

Dowelled together.

F05A095E-41F3-4F01-B8FF-D07795D1CE8C.jpeg

It will be a test of my skills to make a mitre joint at the acute angle of the horn and then at the right angle where it meets the neck block. That's why it will need the reinforcing block in the horn to support that fragile mitre joint.
 
I've included this sequence in the uke build, because the item is required for making the ukulele bodies.

Many acoustic instruments like guitars and ukuleles have dished or bowl shaped backs. Creating that on the back is achieved by gluing internal braces to the instrument back at the desired radius. Those radii are many between different manufacturers. On my plans, the radius is shown at 1220mm.

The rim, or sides, of the instrument start out level, so would not match the contour of the dished back. To achieve this, the rim is rotated in a sanding dish of the same radius. I needed to create a CAD/CAM file to make this happen. My software isn't full 3D capable, only 2.5D. But it contains files of shapes which can be manipulated, like dishes and domes, which I have used for this part of the project.

All video sequences are at x4 speed.

[youtubessl]G4rIxCCJcZs[/youtubessl]

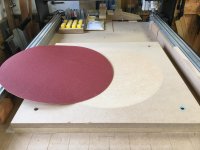
Yesterday, I machined the roughing out of the dish which took an hour and a half. So I let the spindle cool down and left the finishing for today. The roughing out was done with a 6mm end mill bit.

ED7B7DF6-AA1E-49AF-BF77-068D7B1FF2EB.jpeg

The finishing was done with a Rennies 12mm bull nose bit.

[youtubessl]i9Z4qHGvTzk[/youtubessl]

The sanding sheet is available for fitting to floor sanders. Just happened to be the size I wanted. I've sealed the exposed fibres of the MDF with WS Polyurethane varnish and will maybe have provide another coat before I stick the disc into the dish.

8FA31271-E340-4B9C-9E0F-B0FD1134BEEA.jpeg
 
The last of the forms, I think, for the laminating press.

There's a 2.5mm offset between the two to accommodate the two same thickness leaves of the same tonewood (not one inferior thicker and one pretty thinner like some manufacturers do) and some cushioning thin cardboard.

C1107346-64F6-4CAF-9651-C80432F6875E.jpeg

Now it's time to get the tonewood out and start working with it.
 
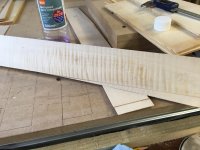
Look at that stunning ripple in those Sevenoaks Sycamore back and sides, with a nice straight Alpine Spruce for the soundboard. I've decided to make this the symmetrical Dreadnought style Concert size model.

79E0E6AB-1755-4916-9095-6AFDD1DC8CDD.jpeg

These Sycamore pieces are less spectacular, so I shall make these into the cutaway Dreadnought style Concert size model, then I won't be so cheesed off if I don't make such a good job of the cutaway. Nice straight Alpine Spruce again for the top.

24157D59-1930-4673-87CE-11292B449484.jpeg
 
Today I prepared the sides for heat bending. I shall be using a bending iron this time, and will try and remember everything the Pro taught me on the course earlier this year. I am also laminating two leaves per side this time which when laminated will leave the sides almost exactly the form shape, whereas just bending to the shape with a single leaf, leaves and element of spring in that leaf which introduces stress into the instrument body when it's glued up.

So, I set up a new 80 grit belt on the drum and had already sorted the pairs that I wanted to be the showy side, which pairs I wanted to be on the inside, and which sides of those were to be the glued faces. I am aiming for a laminated side of between 2.2 and 2.5mm thickness.

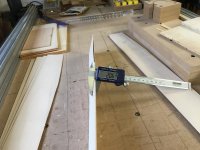
I got them all sanded down to around 1.5 - 1.6 mm thick. The 80 grit leaves sanding lines on the wood so for the final thicknessing I set up the 120 grit belt on the drum.

First pair off the machine to thickness.

40E0A95F-F7F9-4BB8-95B5-CB34A46A3DCF.jpeg

Although the machine manual says it is capable of going down to 0.8mm, I'm not confident enough yet of setting the belts tight enough not slip and overlap causing burning (DAMHIKT), so I settled for stopping at 1.1mm.

And with its pair, but not with glue, I was happy with 2.26mm.

0B60717B-CEB2-41F7-ACF0-269EF91896EC.jpeg

The second pair for that instrument at 2.16mm.

D6DF3E2B-94E8-4801-8234-2556B7B06470.jpeg

First pair for the next instrument.

80898576-45AB-4D89-812C-3BCC6D02A5B4.jpeg

This was the highly figured pair. Together at 2.06mm.

F22D3265-556F-4364-902A-06B5F8558E04.jpeg

I gave the figuring a wipe with meths to give you an idea of what it will look like.

084FB0E8-7C9B-428A-B219-9D8ED43250CA.jpeg
 
Andyp":1l5082gl said:
I’m still watching Malc with interest and in awe.
You’ve really got those timbers figured out now.
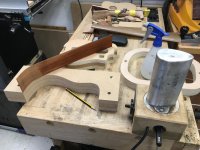
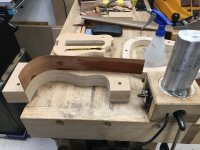
Thanks, Andy. I see what you did there! :)
 
This was only my third time using a bending iron; the first was in 1999 at evening classes and the second in June this year on the course.

I ripped and sanded a piece of Sapele to about 1.5mm and used that for practice. I marked the apex of the upper bout, the waist and the lower bout on to the wood in order to keep me in line on the form. The forms are not used to bend. I'm just using them to compare the bend as I progress and make any adjustments as necessary.

I do the bending by hand and only burnt my little finger a bit. :x

C46A5156-F40E-4742-9CDC-EDF9D26A36D9.jpeg

2AB40A5D-97DD-45F2-A4DA-27D4A8A09094.jpeg

296A14AE-D91A-4DF6-A65E-FCD7595DEC71.jpeg

F73F6010-8299-4842-9090-A4D293EC0545.jpeg

4DA14B3E-48E8-4268-9C7F-78A5FE96A5B6.jpeg

CEE50839-1374-42DB-8EC5-3B2C8E07416E.jpeg

I'm quite chuffed with that.

Now I've got eight more to do in Sycamore.
 
That's very interesting. I actually have a bending iron with interchangeable bronze formers. Bought it in Italy a decade ago on a course, and have never used it as we moved house not long after and my ambitions to make violins were shelved. It's in the loft somewhere. They didn't use them on the course (though they recommended them) - what they actually used was something that really was iron and was heated up in a small brazier. Traditional apparently. There was also some sort of clamp and peg arrangement that held one end fixed whilst you manoeuvred the wood. They also used a silicone bending blanket which achieved final exact shape in a former press.

I found the hot iron one really difficult to use. Violin sides are quite small and its quite easy to catch your fingers or arm on the thing. Managed to burn my wrist somehow. I see you burnt your finger. I think uke sides must be a fair bit larger than violin curves. Do you spray the wood before bending, or pop it in a steamer? I can't actually remember what we did in Cremona. I seem to recall, but may be confused now, that we were taught to overbend slightly to keep tension in the sides when the body was assembled, but this may be wrong as they were pressed in a hot former with a blanket as well.
 
Readers of my earlier posts may remember I made a side bending machine a couple of years ago and used that to make two previous instruments. I was shown and used a bending iron on the course earlier this year, and I also managed to source a secondhand iron around the same time.

The pro on the course didn't use water for the Myrtle we were bending for that instrument. I started without water yesterday, but the Sapele didn't seem to relax at all until I gave it a spray, both sides. If I had to 'unbend' during the process, I found a quick spray eased the process and the enable me to continue reshaping the bend.

I don't know the thicknesses of the violin sides to which Adrian refers, but I am drum sanding mine down to just over 1mm which probably make them easier to bend than thicker material, and they are just under 60mm wide.

But then I shall be laminating two leaves, as I did on the course, and my experience is that if done right, it can leave the laminated side an exact shape of the form with no tension in the sides when putting the rim together. I am advised that it is desirable to remove as much tension in the 'box' part of the instrument to allow the soundboard to vibrate and not lose those vibrations to tension elsewhere.
 
Just finished of the practising this morning before starting on the Sycamore.

If you remember those components I made on the cnc machine, this is how they fit with the bent sides. I don't believe I could have achieved this level of accuracy with hand tools alone.

3867F921-DFBF-4541-A747-68163949E359_1_201_a.jpeg

FD711EF9-96E4-4145-ADF8-F8A43CA8F412.jpeg

0787DDA5-D2B8-4FE7-A44A-72DDA02009AA_1_201_a.jpeg
 
Gosh that was a game and a half!

9E544DB9-6967-41A4-8E27-5BC87CEE89DD.jpeg

The two leaves fit quite nicely between the form of the press. But I also want to include a couple of sheets of soft cardboard to act as blankets between the leaves and the forms to take up any space and to keep the leaves curves smooth.

6C0ABF80-91CA-459A-B4EC-24E6ACEEC269.jpeg

The two forms of the laminating press were offset 2.5mm. But when I was trying to get the two leaves in, and the the two cardboard 'blankets', it became apparent that the extreme sides of the forms, the vertical bits, if you like, were just too narrow. So a quick ease on the oscillating band sander took off just over a millimetre. It worked.

40E2D264-CC0E-4AA7-A192-1C8CCFB90FDD_1_201_a.jpeg

Glued up and fitted.

5F4D22AB-3078-463E-BB52-8A805A417F06.jpeg

Time to start bending the cutaway side…….

9514209B-81E0-451C-9FA1-DD903E8D3657.jpeg

…..and the cutaway.

8BB626F8-E7A6-456D-9833-A69057706643.jpeg

Time to let them rest overnight and for me to think about how I'm going to get those mitre joins accurate after the leaves have all been glued up.

AC087DE1-3A58-4B5F-9FFA-EACB2A687362_1_201_a.jpeg


Having burned my thumbprint, my smartfone now doesn't read it! :x
 
That's looking good.

As for the thumb print, I always add at least two different prints to any device, this was after having a boil lanced and not being able to get into the data centre the next day.[emoji849]
 
DaveL":37dt1gqq said:
That's looking good.

As for the thumb print, I always add at least two different prints to any device, this was after having a boil lanced and not being able to get into the data centre the next day.[emoji849]


Thanks, Dave. Good idea!
 
I took the first lamination out of the press having left it gluing overnight. Hardly any spring at all.

3F8DF3A8-BA02-4870-82C2-2366B6ACEC61_1_201_a.jpeg

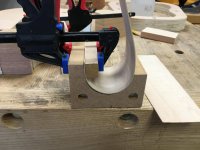
There was a bit of a gap showing by the waist, so it was good to have inside and outside forms the clamp against, so that there would be no caul marks on the wood.

1F6C3FC9-258A-4289-811B-E2DF413BB2CA.jpeg

These cutaway leaves have been a pair of blighters! The radius of the cutaway is the same as the large semicircle of the bending iron. But they wouldn't stay.

E8606D05-8EAA-4B49-999E-9DCC4AE5C6B6.jpeg

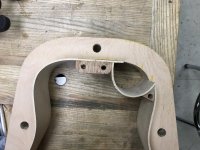
So I bit the bullet and glued them together inside the cutaway shape of the inside form, using the cnc shaped components of the neck block and horn reinforcement. (They'll be glued to the rims, or the rims to them, after I've mastered the mitre joints of the cutaway ends to the sides.)

9196CC4F-14D9-4F74-A7C9-07D127275943_1_201_a.jpeg

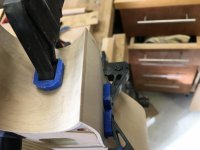
You can never have too many clamps, of any size!
 
Ever thought about vacuum clamping like I've done for veneering? Pressure exerted is enormous and even. Then you would only need the male half of your former and you could compensate for the slight spring back by adjusting the shape without needing to match a female former.

Just a thought :)

Great thread Malc.
 
Robert":1tpdkgtd said:
Ever thought about vacuum clamping like I've done for veneering? Pressure exerted is enormous and even. Then you would only need the male half of your former and you could compensate for the slight spring back by adjusting the shape without needing to match a female former.

Just a thought :)

Great thread Malc.

Thanks, Robert.

Yes, I have. I managed to acquire a Festool Vac-Sys vacuum clamp a while ago and wondered whether that could be employed to maintain the vacuum in a bag. I think that would work with the larger pieces of guitar and ukulele manufacture, but that little cutaway is less than 50mm diameter and about the same width. I'm not sure if it could survive in a thick bag.
 
You don't need a thick bag. I've used very ordinary polythene bags for clamping smaller jobs. As long as there are no sharp corners on the former or the work it works fine. A bit of cloth can protect on sharper bits if worried they may tear the bag, although the cloth can end up glued on... but if you are going to clean it up afterwards anyway..
 
Robert":20j4ondg said:
You don't need a thick bag. I've used very ordinary polythene bags for clamping smaller jobs. As long as there are no sharp corners on the former or the work it works fine. A bit of cloth can protect on sharper bits if worried they may tear the bag, although the cloth can end up glued on... but if you are going to clean it up afterwards anyway..


Thank you. I think I might experiment when I get a gap between projects.
 
…but gluing it as a butt joint instead.

I came to the conclusion that the laminated leaves were still too thin to create two mitre joints, the one at the horn and the one at the neck. In addition the thin leaves had curled slightly, making that even more impossible for my skills.

Here are the components comprising the cutaway rim again.

D506AC20-6608-4474-B015-FFC847F5E83C_1_201_a.jpeg

976ADDB2-18C4-4178-8AA6-71785AA58F91_1_201_a.jpeg

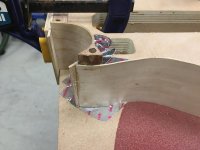
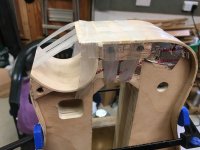
I decide to start fitting the cutaway to the neck block and long side, even though I wasn't going to glue it first. It took a long time with the block plane and the flat sanding board to get it to abut the long side at the the neck block, but I got there. The only reference I had was the workboard (the top of the instrument being flat), and the front of the neck block , being vertical to the work board.

9298AAAD-DC08-4766-A742-6E5D61B56F4A.jpeg

So with the long side and block clamped together and the cutaway clamped in place at its join, I was then able to see what needed to be done at the horn.

For this photo I removed the cutaway to see how the horn reinforcement and the short side fitted.

1CFA0F1B-366A-4306-B882-2F6DE8C002BC.jpeg

Out came the block plane and the sanding board and a couple of hours later after several dry runs, I glued the three parts, the horn reinforcement, the cutaway and the short side together. Clamps, spring clamps and wedges were all employed and original araldite was the adhesive I used to ensure that gap falling took place.

775005B3-9635-4412-97B9-D62540421201.jpeg

After a decent curing time, but not final curing, I released the clamps.

6425A34D-352D-47DD-A11B-94B9F1E5265C.jpeg

2662D34B-822B-4894-B349-2C3FCB3F1F5F_1_201_a.jpeg

And with a little persuasion I eased the components off from the protective tape.

B3B4B0EE-A8F6-4584-BA69-01208C646AE2.jpeg

I shall let it fully cure overnight before I clean the joint up. It is a butt joint again, but looking from above as you play the instrument, you won't see the join because the overlap of the butt is on the top of each joint.
 
Yesterday's joint cleaned up.

43ACD636-55DD-4A18-BD90-C66AFBFFA9BF.jpeg

And the inside is almost as clean!

3CDE9F25-71E2-4C89-A7C5-97D2507FBA9E.jpeg

Set up in the pattern makers vice for the next joint. One down two to go.
 
Nicely done. Very fiddly job getting that right. Especially as you are not edge biding the body, hence nowhere to hide.
 
…but butt joining this one, too.

496F189D-B553-42BB-9E2D-2142336B04DF.jpeg

I quite like this binding tape; it doesn't stretch.

09578B61-A701-4BF0-8514-E96D0481A98F.jpeg

After about 3 hours, I removed the tape.

957BFC4B-5334-4017-ACA6-0F5BF255781D_1_201_a.jpeg

Turned out nice.

DABEDC5F-8947-4125-9716-1C845CF2477A_1_201_a.jpeg

I'l leave it to fully cure (Titebond this time) overnight.

So I started to bend the rippled sycamore when I heard and felt a crack. 'Oh, bother', said I. There also might have been a dash it and a blow it, too.

I grabbed the medium CA glue and accelerator, wicked it into the crack, saw it wicked through to the inside and spritzed it, holding it tight for a few minutes. And it seemed to hold. I spent a while with a chisel slowly carving away the excess glue till all was gone. So, this time I decided to spray the leaves as I bent them, and it certainly seemed to help. I've left the damp leaves, inner and outer, clamped to forms till they dry out, and I shan't glue them till they're dry. Might be a day or two.

But I'm pleased with how today's joint turned out. Two down, one to go.
 
I spent some time cleaning up the neck cutaway joint. Not too bad, but the glue line could have been better.

6B5882E6-8F2B-4723-AED9-753CB7E083A3.jpeg

E87709D7-2AAF-43C5-B0E1-7A44962CD037.jpeg

Third and last joint to glue on this instrument rim.

BD9BCBD1-27A5-4CC1-9FC9-C16F8B69D44E.jpeg

Again the glue line could have been better. Maybe I'll let in some veneer over the join.

25C7668E-BF1C-45E1-B635-3985B0DA850B.jpeg

I won't rush to do another cutaway model…..unless it's a commission.

One of the next instrument's sides are laminating in the background. They turned out OK having been clamped overnight.
 
Amazing stuff, Malcolm. This is woodwork, but a totally alien version to that which I know. I can honestly say that there is no chance I will ever do anything like this, so I hold this sort of work in awe. Fantastic! :eusa-clap: :eusa-clap:
 
Thank you, Mike. That's gracious of of you to say so.

But I wouldn't have the workshop in which I'm making these instruments, if it wasn't for your generosity in providing this forum with all the information, advice, drawings etc. for blokes like me to build the workshop in the first place. I'm indebted to you for that.

I continue, albeit slowly, to make the instruments and document their progress here, and on other platforms, to provide interest, and maybe even encouragement, to other people who might want to think about making an instrument that they can play or learn to play, in the same way as the turners and cabinetmakers on the forum do. I find that documenting here helps me to understand better the build process and to solve problems so as to make the next instrument better.

Last Christmas, I didn't even have a CNC machine, but now since then, I've not only built one, but I've employed it to help me make instruments much more accurately than I have hitherto been able to make by hand. By documenting that build, I hope that might encourage other woodworkers to consider using modern technology available for the diyer to extend their abilities in producing wood based projects.

Like any woodworking, it is extremely satisfying to complete a project and see it and use it, whether it's a pen, a bowl, a cupboard, a table, a workshop or a ukulele.

I've also learned, as cabinetmakers on this forum have informed us in the past, the value of hand made items, in my case instruments, and why they cost so much to buy. I know the cost of the materials to me and if I costed my time at National Living Wage, then one of my ukuleles would have to sell at a minimum of £750 without even having taking overheads into account.

But we do it for the love of it……..and in my case keeping my little grey cells going of as long as I can.
 
Nice work Malc. As an aside, I notice that you're using these one handed clamping jobbies which are OK but don't give nearly enough pressure. When I was at 'the old firm' they got hold of bit of kit that could test the effective pressure of each type of clamp, which was then published on their website, so those one handed things will only go to a paltry 100kg max; see this particular one grabbed at random: https://www.axminstertools.com/axminste ... 0mm-105254
...whereas a bog standard sash cramp goes up to 600kg and a T-Bar goes up to 800kg. I have a couple of those one handed things and they're useful from time to time, but not for general, everyday sort of work - Rob
 
Wise words Malc which sums up the very best of what this forum, and others, are all about. No matter what we do, or how skilled we are, we can all learn and inspire others in ways that may not always seem obvious.

I can only hope that others can find the time to share what we do more often.
 
Woodbloke":tj5l6olt said:
Nice work Malc. As an aside, I notice that you're using these one handed clamping jobbies which are OK but don't give nearly enough pressure. When I was at 'the old firm' they got hold of bit of kit that could test the effective pressure of each type of clamp, which was then published on their website, so those one handed things will only go to a paltry 100kg max; see this particular one grabbed at random: https://www.axminstertools.com/axminste ... 0mm-105254
...whereas a bog standard sash cramp goes up to 600kg and a T-Bar goes up to 800kg. I have a couple of those one handed things and they're useful from time to time, but not for general, everyday sort of work - Rob


Thanks, Rob. What you might be able to see are my mini OH clamps, that I get from Wilko or Aldidl when they have them. I don't use them so much for clamping but more for 'holding in place'. I'm working with curved 2mm quite expensive, for me, tonewood and I don't want to squash a flat into its surface. Even so, I still manage to break them and so have to replace them from time to time.

When I built the workshop, I bought a set of Irwin 6" clamps and they've been used in all weathers and still retain a good measure of clamping force.
 
Andyp":24tvt0cp said:
Wise words Malc which sums up the very best of what this forum, and others, are all about. No matter what we do, or how skilled we are, we can all learn and inspire others in ways that may not always seem obvious.

I can only hope that others can find the time to share what we do more often.


Thanks, Andy. One of these days, I'm going to get round to see if I can make mini V&As on the cnc machine as coasters. ;)
 
Back
Top